 by
by Microsoft Forms are a great way to get information from people. I’ve mentioned this before, but it’s important to stress. Microsoft Forms are a great way to collect data, but not to store it, since data is stored in a temporary folder on your OneDrive. Also, it’s pretty easy to go to forms and purge all data quickly, so today, we’ll focus on a specific feature—upload files. More importantly, how to add Forms uploads into a SharePoint list as attachments and keep your data safe and organized.
SharePoint is much better to store your data since we can hold each form response as an item and add the attachments to that item. SharePoint also has the possibility for versioning and other security feature that keep your data safe.
How to add Forms uploads into a SharePoint list as attachments
The template shows you how to import uploaded files in Microsoft Forms into SharePoint list items as attachments.
So let’s look at how to get a response, upload all files as attachments and save the data.
The Form
Let’s start with the form. We don’t need to make it too complex since we’re focusing on the attachments. To do that, let’s create a new form and add it to an upload section. To do that:
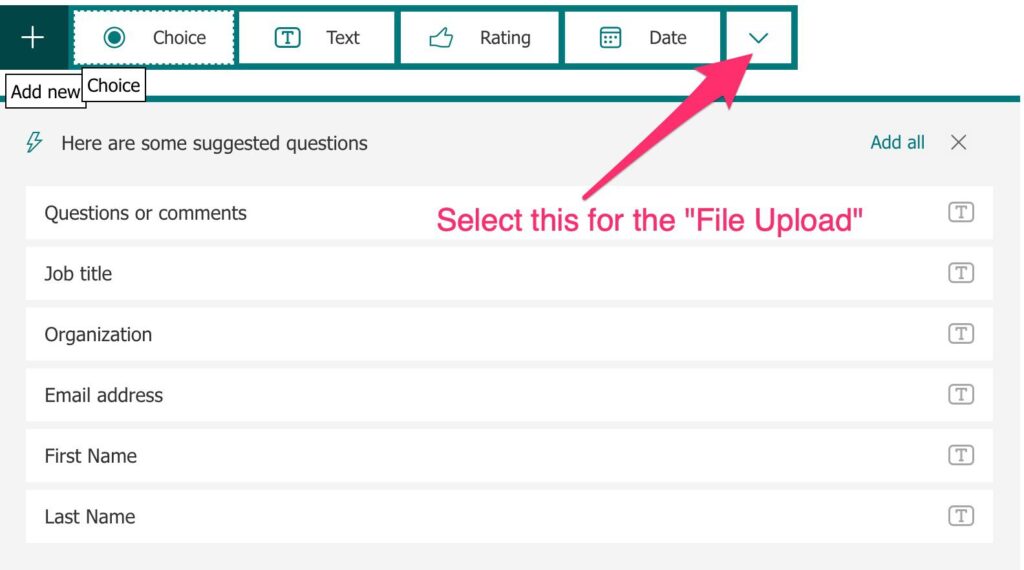
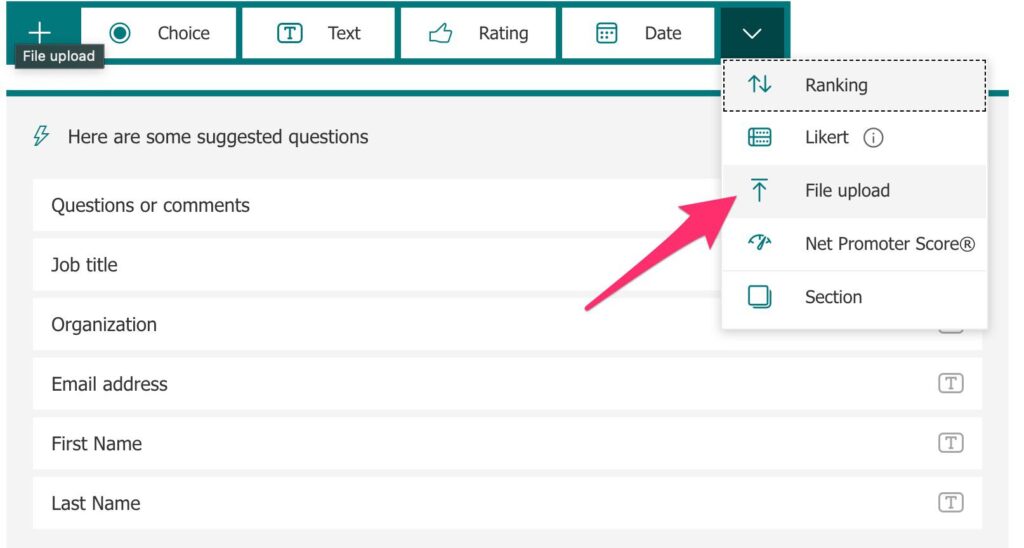
Select “File Upload.”
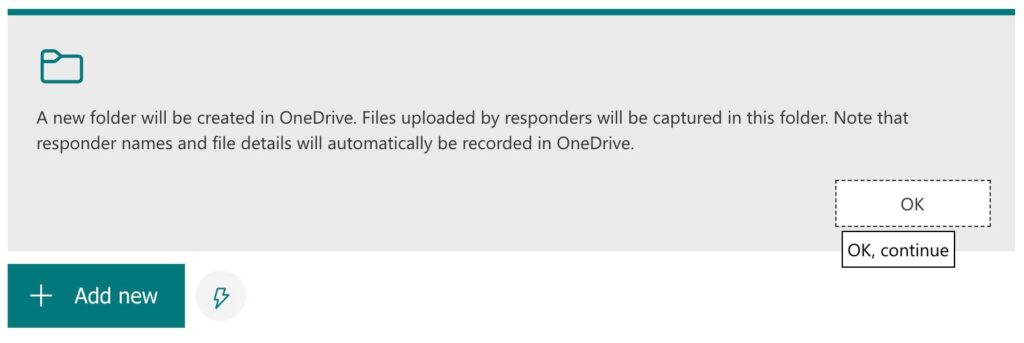
Microsoft Forms will notify you that the files will be stores in your OneDrive.
Since we want to test with multiple attachments, let’s increase the limit.
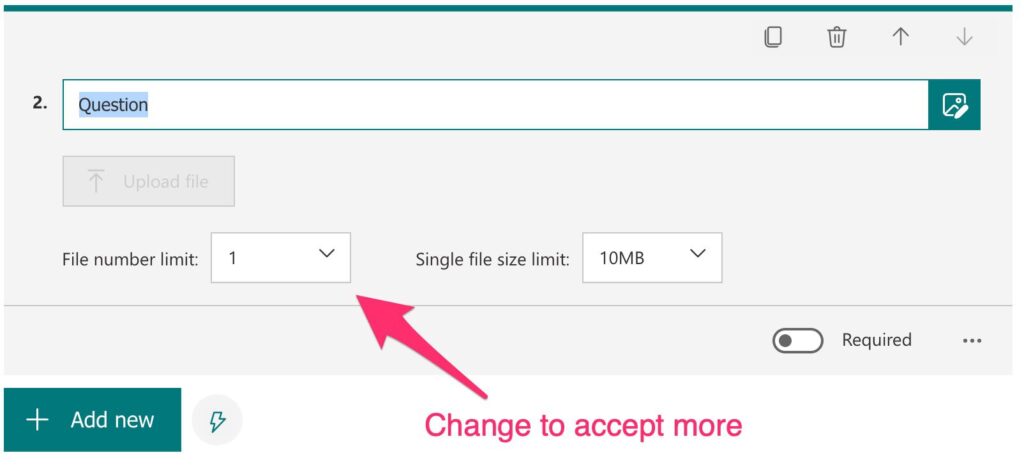
Let’s pick 3.
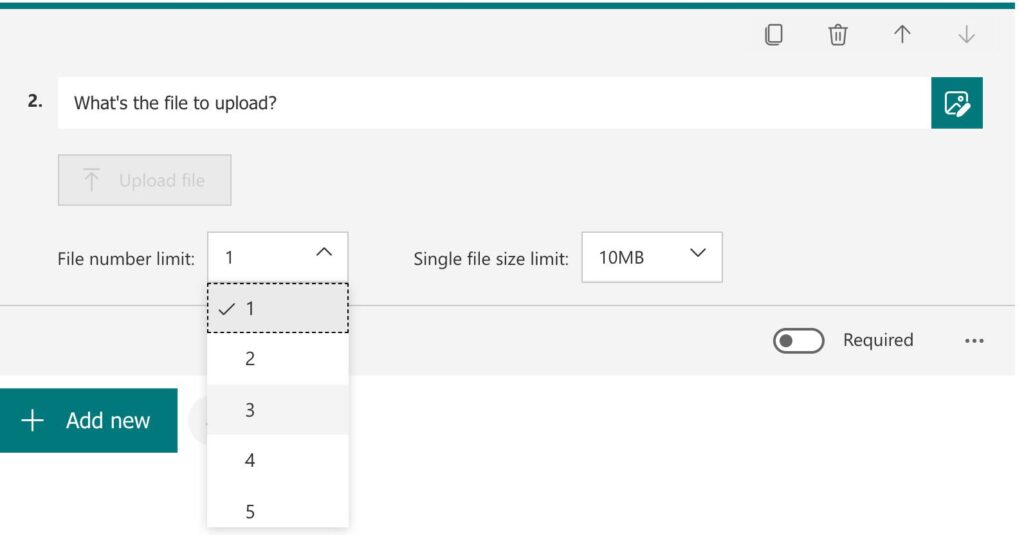
Finally, let’s add a Title to match it with the “Title” column in the SharePoint list.

Nothing fancy. Let’s now look at the list.
The List
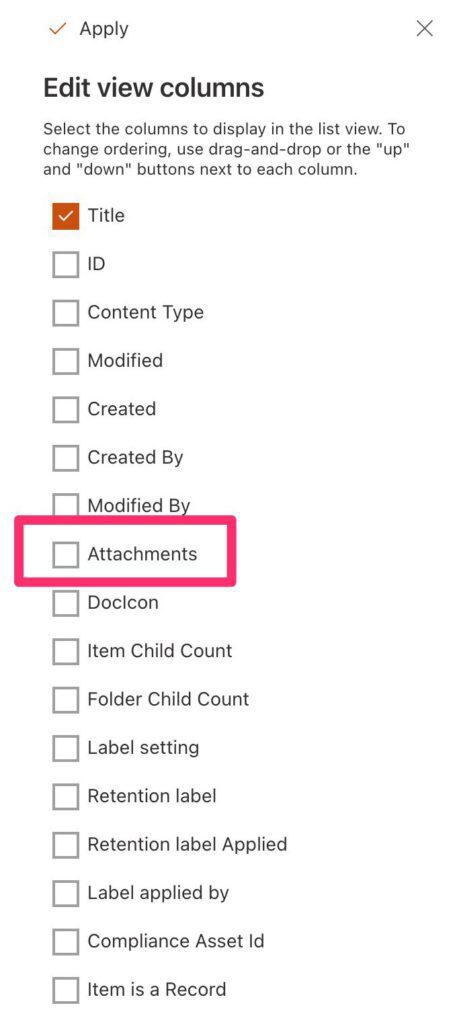
The good news is that any list that you create already supports attachments. The field is hidden, but it’s added automatically to your list. Let’s add it. In your list:
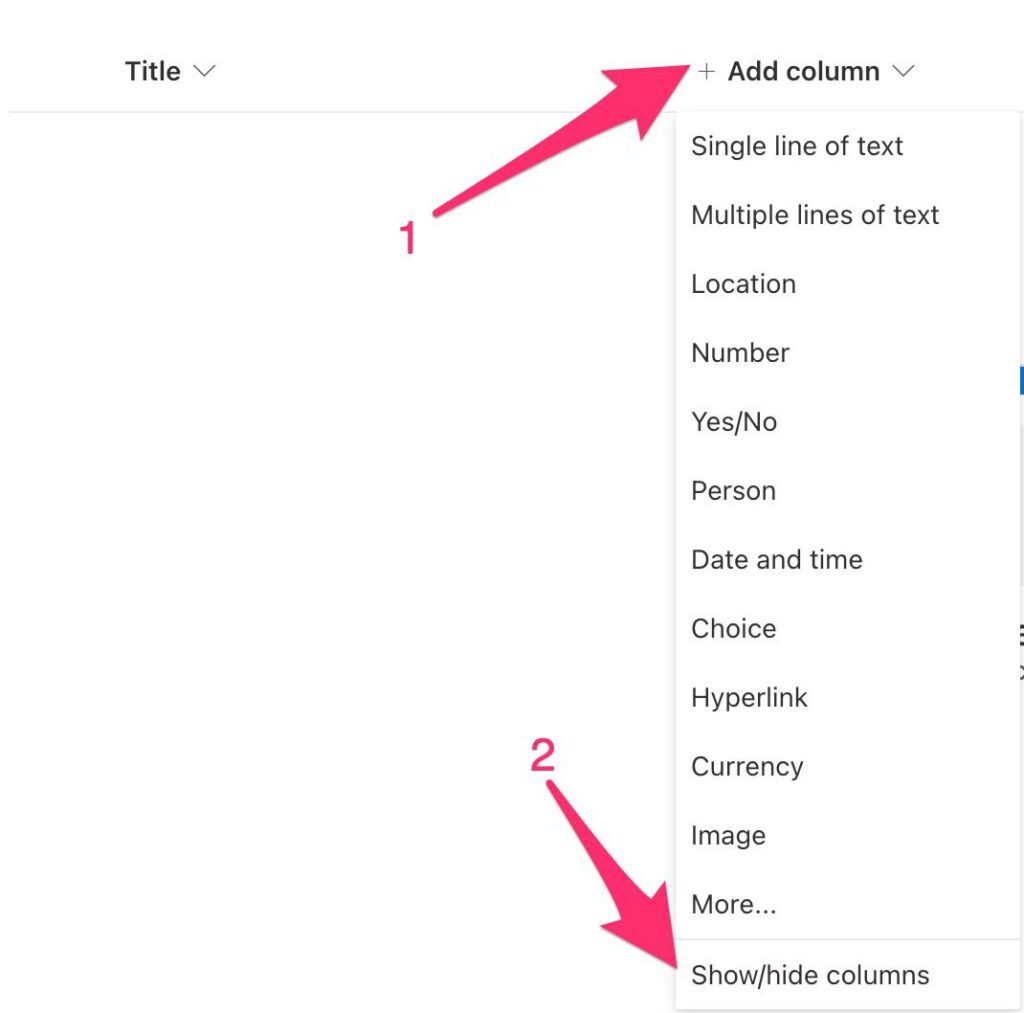
Select “Attachments” and click “Apply.”
That’s it. Nothing more is needed.
Bringing things together.
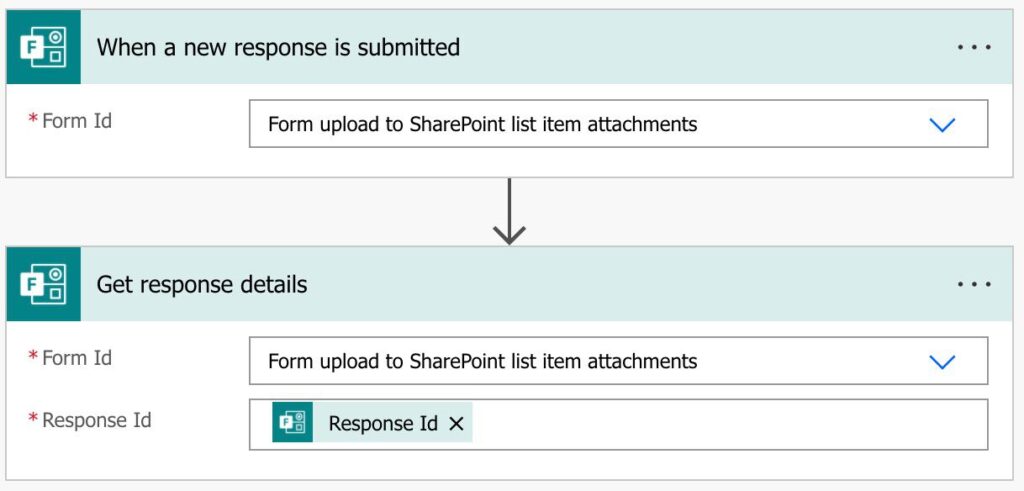
As always, Power Automate is the “glue” that makes things talk with each other. So we’ll use the “When a new response is submitted” trigger to catch the responses.
Here’s the trigger and the action.
Let’s see what we get when we upload a couple of files.
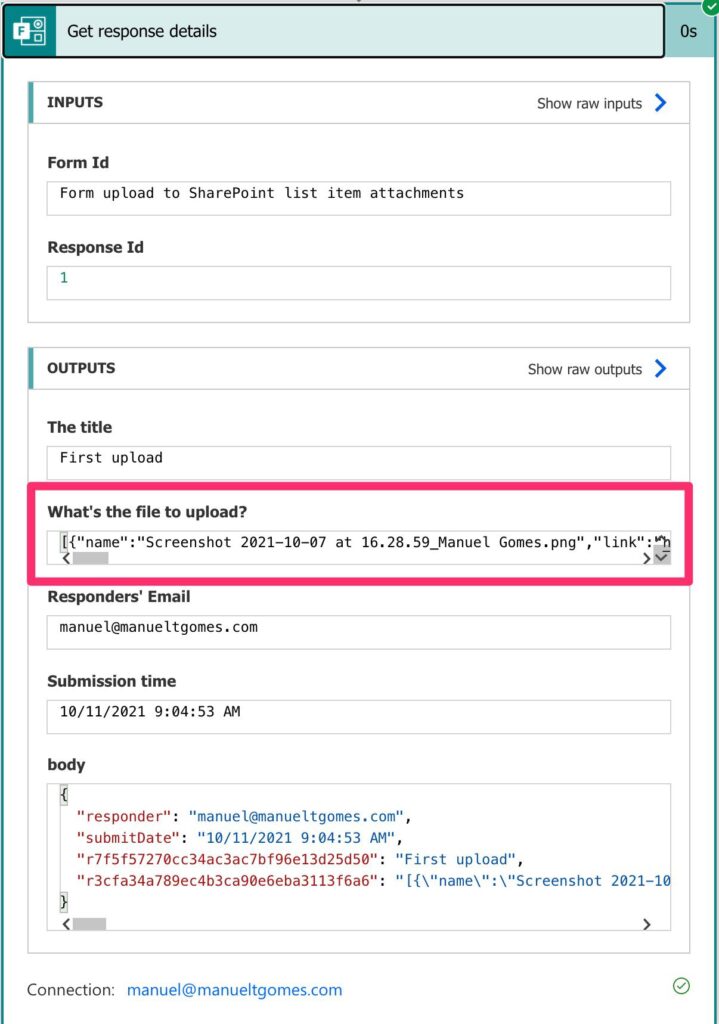
Looks good, but let’s look a bit further into the “body” part:
{
  "responder": "manuel@manueltgomes.com",
  "submitDate": "10/11/2021 9:04:53 AM",
  "<redacted>": "First upload",
  "<redacted>": "[{\"name\":\"Screenshot 2021-10-07 at 16.28.59_Manuel Gomes.png\",\"link\":\"https://manueltgomescom-my.sharepoint.com/personal/manuel_manueltgomes_com/Documents/Apps/Microsoft%20Forms/Form%20upload%20to%C2%A0SharePoint%20list%20item%20attachments/Question/Screenshot%202021-10-07%20at%2016.28.59_Manuel%20Gomes.png\",\"id\":\"<redacted>\",\"type\":null,\"size\":320814,\"referenceId\":\"<redacted>\",\"driveId\":\"<redacted>\",\"status\":1,\"uploadSessionUrl\":null},{\"name\":\"Screenshot 2021-10-07 at 16.29.00_Manuel Gomes.png\",\"link\":\"https://manueltgomescom-my.sharepoint.com/personal/manuel_manueltgomes_com/Documents/Apps/Microsoft%20Forms/Form%20upload%20to%C2%A0SharePoint%20list%20item%20attachments/Question/Screenshot%202021-10-07%20at%2016.29.00_Manuel%20Gomes.png\",\"id\":\"<redacted>\",\"type\":null,\"size\":3758063,\"referenceId\":\"<redacted>\",\"driveId\":\"<redacted>\",\"status\":1,\"uploadSessionUrl\":null}]"
}
It seems a bit complex, so let’s break it down and fetch the array of the uploads. Let’s clean it up a bit and format it:
[
    {
        "name": "Screenshot 2021-10-07 at 16.28.59_Manuel Gomes.png",
        "link": "https://manueltgomescom-my.sharepoint.com/personal/manuel_manueltgomes_com/Documents/Apps/Microsoft%20Forms/Form%20upload%20to%C2%A0SharePoint%20list%20item%20attachments/Question/Screenshot%202021-10-07%20at%2016.28.59_Manuel%20Gomes.png",
        "id": "<redacted>",
        "type": null,
        "size": 320814,
        "referenceId": "<redacted>",
        "driveId": "<redacted>",
        "status": 1,
        "uploadSessionUrl": null
    },
    {
        "name": "Screenshot 2021-10-07 at 16.29.00_Manuel Gomes.png",
        "link": "https://manueltgomescom-my.sharepoint.com/personal/manuel_manueltgomes_com/Documents/Apps/Microsoft%20Forms/Form%20upload%20to%C2%A0SharePoint%20list%20item%20attachments/Question/Screenshot%202021-10-07%20at%2016.29.00_Manuel%20Gomes.png",
        "id": "<redacted>",
        "type": null,
        "size": 3758063,
        "referenceId": "<redacted>",
        "driveId": "<redacted>",
        "status": 1,
        "uploadSessionUrl": null
    }
]
Looks a bit better. As you can see, we have the following fields:
- Name
- Link – this is the place on my OneDrive where the file is stored.
- Id – for us to fetch the file.
The remaining ones serve their purpose, but they are not relevant for now.
I’m showing you this for a reason. As you can see above, we don’t have the file contents, only a link to the file on our OneDrive. However, some actions return the file’s contents, so be aware of this difference.
So what do we want to do?
- Fetch all attachments
- For each upload, fetch the file contents
- Add the attachments to the created item
Fetch all attachments and add them
As you can see above, we have a JSON array in the response. But to Power Automate, it’s a string. As you can see above, all items have \" meant that we’re defining double quotes as any other character. If you try to add it to a “Apply to Each” action, you’ll get the following error:

The execution of template action 'Apply_to_each' failed: the result of the evaluation of 'foreach' expression '@outputs('Get_response_details')?['body/<ID>']' is of type 'String'. The result must be a valid array.
It “makes sense” if you think about it. The “Apply to Each” action expects an array, but we have a string. So let’s convert it using the “JSON” function.
Here’s the formula:
json(outputs('Get_response_details')?['body/<ID>'])Please note that you need to replace the formula with the value from your form. Power Automate uses the form’s ID so you need to include it here, but you can build the formula yourself. Here’s how to do it:
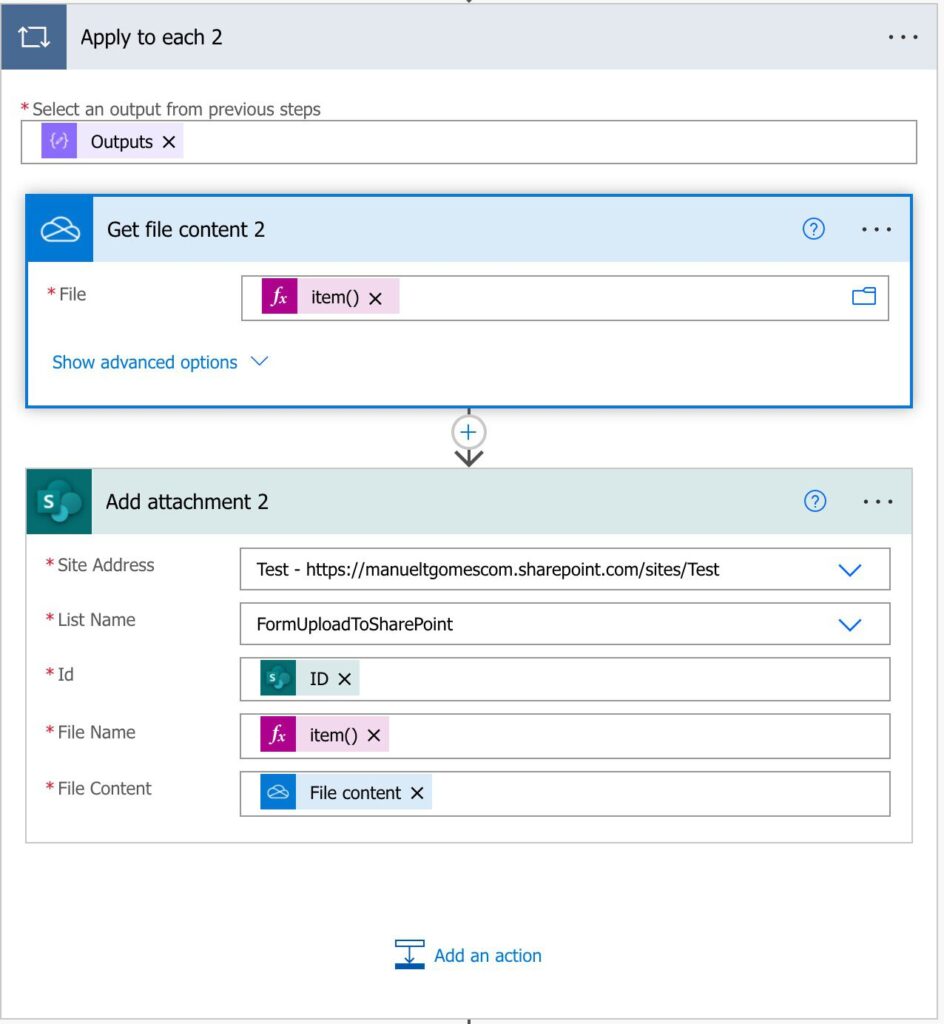
For each item
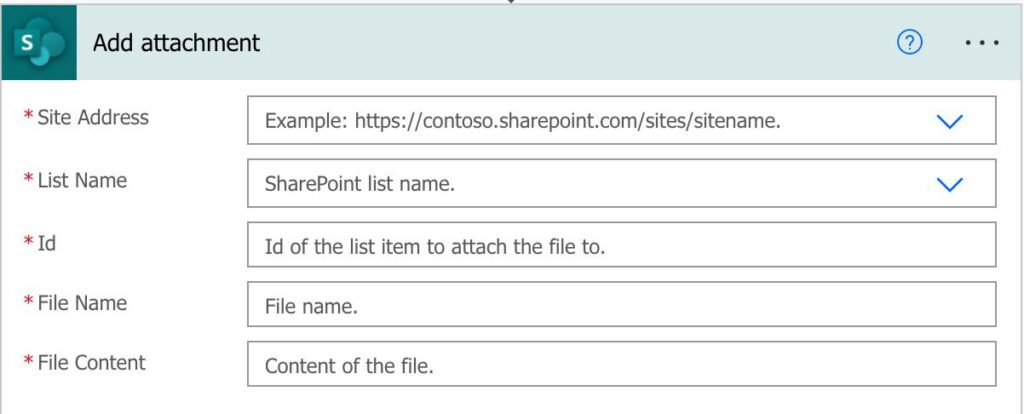
Now that we have the information ready, let’s look at what SharePoint expects. To do it, we will use the “Add attachment” action:
As mentioned above, we don’t have the file contents, but we do have the file ID, so we can use the “Get file content” action using the ID that we have.
Let’s build the “Apply to Each” action.
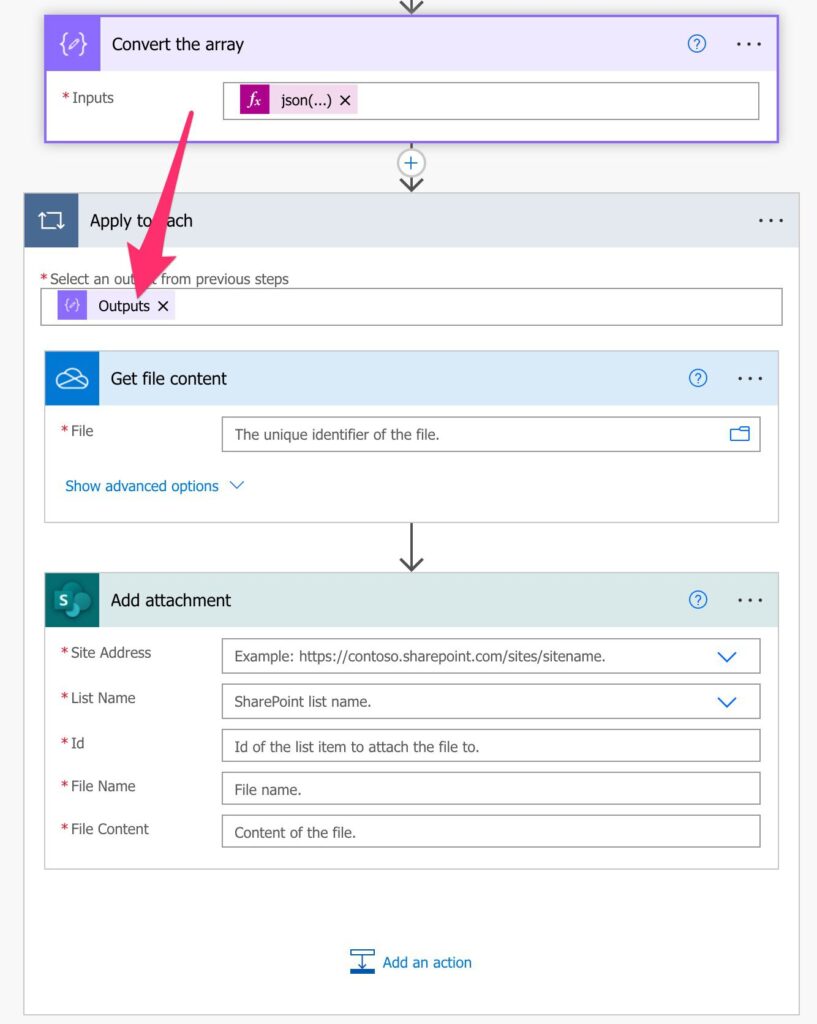
Now let’s add the ID to the file contents.
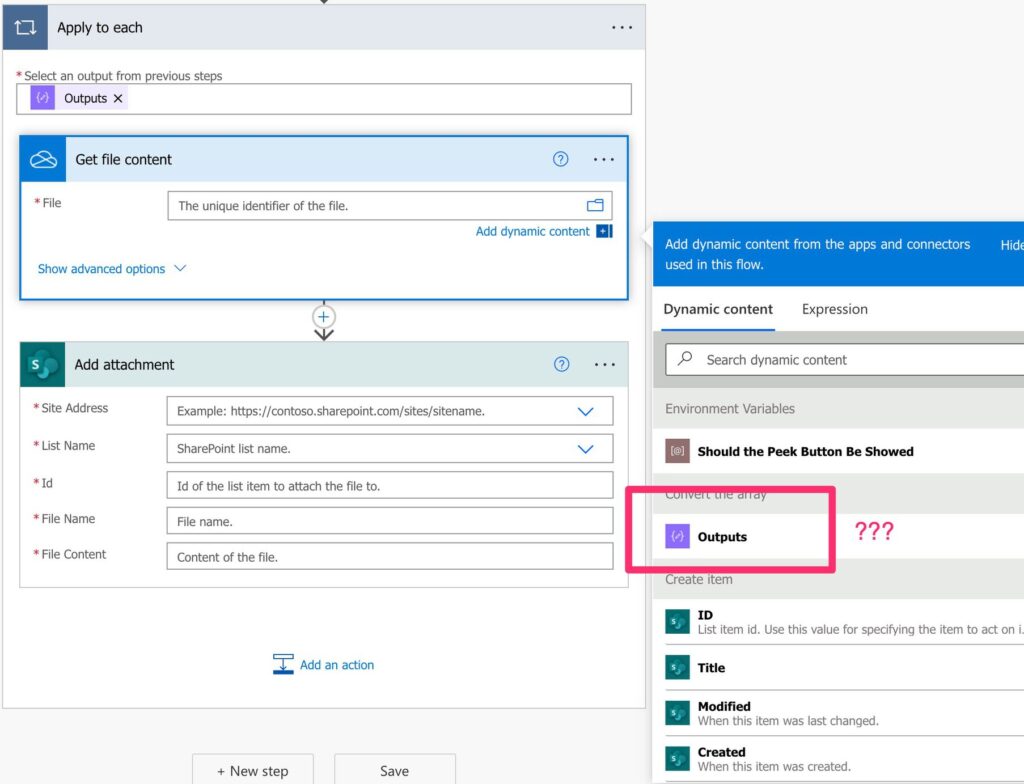
We have a problem. Since Power Automate converts the string that we get from the “Get response details” action when the Flow is running, we don’t know the structure now so that Power Automate won’t display it. We have two ways to solve this:
- The visible way, by adding a “Parse JSON” action and use it to reference the elements.
- The geeky way is by calling the elements directly.
Let’s look at both. Since we know the structure, we can use the “Parse JSON” action and provide the example above in the “Generate from sample”. We’ll get the following:
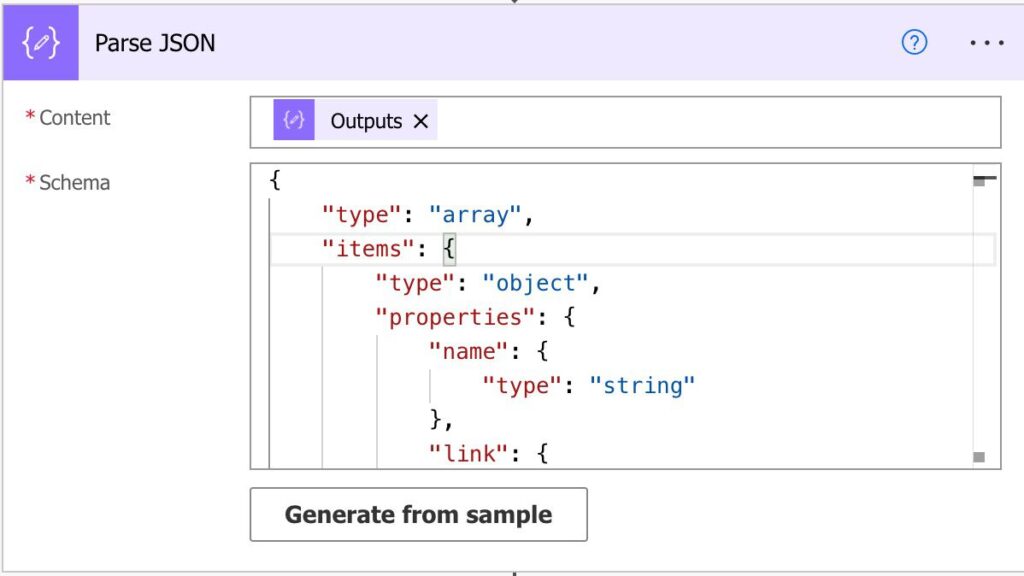
The schema will always be the same so that you can use this one:
{
    "type": "array",
    "items": {
        "type": "object",
        "properties": {
            "name": {
                "type": "string"
            },
            "link": {
                "type": "string"
            },
            "id": {
                "type": "string"
            },
            "type": {},
            "size": {
                "type": "integer"
            },
            "referenceId": {
                "type": "string"
            },
            "driveId": {
                "type": "string"
            },
            "status": {
                "type": "integer"
            },
            "uploadSessionUrl": {}
        },
        "required": [
            "name",
            "link",
            "id",
            "type",
            "size",
            "referenceId",
            "driveId",
            "status",
            "uploadSessionUrl"
        ]
    }
}
First, let’s look at the “Get file content” action and try to add the ID:
Don’t forget to replace, in the “Apply to each” action, the “Parse JSON” since it’s the one that will contain the array we would like to parse.
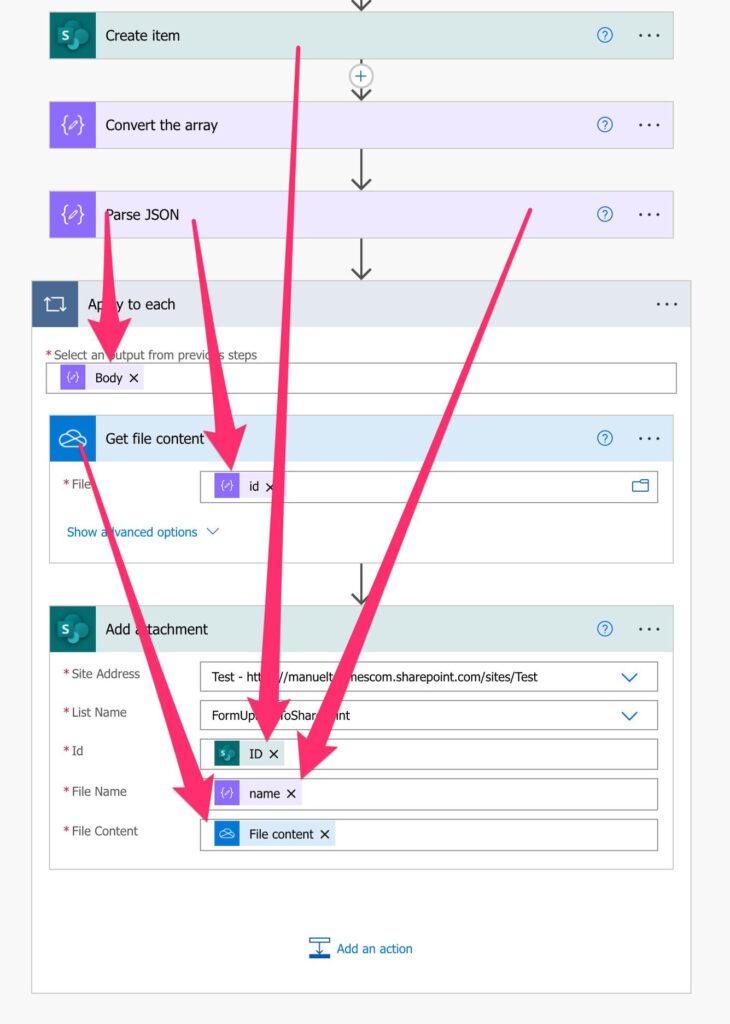
There are a lot of arrows, but I want you to understand where things come from.
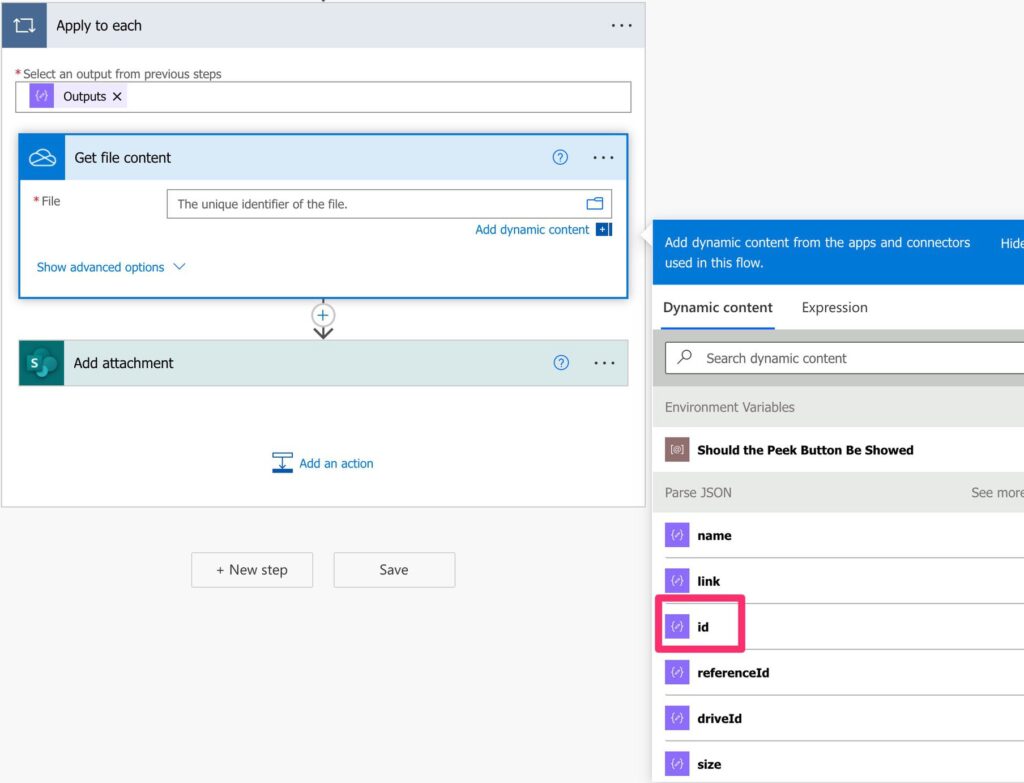
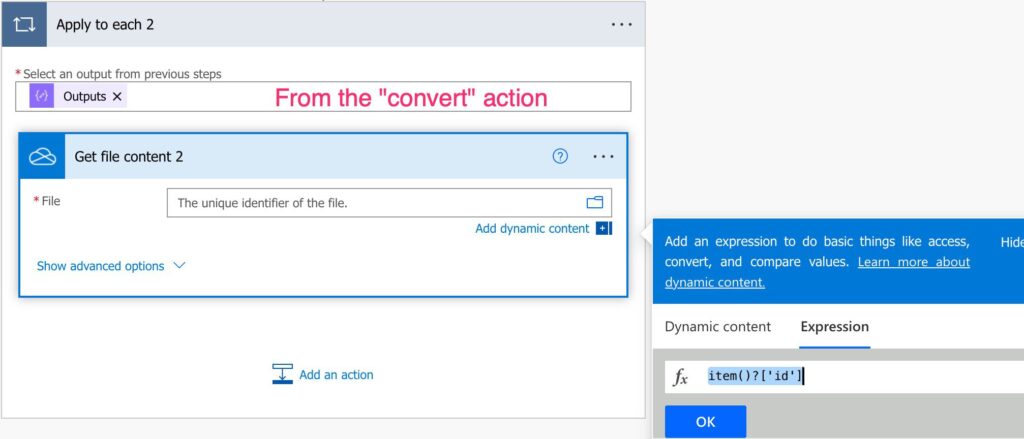
The “geeky” option
Ok, let’s finish things up with the “geeky” way. Since we know the structure of the array, we also see the element’s name (it’s called “id”) that we want to fetch. We also see the syntax to get the elements from the JSON. In the “Apply to each” action, we can use the “item” function to fetch them. It will be something like this:
item()?[<name of the field>]
The item will return the current element parsed of the array inside the “Apply to each” action. After that, we indicate that the element may exist with the “?”. By putting this, the Flow won’t break if the item doesn’t exist. It’s also safe because if it’s empty, then the “Apply to each” action won’t parse any element. After that, we indicate what the name of the field that we want to get is. In this case, we want “id” and “name”, so let’s check how it works:
Now let’s use the “Add attachment” action:
What it looks like in SharePoint
Now that Power Automate inserted the data, let’s look at the SharePoint list.

Notice that we have one item with multiple attachments. Don’t duplicate items for multiple attachments since it’s not necessary.
If you look at the details of the item, you can see the attachments there.
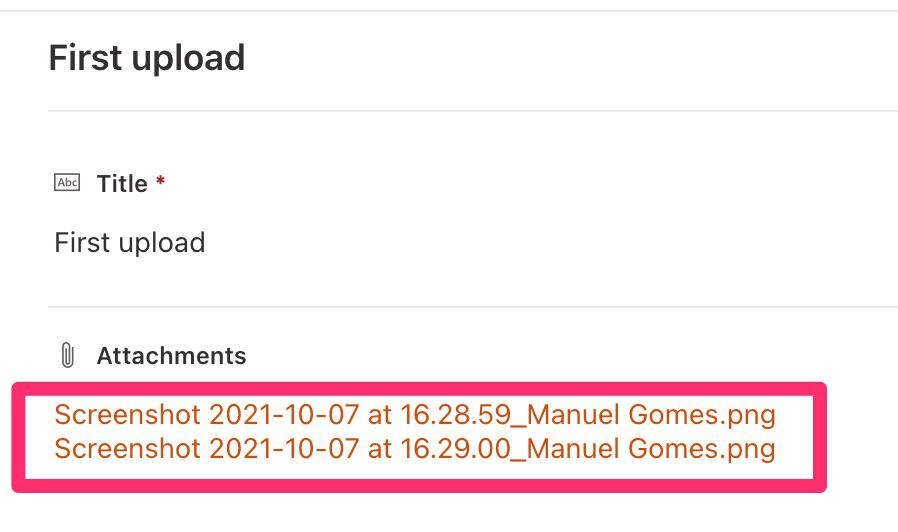
That’s it.
Final thoughts
The overall process is relatively straightforward, but I wanted to show you some things that could be confusing, like converting the array or inserting the values in SharePoint when the item doesn’t show up in the dynamic content. As always, you can find the template in the “cookbook” section under add Forms uploads into a SharePoint list as attachments.
Photo by Markus Winkler on Unsplash


Hi Manuel. This looks to be just what I need, but I’m missing something at the convert string to array step that provides the outputs needed for the ‘Apply to each’ section. You show a formula. Where do you use it? Compose didn’t accept it.
Thanks for your help.
Hi David,‘]” with the ID of your form. If you look at the error message my ID is “outputs(‘Get response_details’)?[‘body/r3cfa34a789ec4b3ca90e6eba3113f6a6’)”. I added a GIF to the article to show you how I’m doing it.
You need to edit the formula slightly. Since the trigger generates random IDs for the Form, you need to replace the “outputs(‘Get_response_details’)?[‘body/
Cheers
Hi Manuel. In the end I used Get file content using path. No matter what variations I tried, Get file content (with id) failed with error: Route did not match clientRequestID
Many thanks
David
Hi Manuel,
Thank you so much for this post! It helped a lot. I have a question. My flow is working great, it uploads the files. But for 2 or more files flow status become “Failed” even if the file is uploaded successfully. (for 1 file it is “succeeded”) Do you have any idea what is the cause?
Hi Reyhan,
Do the files have the same name? The files need to have unique names per SharePoint item, meaning that if you’re uploading 2 “doc.xlsx”, for example, SharePoint will fail.
If it’s not this, can you provide me the error message so I can try to help further?
Hello,
File names are not the same. I guess I did something wrong with the flow. Today I checked and corrected some fields. And now it is working successfully. Thanks for the support.
Oh, that’s great! It was a strange error, so I’m happy that you could fix it.
Hi Manuel,
Great explanation of the steps! I have a quick question regarding the name of the attachments, and I cannot figure out how to resolve it (maybe I am missing it). I would like to keep the same name of the files submitted by the end user in Microsoft Forms. It seems to rename the file, and I cannot locate where to change this at. Could you help me with this process?
Thanks,
Ricky
Hi Ricky,
You can change the “File Name” field in the “Add attachment” action. It doesn’t need to be the same as the file. Don’t forget two things:
1. If you change the name, don’t forget to include the extension with the new name.
2. The name must be unique per item. If you have two “file.pdf,” for example, SharePoint will return an error, and your Flow will fail.
Cheers
Manuel
Hello Manuel,
Thanks for the quick follow up! I see now in my flow that I can adjust the name to whatever I would like. Awesome!
A quick follow up question for you. Is there a way to keep the same name for the documents that they attached? For example, if they named the PDF submitted as 2022Document1.pdf, how would I keep this same name without knowing what they submitted it as ahead of time? My flow has an email getting sent to a regulatory body with these attachments and the reference to them in the cover letter submitted, so keeping the same name as what the submitter used is crucial.
Thanks,
Ricky
Hi Manuel,
Thanks for the quick follow up! I see that now I can adjust the name of the attachment, and it works. Awesome!
I have a quick follow up question. Is there a way to keep the same name of the document that the submitter originally submitted in their response? For example, if the submitter attaches a file named 2022Document1.pdf, how would I keep this name without knowing what the name is ahead of time? In my flow, I have an email getting sent to a regulatory body with these attachments, so keeping the same name of the attachments is crucial since the names are referenced in the cover letter also sent.
Thanks,
Ricky
Hi Ricky,
The original file name comes from Forms. If you look at the content of the “Get response details” you’ll have a field called “name” that contains the file name with the extension. You can use that one in the “Add Attachment” action.
Cheers
Manuel
Hi,
Fantastic tutorial, thanks.
Maybe worth to notice, that the file is stored in Sharepoint if the form is part of a TEAMs channel.
Then you have to replace
‘Onedrive “Get File Content By Path”‘
by
‘Sharepoint “Get File Content By Path”‘
Exactly! Good catch!!!
I’m getting errors using this if the file upload is optional.
I have the same issue, is there a solution to this please?
The “geeky” option fails at the JSON parse step if no attachment is added – makes sense as there is nothing to parse so it just stops
Great content, this really helps.
Do you have a post on how to write a condition that identifies if there is an attachment?
I have an upload question on forms, that isn’t required. I wrote flow in like above but it fails if there isnt an attachment?
I tried length(body(‘Parse_Json’)?[‘name’]) but I’m still getting an error.