by
by Sometimes we need to deal with zipped files, and there’s a question on how to unzip a file. Power Automate provides the OneDrive for Business “Extract archive to folder” to help us with this, but I wanted to go a bit further and create a template that you can import and use in all your Flows.
An “analogous” action for SharePoint called “Extract Folder” does more or less the same. We’ll tackle that in a future reference article. Also, there’s an action for OneDrive with the same name and characteristics if you prefer to use OneDrive.
The template will contain some validations so that you can use it as a “helper Flow.”
As always, you can download it here, or if you want to know more, read further to understand what we’re doing in the template.
Let’s see how to unzip the file.
Strategy
The strategy is essential so let’s define it before we dive in. Since the idea is to make it a template, we want to:
- Have a trigger that gets the file and the path to unzip it.
- First, check if the file is a zip file.
- Then, unzip it for the folder.
- Return the path with the extracted files and the number of files extracted.
Simple enough, but why do the validation?
The validation is essential to check, for example, If the file is not zip or not. If we don’t validate it before, Power Automate will return an error running the “Extract achieve to folder” action to deal with the error accordingly. Also, since other Flows will need to know where to find the files, we will return the path where the files were extracted and the number of files. This way, we can check where we continue if there are files or stop if there aren’t any.
Why provide the file and not the path in the trigger
You may be wondering why we are not providing the path to the file in the trigger right now. It would be more accessible instead of the file itself.
It’s a good question.
We always want to have “Single-responsibility” where one Flow takes care of only one thing. For example, suppose the Flow unzips files; that’s all it will do. We don’t need to accommodate if the file is in OneDrive, SharePoint, or an email, for example. That’s the “job” of another Flow.
So by providing the file, we are signaling to the other Flows that use this one that they need to deal with that complexity. We can even have another flow whose responsibility is to deal with files in multiple locations. That’s fine, but we’ll separate things.
Think of it as lego pieces. The pieces are super simple and used to build complex things. For example, you don’t have a square bit but adjust to a rectangle if needed. A piece is a piece, and that’s it. Only does one job.
I’ll go deeper into this concept in the future, but what’s important to understand here is that things should be as simple as possible. You should say what Flow’s objective is in a few words. If you can’t, you need to simplify or break it into multiple Flows.
The template
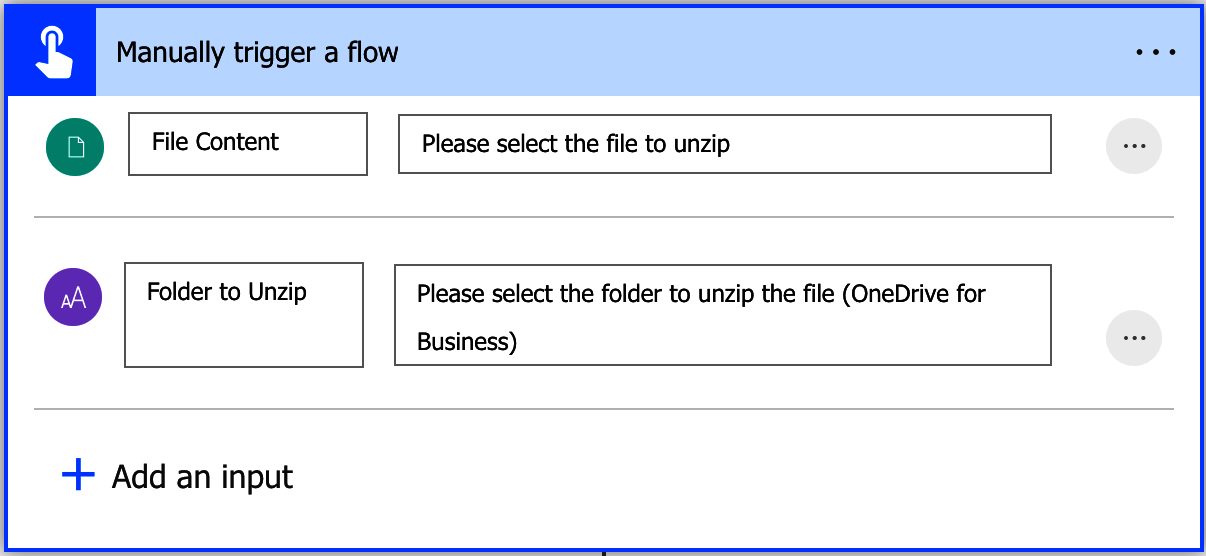
Now that we have the rules let’s build the template that will cover all of this. First, let’s select the “Manually trigger a Flow” trigger with the following parameters:
- The file to unzip
- The destination folder
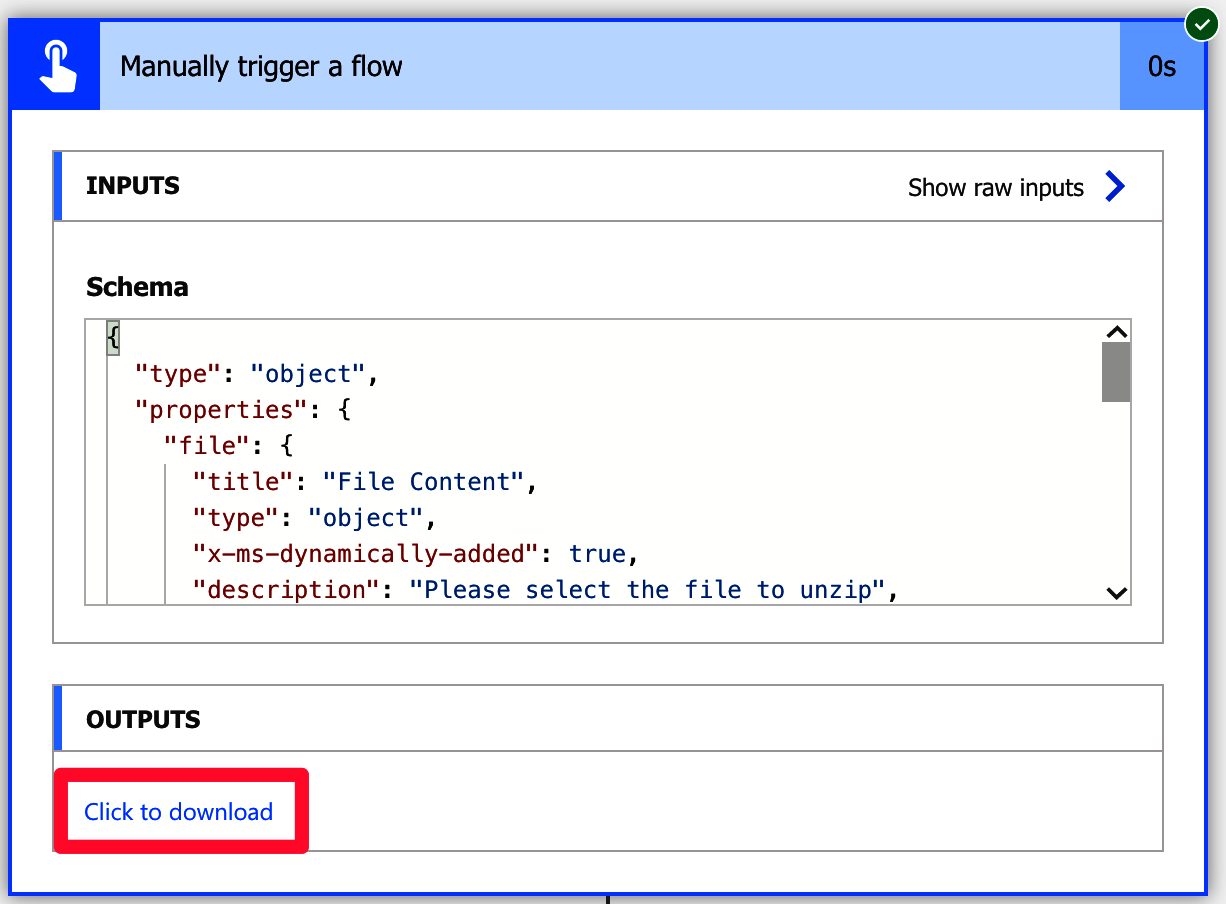
Here’s the “Manually trigger a Flow” trigger:
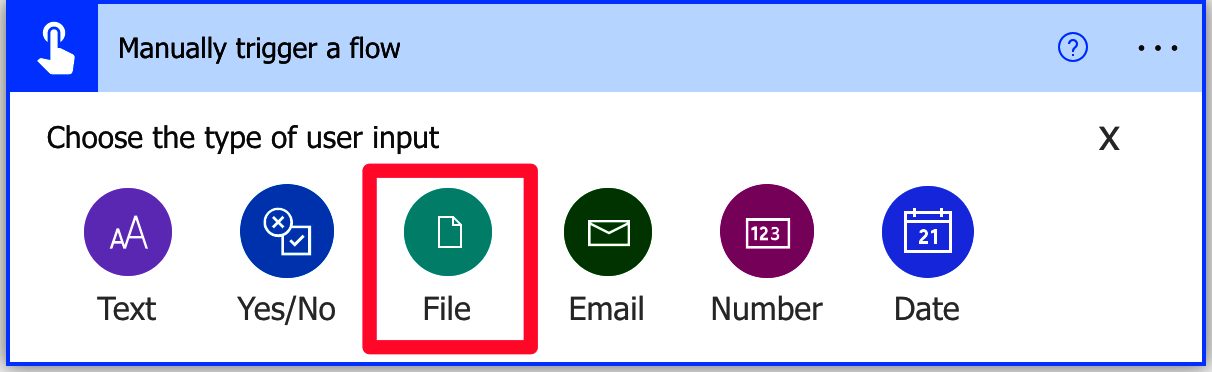
The Flow will accept the file content and not the path to the zip file. So we pick the option “File” in the type of user input to do this.
When you press “Run,” you’ll see something like this:
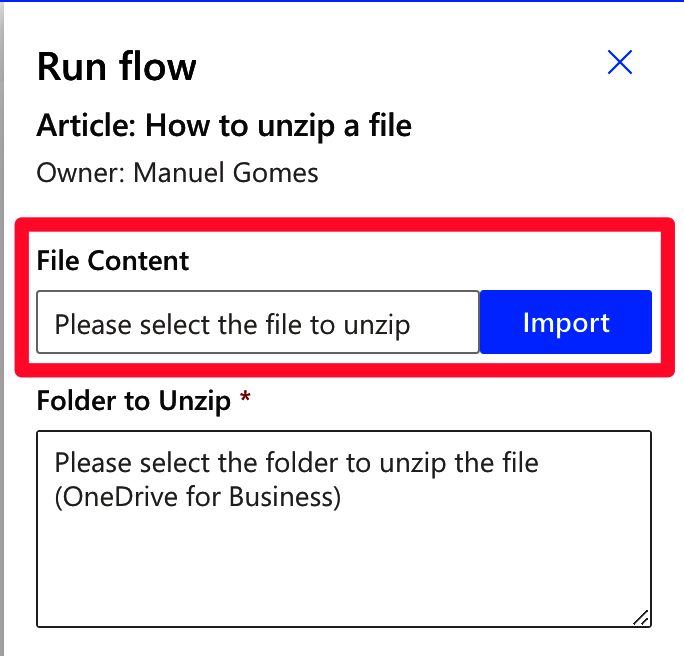
You can then upload the file and run it.
Check the file
Now let’s check if the file is a zip. There’s o much we can test since we’ll only know for sure once we run the “Extract archive to folder” action, but at least you can check if it’s zip or not.
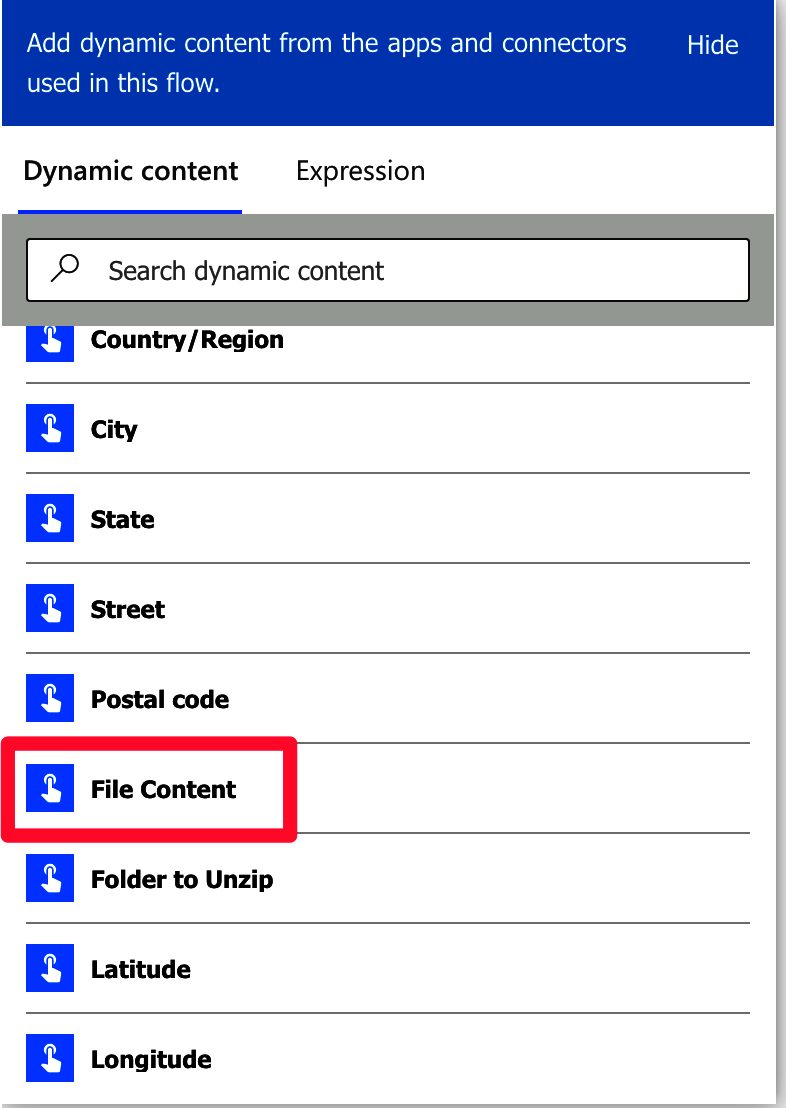
I wanted to get here to show you a bit of a “gotcha.” The “Manually trigger a Flow” trigger will return the file’s contents in the dynamic content list but not its name.
But if we check the “Output,” we’ll see something extra there.
I’ll click on the “Click to download” and copy the results into Visual Studio Code to make things more presentable.
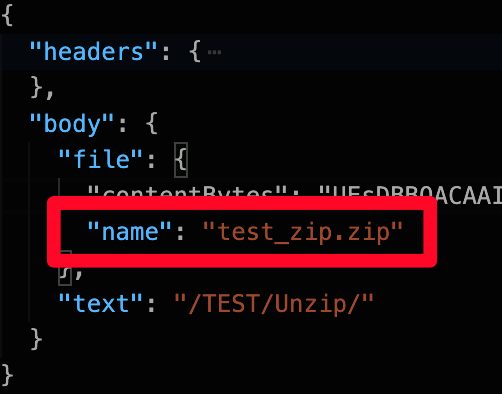
So if we have the name in the output, we can create it. We can use the “triggerBody” function and then “drill down” JSON. Here’s the formula:
triggerBody()['file']['name']
Notice that we’re using the names in the JSON file above. The “triggerBody” function will return the contents of the “body,” then go to the “file” and then to the “name.” We use square brackets to do this.
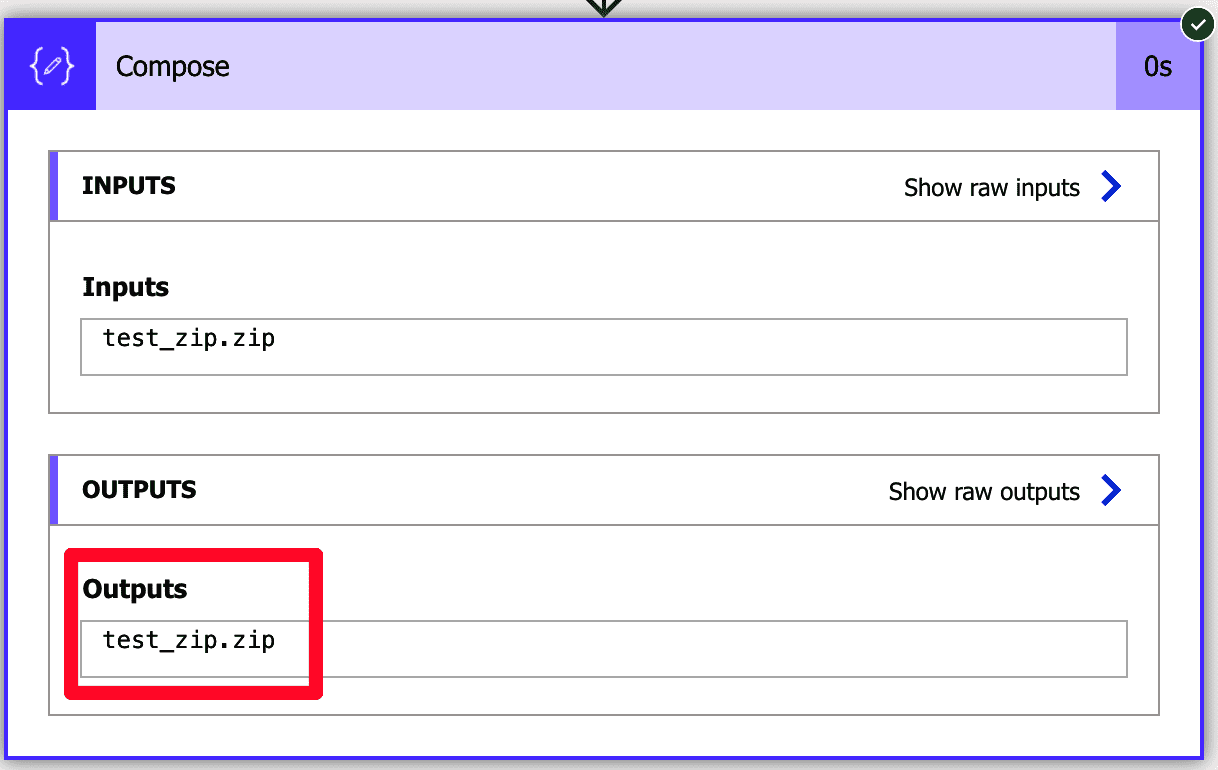
When you apply the formula, you’ll get:

As a side note, when you save the Flow and run it, Power Automate may change it to something like this

It’s the same, but it looks a bit better.
Here’s the result once you run the Flow.
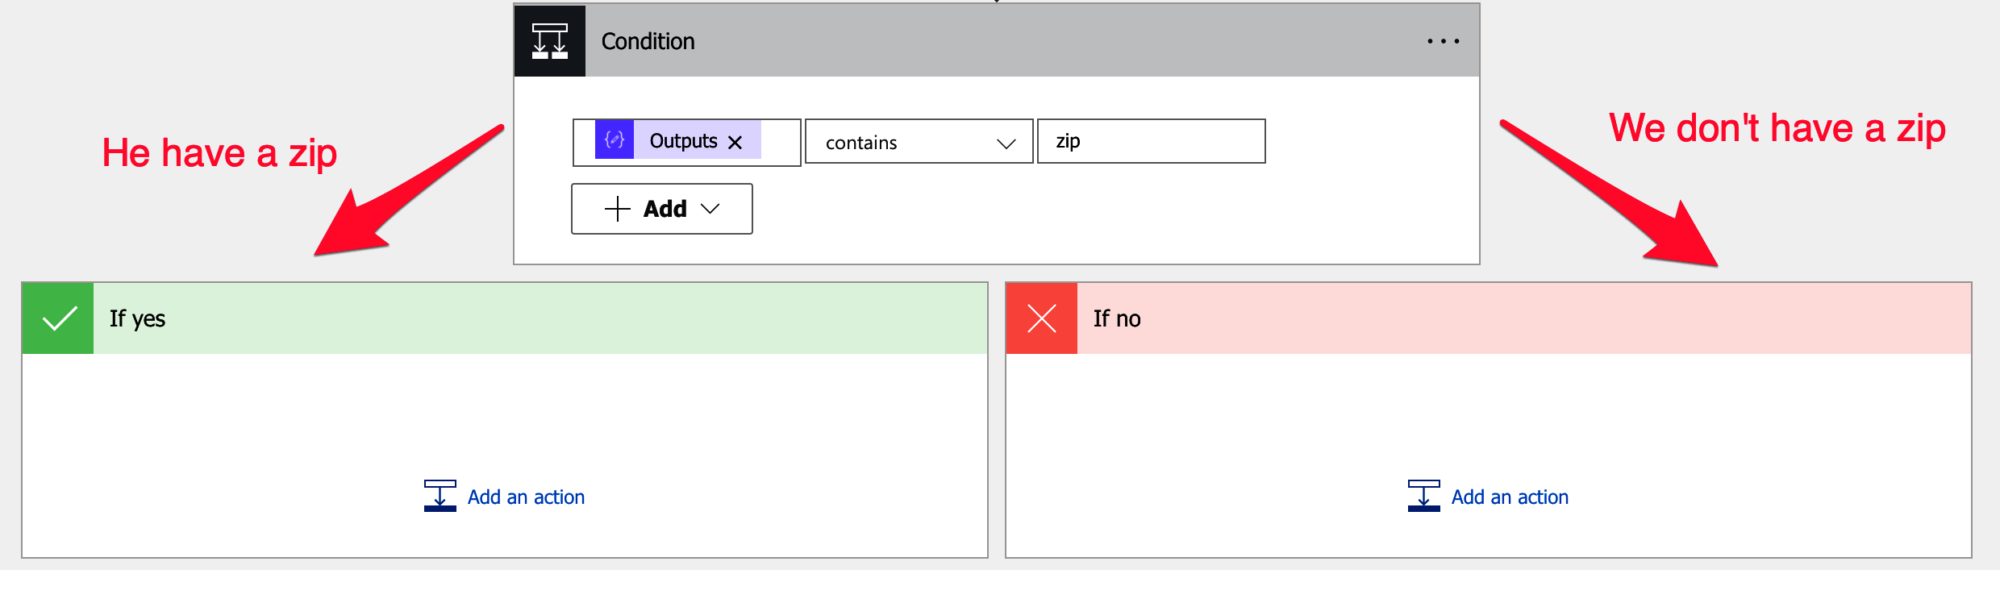
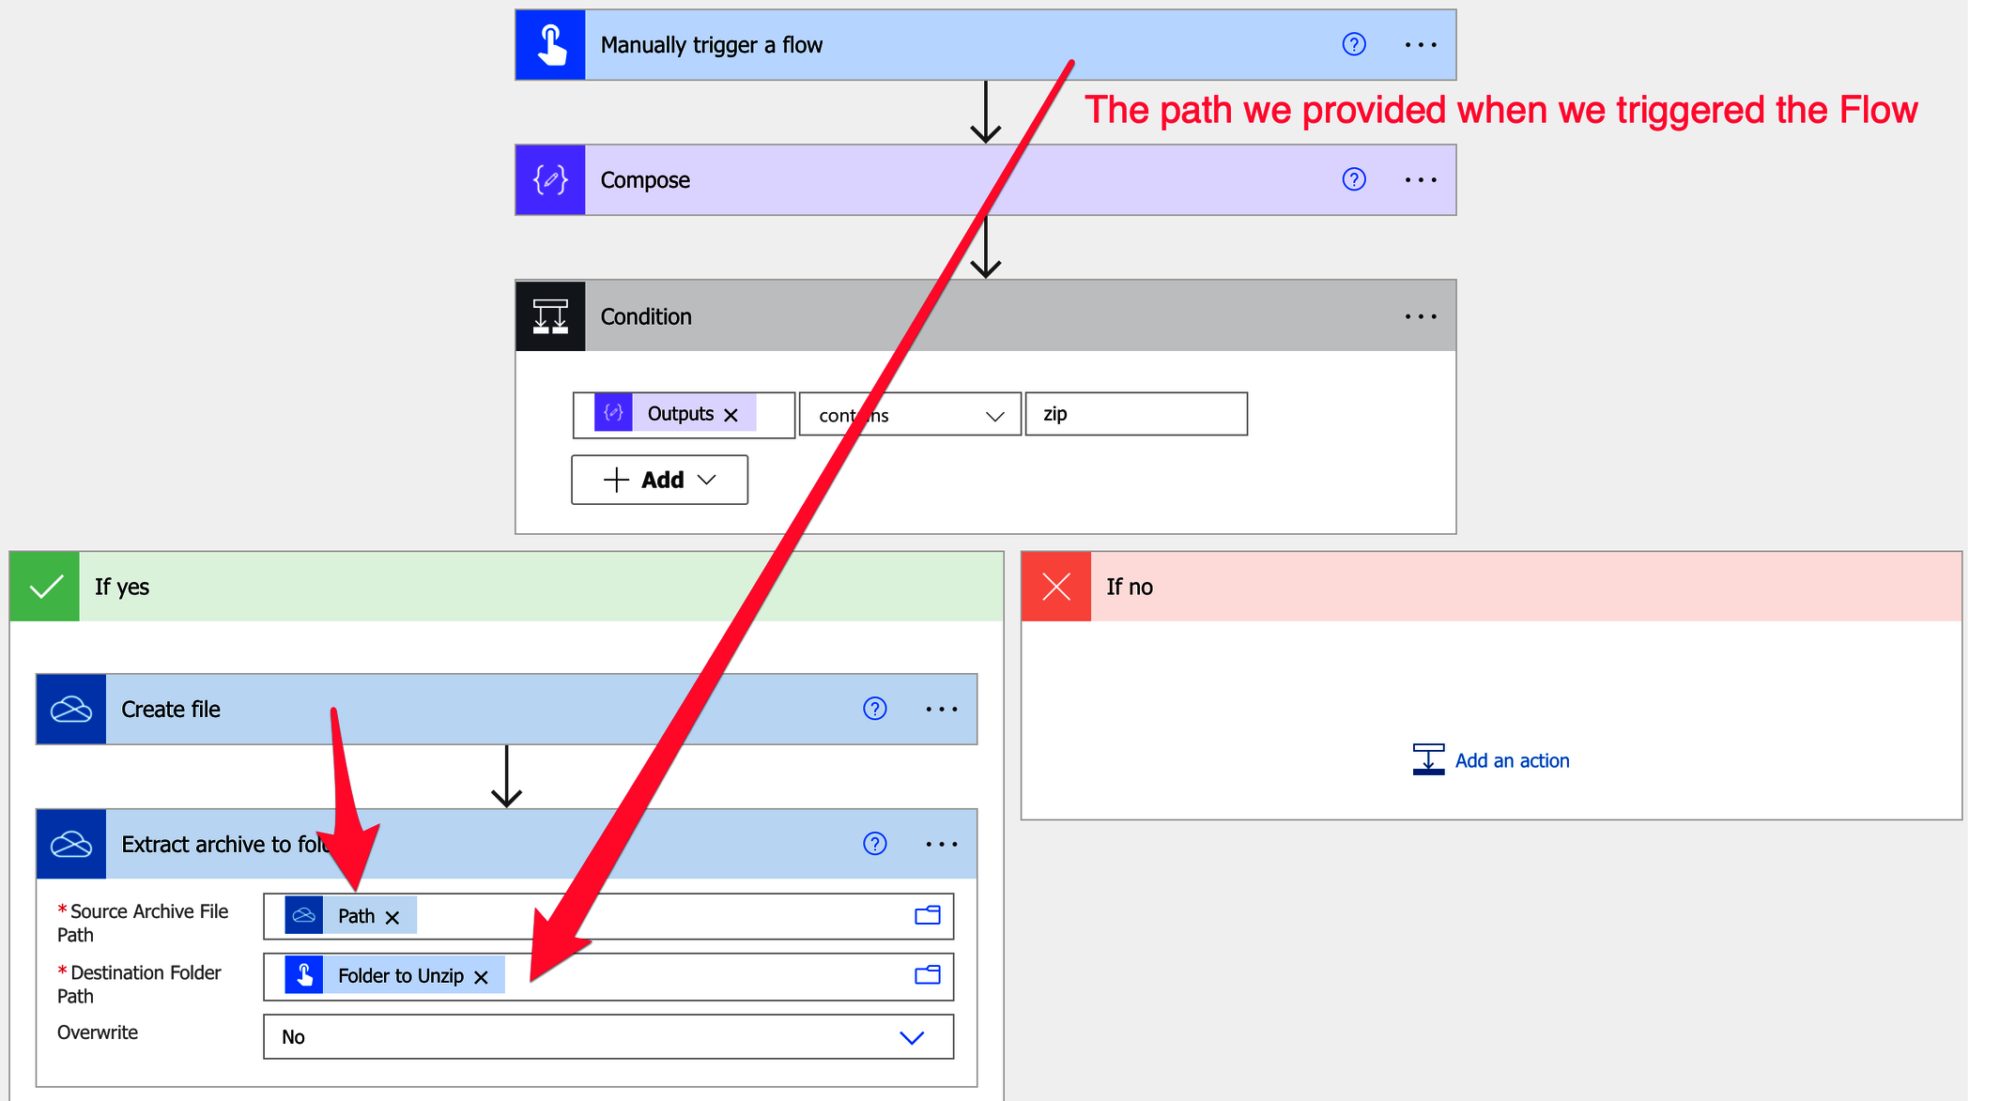
Now that we have the file name, we can check if it’s a zip, using a “Condition” action.
Let’s now extract the file.
Extracting the file
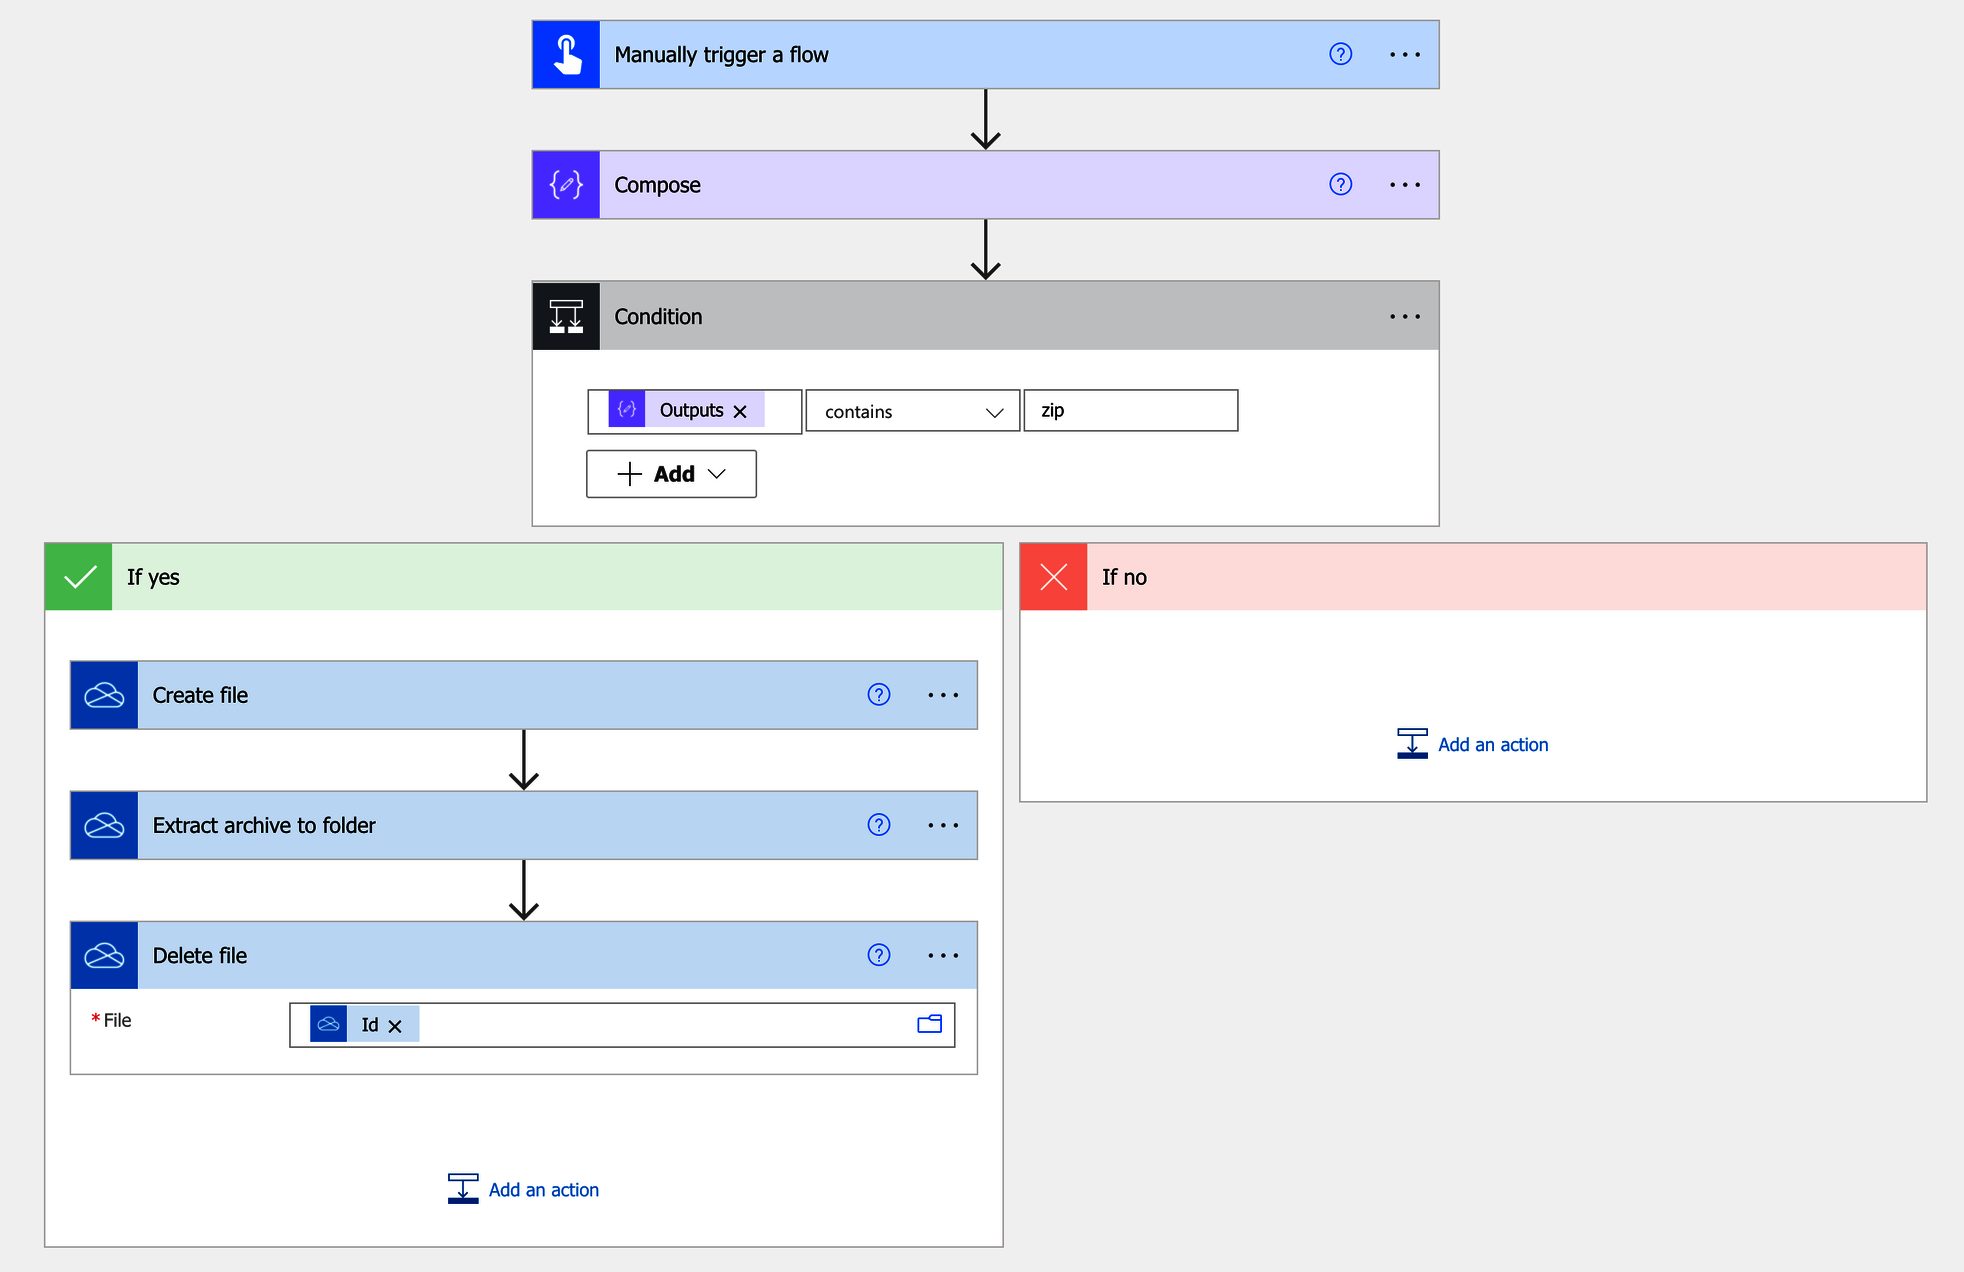
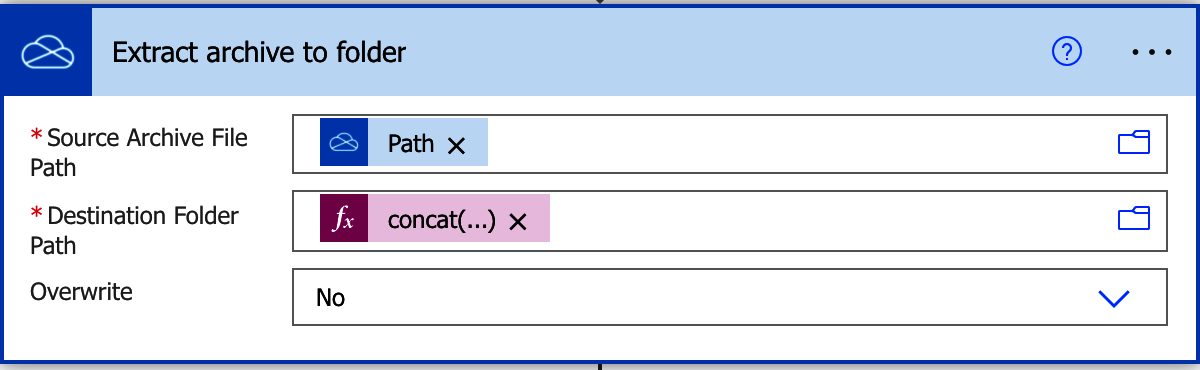
Like we mentioned before, we can use the “Extract archive to folder” action, but since the action requires a “path” to a file and not the “contents” of the file, we need to save it somewhere temporarily. Again, I’ll leave it up to you where to store it, but here’s the “Create file” action.
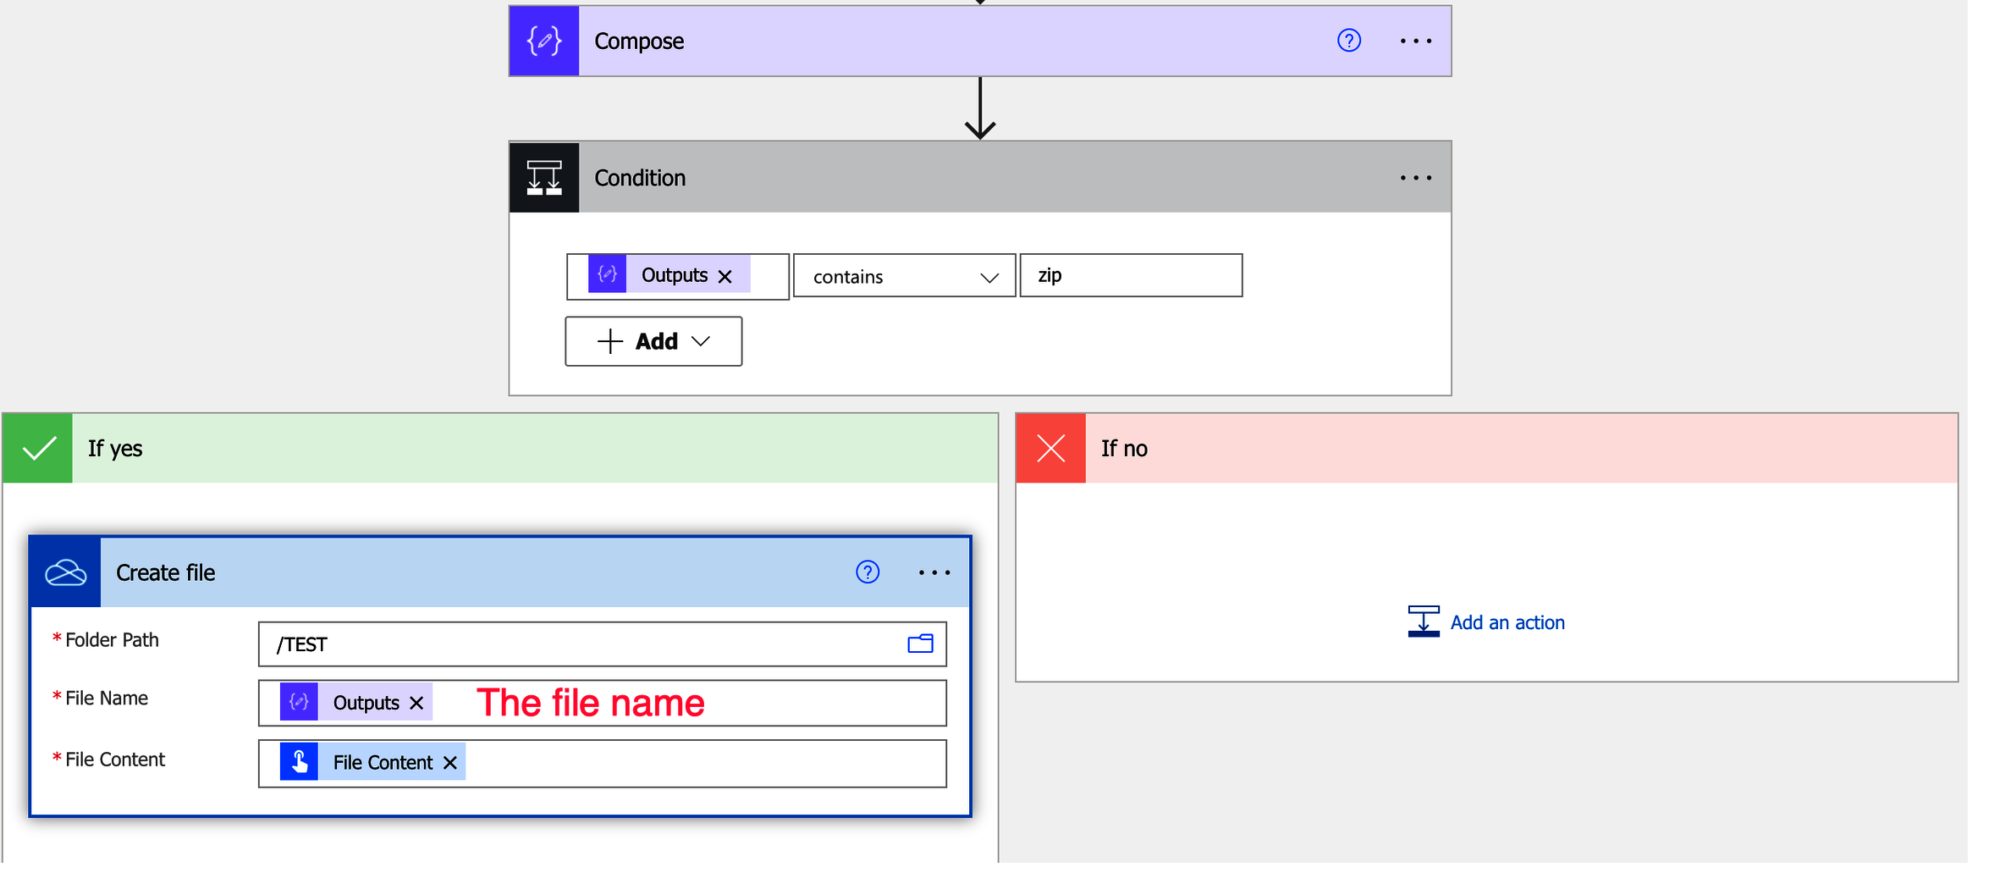
Notice that we’re using the “Compose” action with the file name.
Now that we have a file, let’s unzip it.
Finally, let’s remove the temp file that we created not to leave “garbage” behind.
If we run, we’ll get an error:
Destination folder '/TEST/Unzip/' already contains files. To overwrite this folder, set overwrite to 'true'.
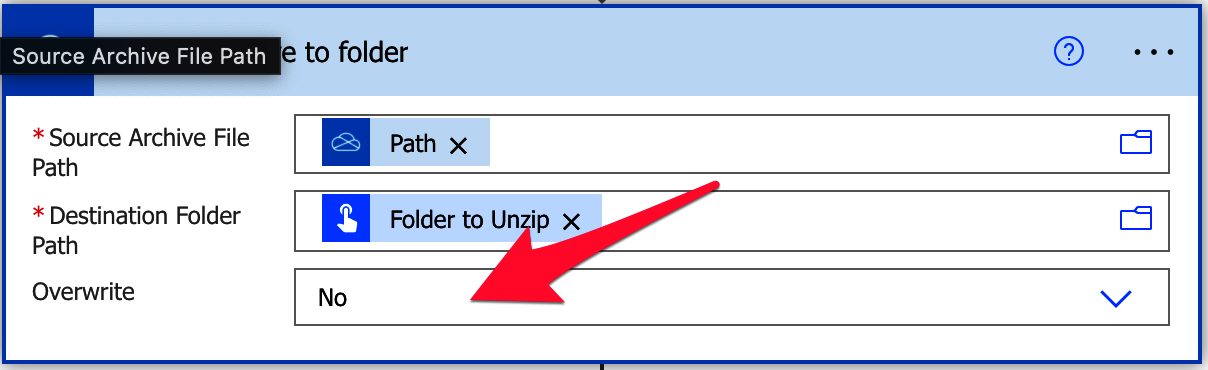
I did this on purpose to show you something. Since Power Automate will create files in a folder, if the folder already contains files or the folder exists, then it will warn you. It’s the same when you try to unzip in a file called “test,” and a “test” folder already exists. Any operating system will warn you that the file or folder already exists not to lose data. Here we have two options. First, if you don’t mind the file’s contents being overwritten by the unzip, you can toggle the “override” flag in action.
Or you can create a new folder with a unique name so that you’re sure that the folder is always new. There are a few strategies, but the date is usually the most straightforward and safest. Let’s do that and see what we get:
concat(triggerBody()['text'],'/',formatDateTime(utcNow(),'yyyyMMddhhmmss'),'/')
We’ll use the “concat” function with:
- The path that we provided.
- The “formatDateTime” function with the year, month, day, hour, minute, and second to make it super unique.
- The “/”between the values so that we have a folder.
Here’s what it looks like:
Since we want to return the path later, let’s put the “destination folder path” in a compose action to re-use it.
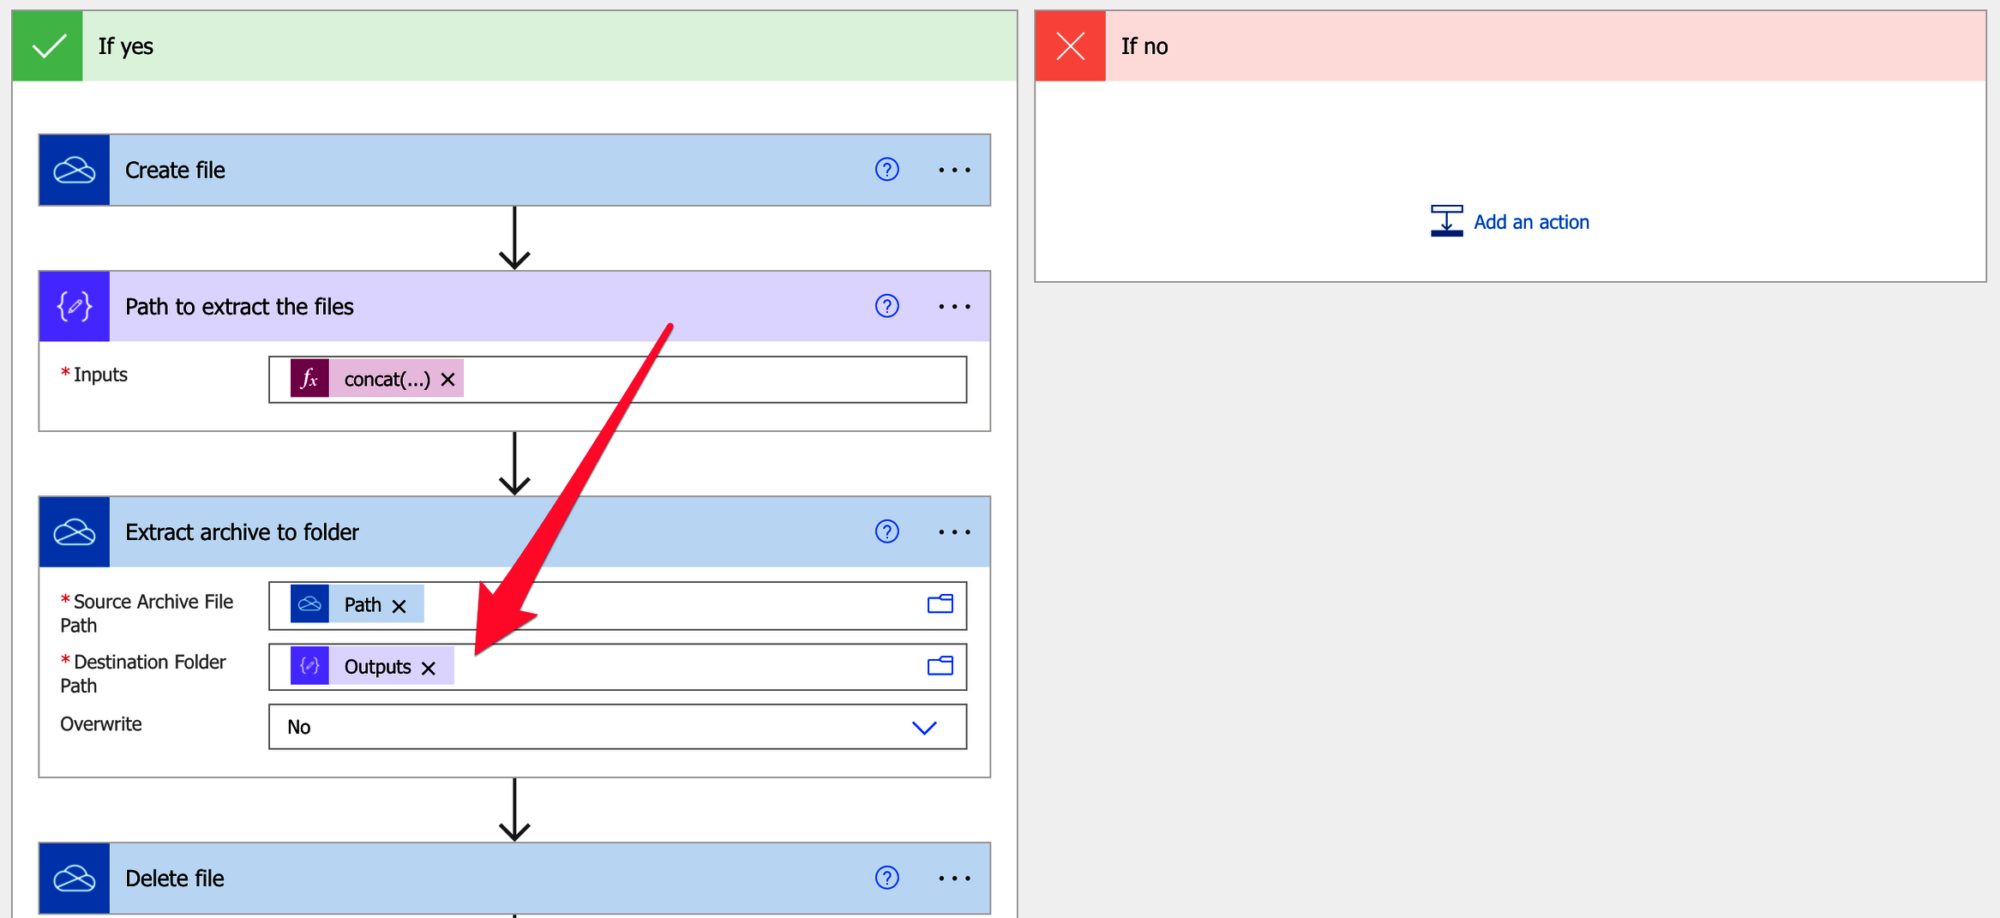
And here’s the folder:

Returning the information
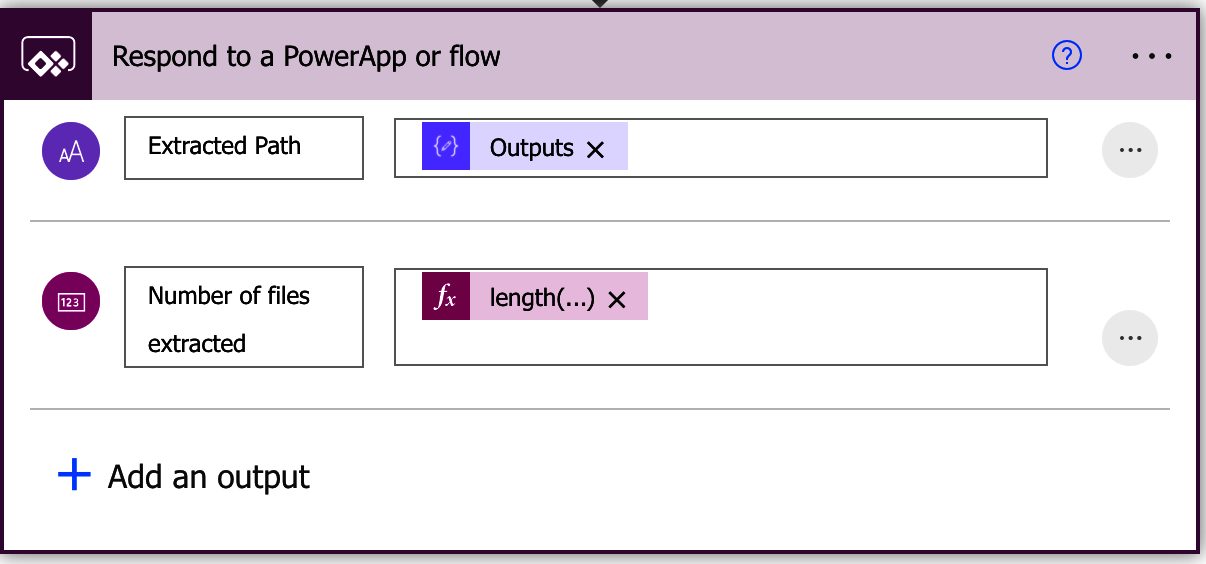
Now that we have the information in a folder let’s create a response with the “Power Automate: Respond to a PowerApp or flow” action.
As we mentioned before, we’ll return the number of files extracted and the files’ path, and the number of extracted files. Since the “Extract archive to folder” action returns the files that were created, we can count the number of files to return:
length(outputs('Extract_archive_to_folder')?['body'])
Here’s what it looks like:
Error handling
Finally, let’s work on error handling. Multiple things may happen like:
- The path that you provided has files already.
- The zip file is invalid.
- A problem in uploading the files.
- Error saving the temporary file
- Error deleting the temporary file.
We can define paths for failure and return the “path” as empty and the number of files as zero. This way, the “parent” Flows will know that something went wrong without the Flow failing.
Alternatively, you can let the Flow fail and deal with the error in the parent since this is a “helper Flow,” you can consider that the responsibility of dealing with errors is in the parent since the information provided was incorrect.
It’s your decision, but here’s how to deal with the errors in this Flow in case you opt for the first option.
First, let’s add a branch for the error “path.” If you don’t know how to do this, I go into a lot of detail in “Plan for errors and timeouts.”
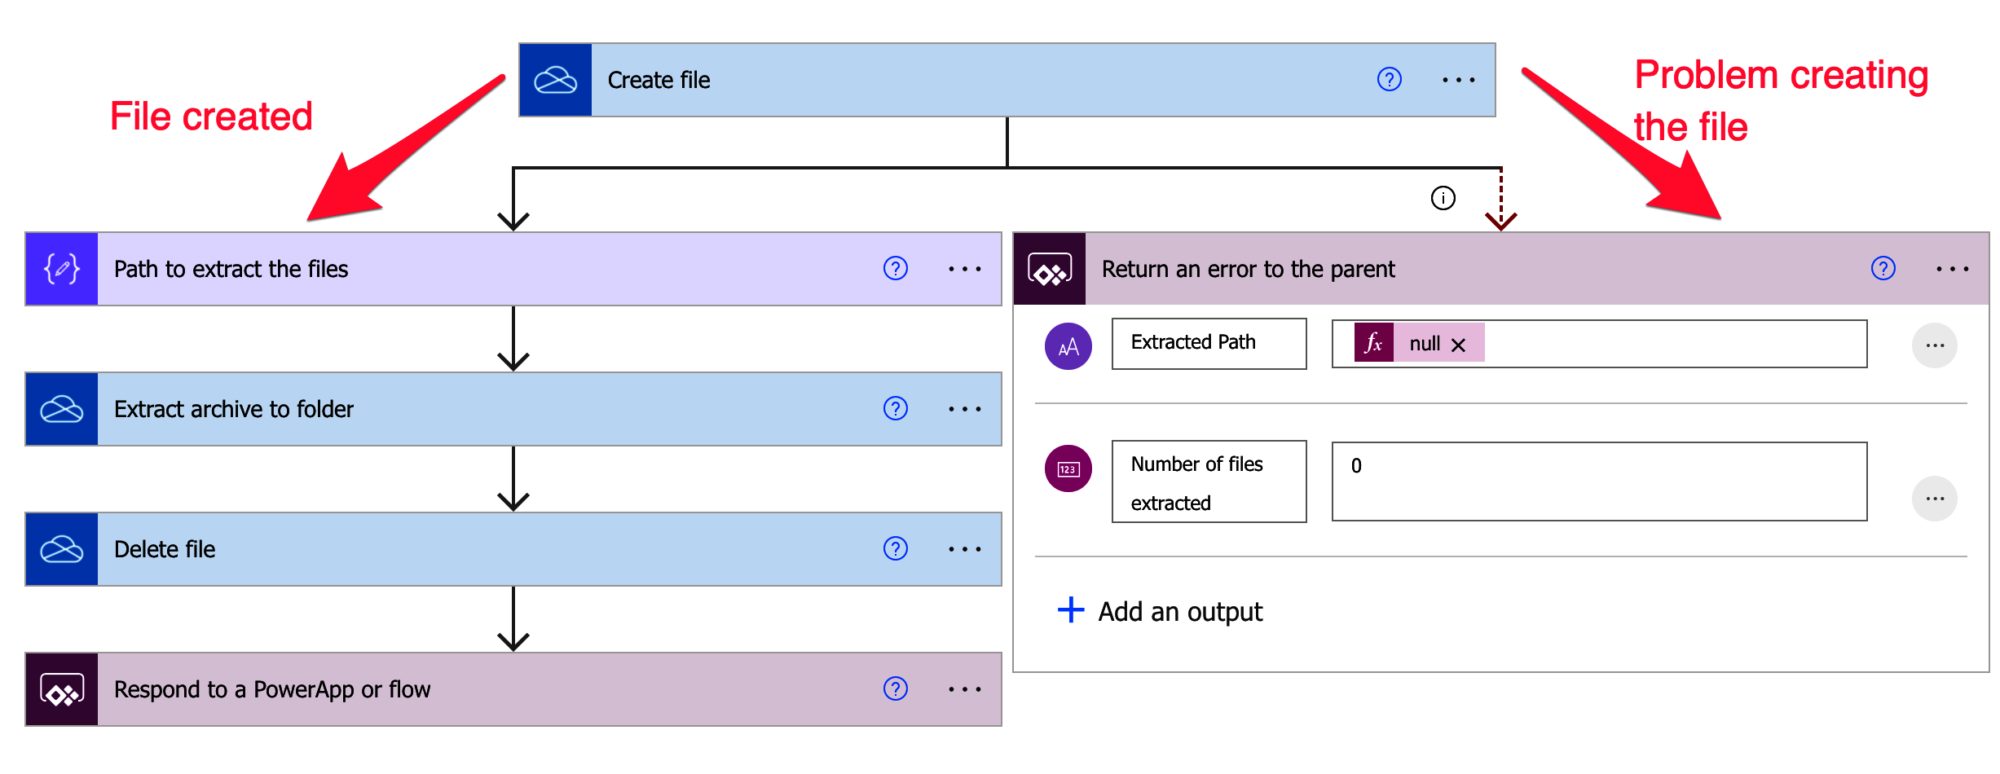
We’re reacting to something going wrong in the file creation by doing this. Here’s what it looks like in all paths.
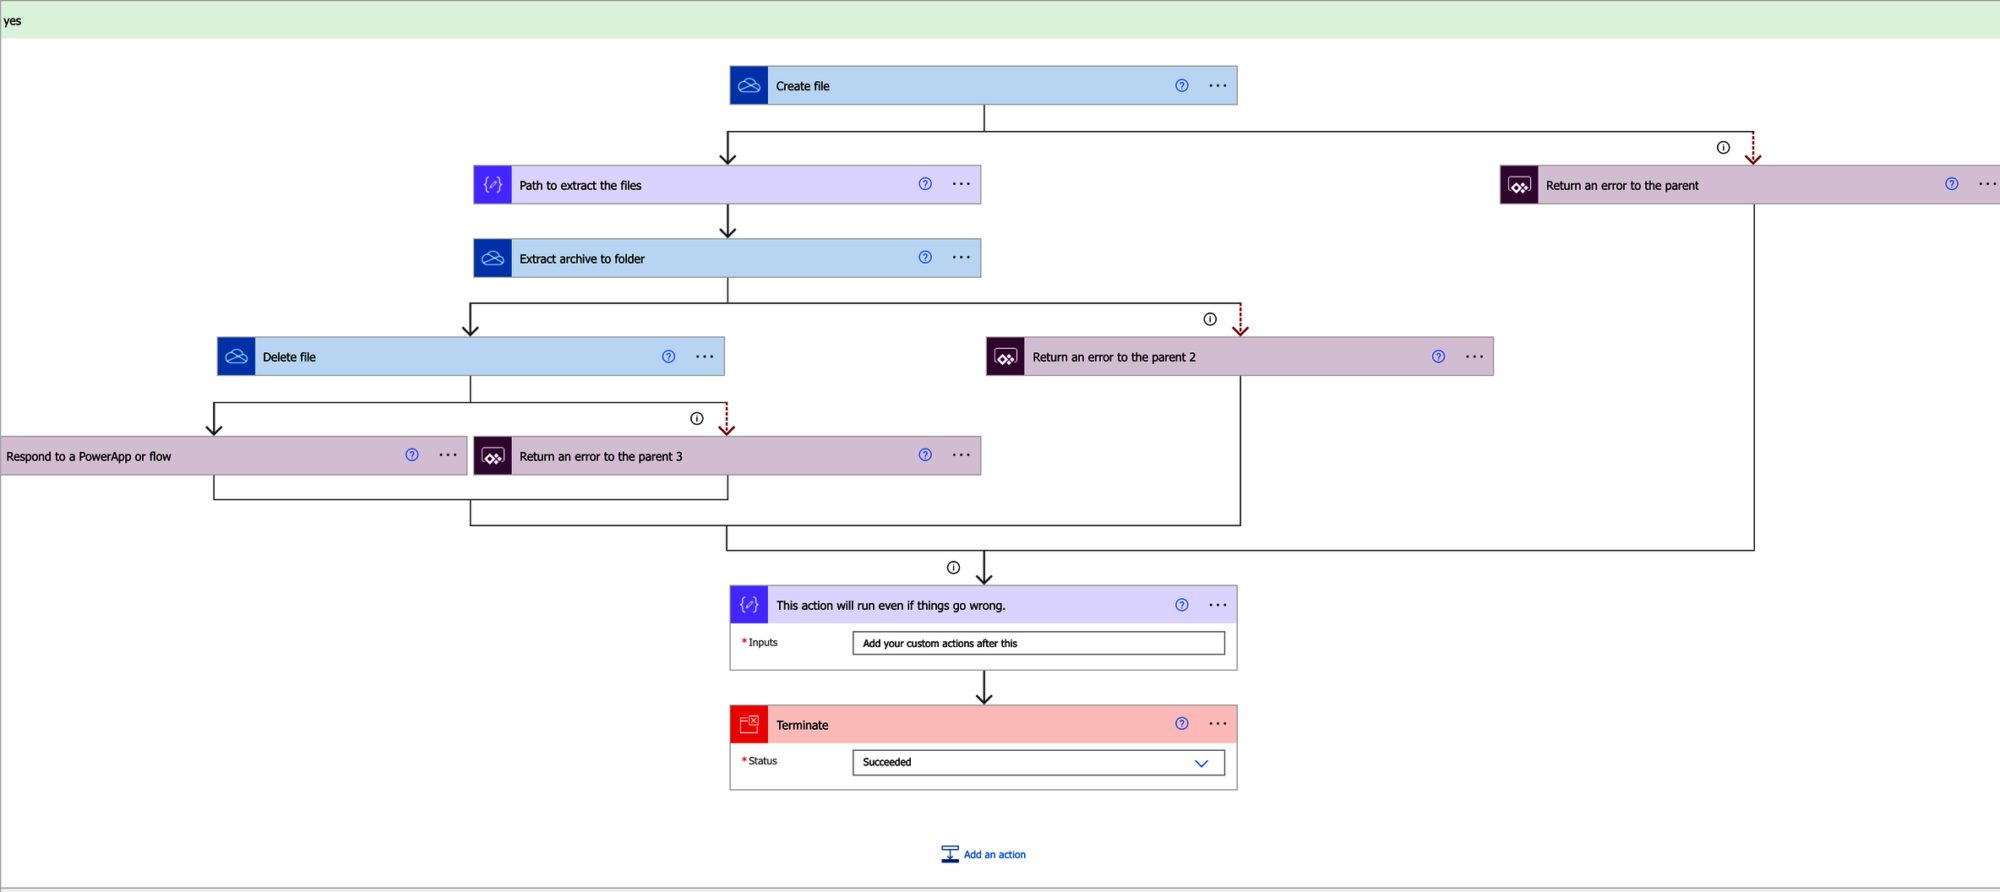
Notice the end part where I have a “Compose” action and a “terminate” action. The “branches” that deal with errors will catch them, but the Flow fails. If we don’t put the “terminate” action, in the end, the Flow will still fail with an error. Since the strategy was to return always “success” even if the Flow has errors, we need to add that action in the end.
I’ve added the “Compose” action to “catch” all paths as a placeholder. To do that, you need to go to the “Configure run after” and select all options.
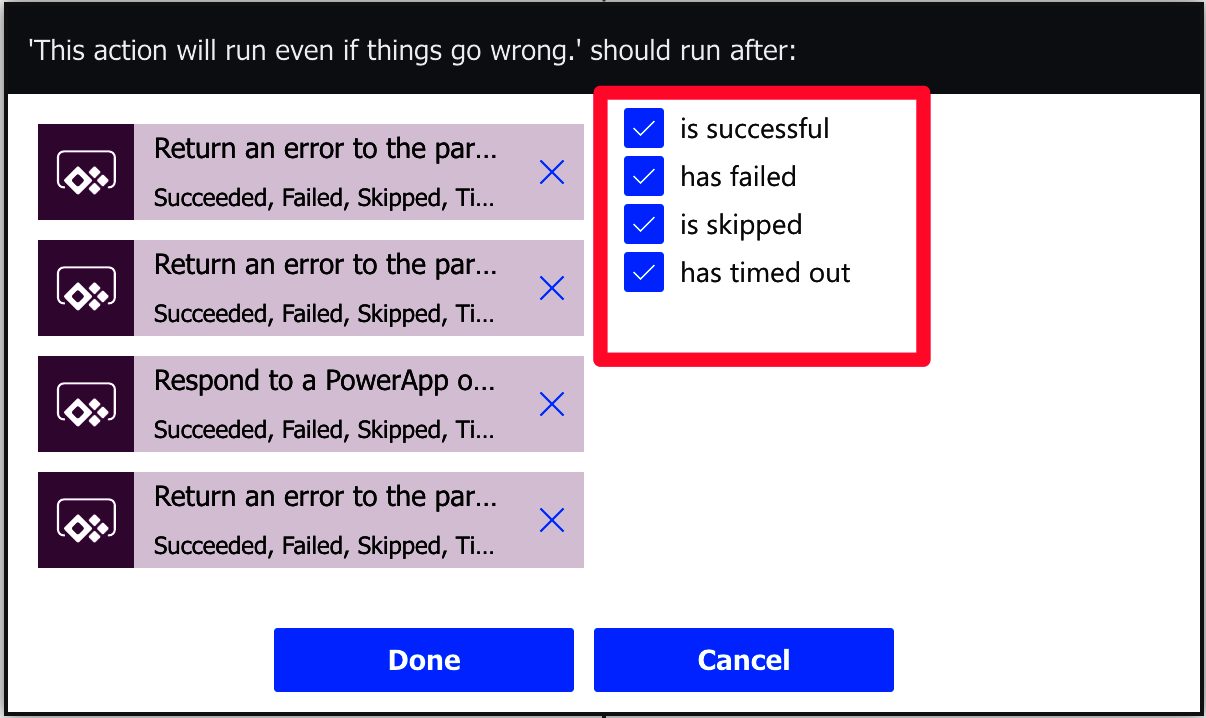
By doing this, you’ll be telling Flow too, regardless of what happens, to run the “Compose” action.
Simulate using it in another Flow.
Now that the Flow is done, let’s use it as a “helper Flow” by calling it the “Run Child Flow” action. To do that, you can use the Flows that you’re acting like this or create a new Flow like this:
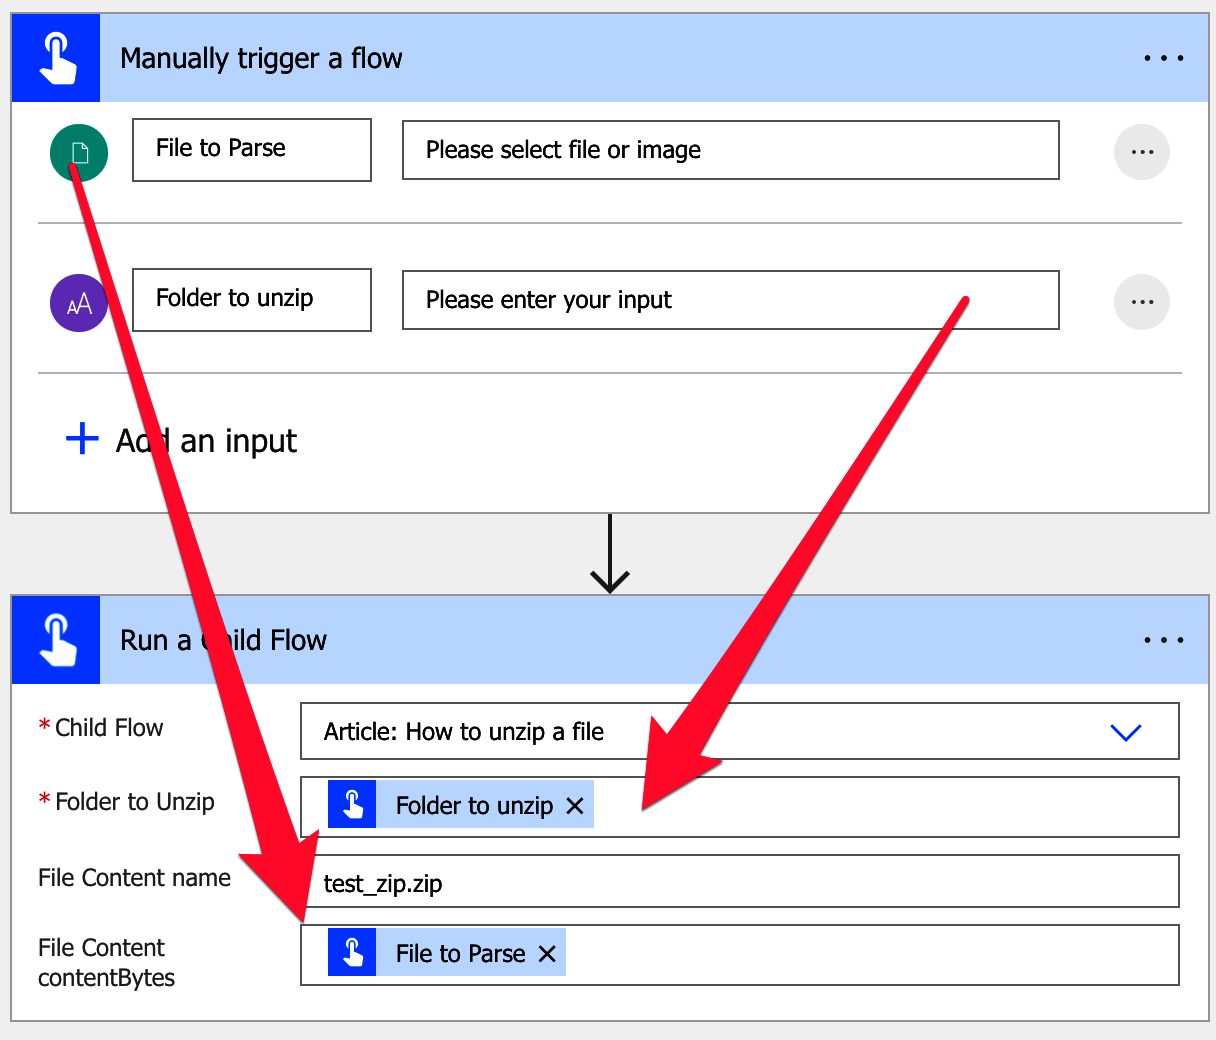
We’ll use the “Manually Trigger a Flow” action to run the example, but you use it anywhere on your Flows. Here’s the result:
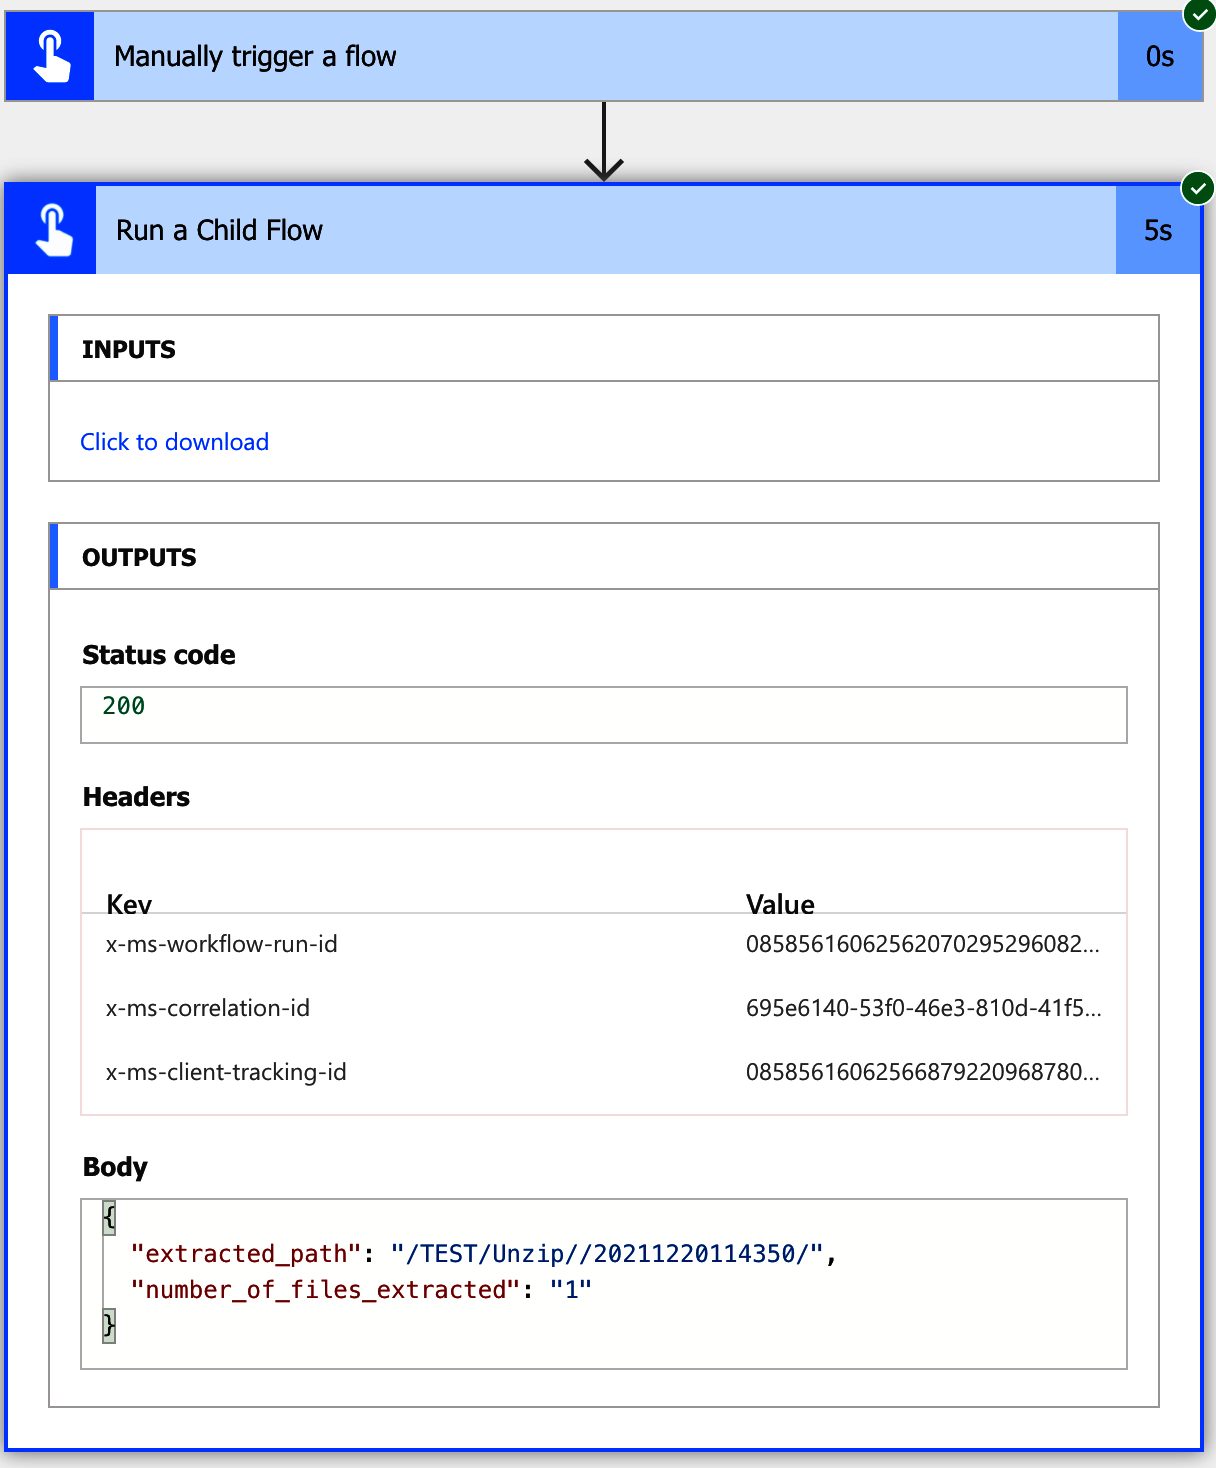
We now have a folder with the files and the number of extracted files.
Final thoughts
I know we went into many details about building the Flow, but it’s important to know what’s happening in each step. It’s a learning experience how to use the actions and how to use the proper strategies to have Flows that run correctly.
Photo by Tim Johnson on Unsplash