
When we look at SharePoint document libraries we see folders and files and we think "that's it". "That's it" is quite powerful already since we can sync them with our system, collaborate online on files and much more, but there's something more that people don't notice. We can add columns that give a whole new dimension to the data. These columns work in a similar way as the SharePoint list ones (it's the same infrastructure underneath), so let's take a look on what they are, how to use them and how are they useful.
One thing before we proceed. I will use properties and columns interchangeably in the article. This is because when you look at the folder structure you will see them as "Add column" so they are basically SharePoint list columns, but in this case they provide us with information linked to the file.
Let's take a look now on what they are and how to use them.
What "properties" actually are
Like I mentioned before, a document library can have columns, exactly like a list can. Document Libraries are special types of lists, not something different, so they "inherit" the features of lists and they work the same way.
So if you add a "Status" column for example, here's what you see.
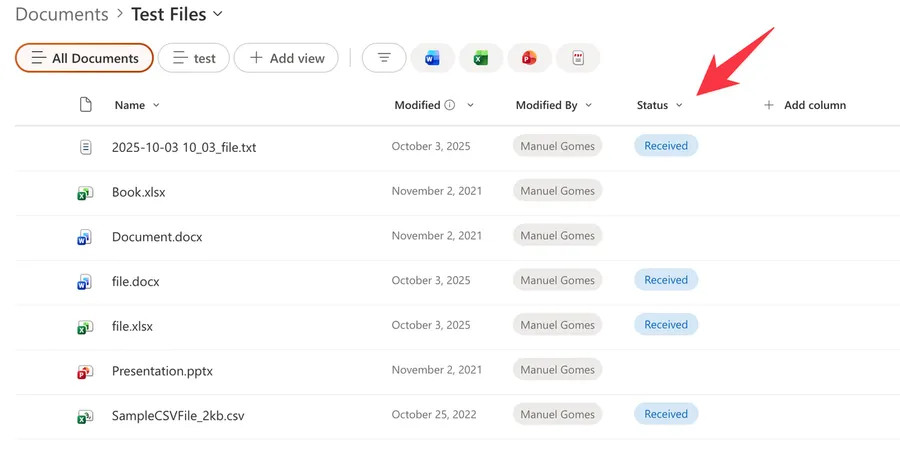
This is quite useful because you can augment greatly the data and make files and folders much more useful.
Why this beats folders (but doesn't replace them)
You can still use folders since the columns are applied to the whole document library, but with this you can as well:
- Filter and sort a view by any column. Show only the files where Status is "Approved," newest first.
- Group files by a column, so a single library can display itself as neat sections by Client or by Department.
- Build several views over the same files. One view "by Status," another "by Owner," another "Due this week," all reading the same flat library instead of a folder maze.
- Edit in bulk with "Edit in grid view," filling in many files' properties in a spreadsheet-style grid.
- Find files by what they are, because metadata is searchable, so a file tagged Client = "Apple" surfaces even if nobody put "Apple" in the file name.
And of course you can do combinations on all properties making things quite powerful.
But these won't replace folders for obvious reasons. We always think in "folders" and not "categories," so please consider this as an enhancement to folders and not a replacement.
How to add them
Adding a property is quick, and you do it right from the library. Let's add one together.
- Open the document library and look at the row of column headers.
- At the far right of those headers, select Add column.
- Pick the type you want from the short list, or choose See all column types for the full set, then select Next.
- Give the column a clear name, set its options (the choices for a Choice column, a default value, whether it is required), and select Save.
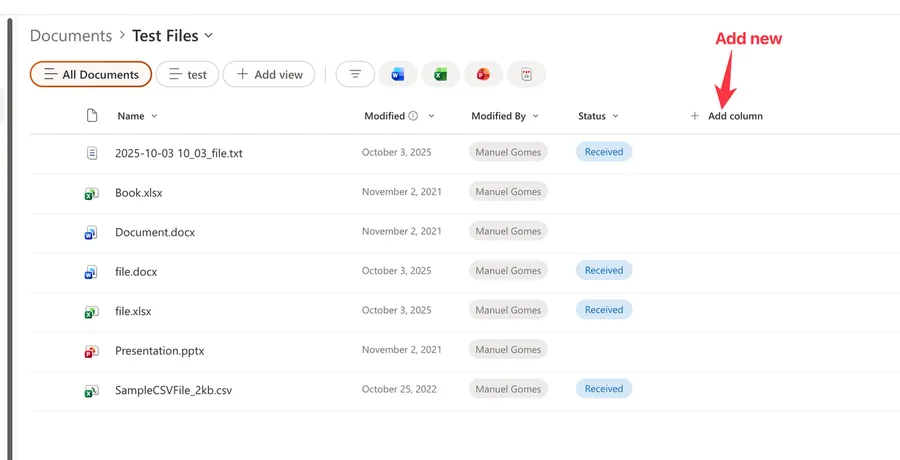
That is the column created. It shows up in the library straight away, empty and waiting for values.
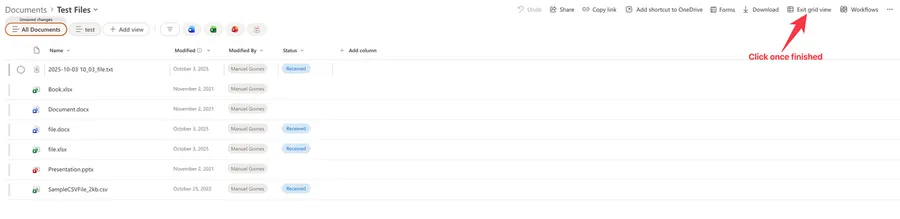
Filling in the values is just as direct. For a single file, select it and open the details pane (the i information button), then edit the fields there next to the preview. For lots of files at once, switch to Edit in grid view and type the values straight into the grid, the same way you would in a spreadsheet.
If you want the column to do more than store a value, you can change how it looks. SharePoint lets you color-code your columns and apply advanced column formatting, so a Status of "Overdue" can jump out in red. That part is purely visual, so it never changes the underlying data.
The columns you can add
SharePoint gives you a healthy set of column types: single line of text, multiple lines of text, choice, number, currency, date and time, yes/no, person or group, hyperlink, lookup, and managed metadata, plus the newer Image and Location types. Most of the time a simple Choice or Date column is all you need to make a library searchable and sortable.
A couple are worth a note. Managed metadata pulls from a central term store, so it gives you consistent, governed tags across sites, but it takes a little more setup than a plain Choice column. And if you want a column you can reuse across several libraries, you create it as a site column rather than defining it again in each library. For getting those columns to actually show up in your views, I have a separate walkthrough on showing additional columns in views.
Making the right values easy to capture
Properties only help if they get filled in, and SharePoint gives you two ways to nudge that along.
You can mark a column as required, so people are prompted to supply it. Worth knowing: the prompt is reliable in the classic experience, but in modern libraries a drag-and-drop or multi-file upload often lets the file through with the field still blank, and the user is only reminded afterward. That behavior is widely reported by practitioners rather than spelled out by Microsoft, so test it in your own library before you rely on it.
You can also set a default value per library, or even per folder, under the library's column default value settings. Drop a file into the "HR" folder and its Department column fills itself in as HR. It is a quiet little feature that keeps metadata consistent without anyone thinking about it. Note that not every column type supports defaults (person and lookup columns, for example, don't), so keep defaults to the simpler types.
If you would rather set these values from an automated process, you can do that with Power Automate too, which I cover in its own article.
Content types and labels build on the same idea
This is a bit more advanced but I wanted to feature it nevertheless.
I gathered this part from online sources and haven't tested it myself yet, so please treat it as background to verify in your own tenant before relying on it.
A content type bundles a set of columns (and a template and a few behaviors) into a single reusable definition. Apply it to a library and every file of that type gets the same metadata schema, which keeps things consistent when more than one team is involved.
Microsoft 365's compliance labels also surface as columns. When a sensitivity label or a retention label is applied, it appears as a column you can see, sort, and filter on, managed through Microsoft Purview rather than in the library settings. (Data loss prevention reads that content and those labels, but it isn't itself a library column, so think of it as a neighbor rather than a property.)
There is also a growing AI angle. SharePoint can now use autofill columns to read a file and populate a column for you, some libraries gain a metadata search box that lets you query a specific column value directly, and well-structured metadata makes Microsoft 365 Copilot noticeably better at answering questions about your documents. These newer capabilities depend on Syntex or Copilot licensing, so you may not see them in every tenant.
A couple of limits to plan for
Two boundaries are worth keeping in mind before you go all in.
The first is the 5,000-item list view threshold. Your files are all safely stored, but a single view can only return 5,000 items at once. The fix is metadata itself: index the column you filter on, then build views that filter down to under 5,000 results. SharePoint Online even indexes some columns automatically, though it stops doing that above 20,000 items, so plan your key columns early.
The second is managed metadata setup. It is the most powerful tagging option, but it needs a term store defined first, so reach for it when governed, reusable tags actually matter, and stick to Choice columns when they don't.
Final Thoughts
Adding properties to your SharePoint files is one of those small habits that pays off every single time you go looking for something. You describe a file once with a few columns, and from then on you can filter it, group it, search it, and let Copilot reason about it, all without a single extra folder. Start with one or two columns that match the questions you actually ask, and grow from there.
Photo by Ali Shah Lakhani on Unsplash


No comments yet
Be the first to share your thoughts on this article!