Gmail is the biggest email service in the world and chances are that you have an email account there, but keeping the emails organized can be a pain. Gmail has rules but they are limited to things inside Gmail like applying tags, moving emails, etc and they are quite useful, but if we want to take things a bit further we need more power and that's where N8N can help.
The N8N "Gmail Trigger" node watches a Gmail mailbox and starts your workflow whenever a message that matches your filters shows up. You can still use the Gmail rules but can then augment things like sending you a notification when a specific email arrives, extract attachments and put them elsewhere or anything that can save you time.
One important thing is that the "Gmail Trigger" is a polling trigger, not an instant one. It doesn't get pushed the moment an email lands, but instead it checks the mailbox on a schedule you choose and picks up whatever is new since the last check. You can't trust it to trigger the instant the email arrives, but it's close enough if you pick the right polling time.
Let's explore how to use it.
Where to find it?
Open your workflow, select the "+" in the "add your first step", and search for "Gmail" in the nodes panel.
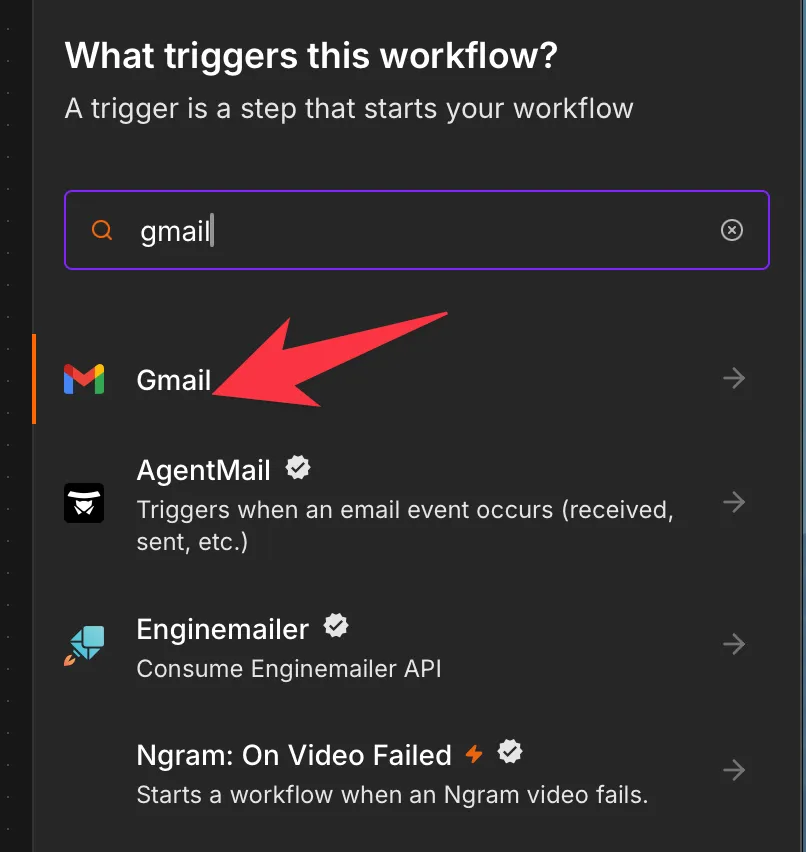
Pick "On message received":
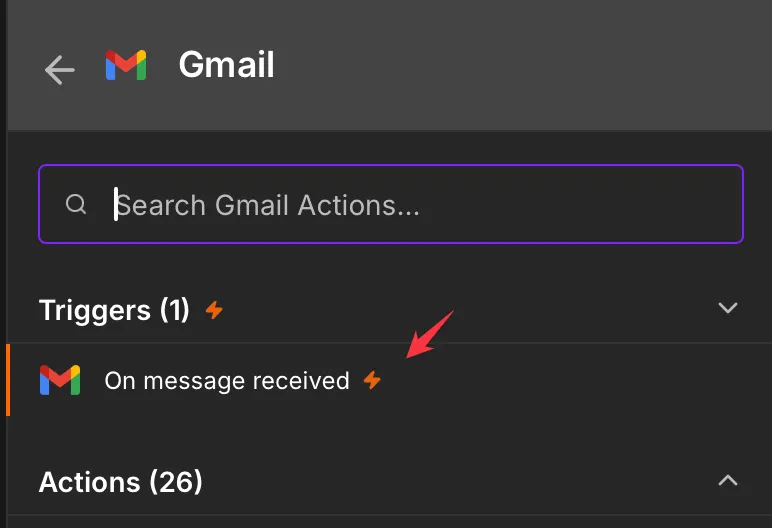
Here's what it looks like:
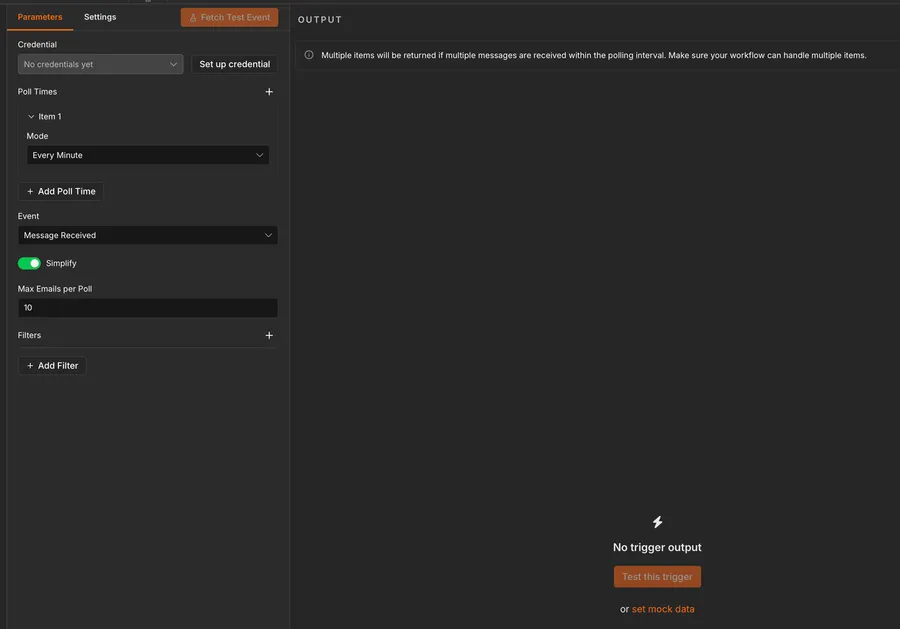
We will detail the values in the next section.
The "Gmail" node (no "Trigger" in the name) is the action node you use to send, label, or read messages once a workflow is already running. The "Gmail Trigger" is what starts the workflow in the first place. You'll often use both in the same automation. You can see that it's the trigger with the ⚡️ symbol.
Now that we know how to find it let's understand how to use it.
Usage
You connect a credential, pick how often it polls, and optionally narrow down which emails count.
Credentials
The "Gmail Trigger" connects to Google with an OAuth2 credential, and that's the route N8N recommends. On N8N Cloud you can use the managed OAuth2 option and simply sign in with your Google account, with no Google Cloud Console setup at all.
A service account credential also exists, but Google discourages it for Gmail because it relies on domain-wide delegation, and the node flags it with a warning. Unless you're on Google Workspace and specifically need to impersonate mailboxes, stick with OAuth2.
If you're self-hosting N8N you will need a few more steps, but we'll cover that in another article.
Poll Times
This is where you tell the node how often to check the mailbox. The "Mode" field offers ready-made schedules like every minute, every hour, or every day, and a custom option that takes a Cron expression when you need something more specific. Choosing a mode reveals the matching fields, so picking "Every Day" lets you set the hour and minute.
Simplify
Left on (the default), "Simplify" returns a tidy version of each email with the message IDs, labels, and the headers you usually care about: From, To, CC, BCC, and Subject. Turn it off and you get the full raw Gmail API response, payload parts and all. Start simplified and only reach for the raw form when you genuinely need a field the simplified version leaves out.
Filters
The "Filters" section keeps the trigger from firing on every single message:
- Include Spam and Trash: off by default, so junk doesn't wake your workflow.
- Label Names or IDs: limit the trigger to emails carrying a specific label.
- Search: accepts standard Gmail search operators, the same ones you type in the Gmail search bar, such as
from:billing@example.com has:attachment. - Read Status: choose "Unread emails only" (the default), "Read emails only", or both.
- Sender: match a full address or a partial sender name.
Outputs
The node emits one item per matching email. With "Simplify" on, each item carries the message identifiers, its labels, and the common headers. A trimmed example looks like this:
{
  "id": "<exampleMessageId>",
  "threadId": "<exampleThreadId>",
  "labelIds": ["UNREAD", "INBOX"],
  "From": "Jane Doe <jane@example.com>",
  "To": "you@example.com",
  "Subject": "Invoice for June"
}
id: the unique Gmail message ID, handy for fetching the full message later with the "Gmail" node.threadId: the conversation the message belongs to.labelIds: the labels Gmail has on the message, likeUNREADorINBOX.From,To,Subject: the headers you'll reference most often downstream.
In the next node you read any of these with an expression. For example, {{ $json.Subject }} pulls the subject line:
$json: the data of the current item coming out of the trigger..Subject: the field you want from that item.
Header casing and which fields appear can shift with the Gmail account and the N8N version. Run the trigger once with "Fetch Test Event", then expand the output to see the real keys before you wire up expressions against them.
Real-world examples
Save invoice emails to a folder
If you get a lot of invoices on your email you can organize them automatically. Set "Search" to has:attachment and "Sender" to your supplier, then feed the trigger into the "Gmail" node to download the attachment and an upload node to store it in the corresponding folder. You can even have different folders for each type of provider so that you can organize things even better. Then archive the email and you're good to go.
Turn flagged emails into tasks
Apply a Gmail label like to-do from your phone, then set "Label Names or IDs" to that label. Each labeled email becomes a new item that another node can turn into a task in your project tool. You triage on the go and let N8N do the data entry.
If you don't want to do manual tagging, you can try to create rules for things that you consider that are always tasks. For example, if you get an email from the water company you have to check it, so creating a task is a good way to not let anything slip. Even if you can't create tasks for 100% of the emails, any email that you can process automatically is time that you save and that's a win.
Automatically archive emails
This is in line with the first suggestion, but there are emails that you don't need to read. You can apply a label and archive them right away. Think of things like Uber Receipts or newsletters. You can apply a "newsletter" label and archive by checking if the email has "unsubscribe" in the text. This is even useful if you use the "categories" and "smart features" of Gmail, but don't use the Gmail app on your phone. Then your email is triaged and then you can take a look at the newsletters when you have time.
Non-intuitive behaviors
It only sees what arrived between polls
Because it polls, the trigger compares the mailbox now against the last time it looked. If a message arrives and is then deleted before the next poll, the node never sees it. Shorter poll intervals shrink that gap but never close it completely.
"Unread emails only" is the default
Out of the box the trigger ignores messages you've already read. If you're testing by re-reading the same email and nothing fires, that's why. Switch "Read Status" to include read emails, or send yourself a fresh message.
This is a good thing since you can be looking at the email and triage it automatically, but if there's an automation that you want to run (move the attachment to somewhere outside Gmail for example), then you need to be careful.
Simplify hides the body
The simplified output gives you headers, not the full message body or attachments. When you need the body text or files, either turn "Simplify" off or follow the trigger with the "Gmail" node using the id from the output to fetch the complete message.
Limitations
Bursts of email can slip through
When many messages land in the same short window, the trigger has historically been reported to miss some of them, especially near the boundary of a polling cycle. N8N has worked on this, but if you cannot afford to lose a single message, treat email polling as best-effort and add a periodic reconciliation step that re-checks the mailbox.
There's a ceiling per poll
Each poll fetches a limited batch of messages rather than the entire backlog at once. A large pile of unread mail is picked up across several cycles, not in one go, so the first run after a quiet period can take a few polls to catch up.
Polling needs an active workflow
The schedule only runs when the workflow is activated. While you're editing, you test with "Fetch Test Event", but nothing polls on its own until you toggle the workflow active.
Troubleshooting Common Errors
Symptom: 401 - unauthorized_client when the node runs.
Cause: The credential's scopes or permissions aren't set up correctly.
Solution: For OAuth2, enable the Gmail API in Google Cloud under APIs & Services, then reconnect the credential. For a service account, enable domain-wide delegation and include the Gmail API scopes in it.
Symptom: The workflow stops triggering after about a week. Cause: A Google Cloud OAuth app left in "Testing" mode issues refresh tokens that expire after seven days. Solution: Publish the OAuth consent screen to "In production", or reconnect the credential to mint a fresh token.
Symptom: The trigger works when run manually but never fires on its own. Cause: The workflow isn't activated, so the poll schedule isn't running. Solution: Toggle the workflow to active, and confirm the "Poll Times" mode is set to a real interval.
Recommendations
Here are some things to keep in mind.
Filter at the source
The tighter your "Search", "Sender", and "Label" filters, the fewer items the trigger emits and the fewer Gmail API calls you make. Narrow filters keep you well clear of rate limits and stop unrelated mail from running your workflow.
Match the poll interval to the need
Polling every minute feels responsive but multiplies API calls and execution count. For most jobs, every few minutes or hourly is plenty. Save the fast intervals for genuinely time-sensitive flows.
Fetch the full message only when you need it
Lead with "Simplify" on and the lightweight headers. Pull the full body or attachments with a follow-up "Gmail" node keyed on the id only when the workflow actually uses them. It keeps executions lean and easy to read.
Name it correctly
Rename the node so others can understand what starts the workflow without opening it and checking the details. Double-click the node title and call it something like "New invoice email" instead of leaving it as "Gmail Trigger".
Always add a note
Add a note to the node or drop a sticky note on the canvas explaining which mailbox it watches, what the filters mean, and any assumptions about the data. It's essential to enable faster debugging when something goes wrong.
Final Thoughts
The "Gmail Trigger" turns your inbox into the starting line for an automation, and it does it with very little setup. Remember that it polls rather than pushes, filter tightly so it only fires when it should, and lean on the simplified output until you truly need more. Get those three habits right and it will quietly start the right workflows for you, message after message.
Sources
- Gmail Trigger node documentation on N8N Docs
- Gmail Trigger node common issues on N8N Docs
- Google credentials on N8N Docs
Back to the N8N Trigger Reference
Photo by Rubaitul Azad on Unsplash

No comments yet
Be the first to share your thoughts on this article!