
We always think about automation as something that needs to run automatically, but it's not always the case. A simple manual trigger when we want something to happen that does all the tasks for us is equally good. This is required because it's not always possible to have a "pattern" to trigger an automation, but the tasks may always be the same.
The Manual Trigger is the simplest way to start a workflow in N8N. It does nothing on its own and it does not listen for events. It waits for you to click a button on the canvas, and only then does the workflow run.
Let's take a look on how to use it.
Where to find it?
Open your N8N workflow, select the "+" to add a node, and usually it's the first one called "Trigger manually".
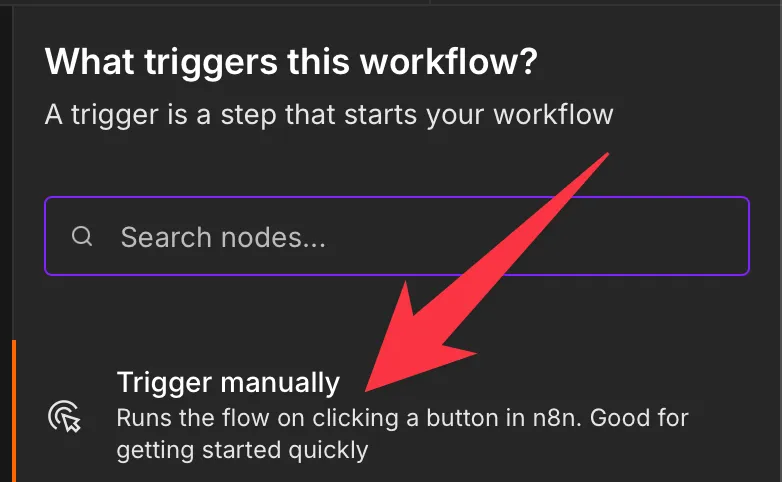
Here's what it looks like:
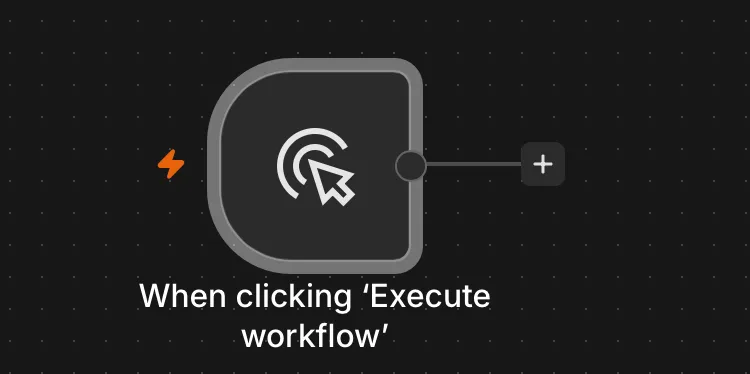
Most of the time you will not even need to add it yourself. When you create a brand new workflow, N8N places a Manual Trigger on the canvas automatically so you have something to click.
There is a separate node called the "n8n Trigger" that fires on instance events like workflow activation. That is a different node with a very similar name. The Manual Trigger we are covering here is the "When clicking 'Execute workflow'" node.
Now that we know how to find it let's understand how to use it.
Usage
The Manual Trigger is super boring to configure and that's a good thing. There is nothing to set up.
Credentials
None. The Manual Trigger does not connect to any service, so it needs no credential. This is one of the reasons it is so handy for testing: you can run your workflow logic without wiring up authentication first.
Parameters
There are no parameters either. You add the node, connect it to the next step, and click "Execute workflow" to run everything downstream. The only real decision is where you place it, and since it must be the starting point, that decision is made for you.
Outputs
The Manual Trigger emits a single item, and that item is empty. It carries no data of its own. Its whole job is to give the next node something to run on.
[
  {}
]
That empty object ({}) is important to understand. Downstream nodes still execute once, but there are no fields to read. If you try to reference a value with an expression like this:
{{ $json.customerName }}
you will get nothing back, because $json points at that empty object and customerName does not exist on it. The $json part means "the JSON of the current item", and since the current item is {}, there is nothing to pull out.
This is why a Manual Trigger is almost always followed by a node that supplies or fetches data, but it could be used simply to trigger actions. Add an "Edit Fields" node right after it and set a few values, and now everything downstream has something real to work with.
Real-world examples
Building and testing a workflow before it goes live
This is the everyday use. You start with the Manual Trigger, build out your logic step by step, and click "Execute workflow" after each change to see the result on the canvas. When the workflow behaves the way you want, you swap the Manual Trigger for a real trigger, such as the "Gmail Trigger" or a "Schedule Trigger", and activate the workflow.
Feeding test data with an "Edit Fields" node
Because the Manual Trigger outputs an empty item, pair it with an "Edit Fields" node to hand-craft a sample record. Set a field called customerName to Maria and another called total to 42, and every node after that can read them with {{ $json.customerName }} and {{ $json.total }}. This lets you rehearse the full workflow with predictable values before real events start flowing.
A workflow you only ever want to run by hand
Sometimes automation is the wrong answer. If you have a clean-up routine or a one-off report you only want to run when you decide to, the Manual Trigger is a perfectly valid permanent choice. You run it from the editor whenever you need it.
Non-intuitive behaviors
It emits an empty item, not nothing at all
You might expect a trigger with no data to send nothing downstream, which would mean the next node never runs. That is not what happens. The Manual Trigger sends exactly one empty item, so the next node runs once. Knowing this saves confusion when a node "runs" but every field comes back blank.
The button label changes between versions
The same node has been shown as "When clicking 'Test workflow'" in older releases and "When clicking 'Execute workflow'" in newer ones. If a tutorial mentions one label and your canvas shows the other, they are the same node.
Only one is allowed per workflow
You cannot add two Manual Triggers to the same workflow. N8N will refuse and ask you to remove the extra one. A workflow has a single manual starting point or none at all.
Limitations
It cannot activate a workflow for production
This is the big one. A workflow whose only trigger is the Manual Trigger cannot be switched to Active. Production runs need a trigger that reacts to an event or a schedule, and the Manual Trigger reacts to neither. To go live, attach a real trigger (any trigger other than the Manual Trigger works) and then flip the workflow to Active.
It only works from the editor
The Manual Trigger fires when you click "Execute workflow" on the canvas. There is no way to call it from outside N8N, no URL, and no external signal. If you need another system to start your workflow, you want a "Webhook" node instead.
It carries no incoming data
Since the item it emits is empty, there is no payload to inspect and no context about why the run started. Any data your workflow needs has to be added by a following node.
Troubleshooting Common Errors
Symptom: When you try to activate the workflow, you see "Workflow could not be activated: Workflow has no node to start the workflow, at least one trigger, poller or webhook node is required". Cause: The Manual Trigger does not count as a production trigger, so N8N sees no valid way to start the workflow automatically. Solution: Add a real trigger such as a "Schedule Trigger", "Webhook", or the "Gmail Trigger", connect your logic to it, and then activate the workflow. You can keep the Manual Trigger during development and remove it once the real trigger is in place.
Symptom: A node after the Manual Trigger runs successfully but every field is empty.
Cause: The Manual Trigger only outputs an empty item ({}), so there is no data to read.
Solution: Add an "Edit Fields" node right after the Manual Trigger and set the values your workflow expects, then reference them downstream with {{ $json.fieldName }}.
Recommendations
Here are some things to keep in mind.
Pair it with an "Edit Fields" node for realistic tests
Because the Manual Trigger hands you an empty item, put an "Edit Fields" node right behind it and populate a sample record. Testing against realistic values catches problems that an empty item never will.
Swap it for a real trigger before going live
Treat the Manual Trigger as scaffolding. Once your logic works, replace it with the trigger that reflects how the workflow should really start, then activate. Leaving only a Manual Trigger is the most common reason a finished workflow will not turn Active.
Name it correctly
Rename the node so others can understand what starts the workflow without opening it and checking the details. Double-click the node title and give it a clear, descriptive name.
Always add a note
Add a note to the node or drop a sticky note on the canvas explaining what triggers the workflow and any assumptions about the data. It's essential to enable faster debugging when something goes wrong.
Final Thoughts
The Manual Trigger is the workhorse of building and testing in N8N. It gives you a button to click while you shape your logic, feeds an empty item so the next node runs, and then steps aside for a real trigger when you're ready to go live. Reach for it early, and swap it out before you activate.
Sources
Back to the N8N Trigger Reference
Photo by boris misevic on Unsplash
No comments yet
Be the first to share your thoughts on this article!