
SharePoint Lists provide you with loads of extensibility without a lot of code or expertise. You can create the data and, with low effort, provide custom Views of the same data, depending on the usage. All of this, just by adding additional columns to your Views to fully customize them to your users' needs. I'll highlight two in this article:
- Showing additional columns in Lists
- Showing additional columns based on column lookups
Let's just quickly define them both, so that we're talking the same language. It's important not to confuse Lists with Views. Consider the List being where your raw data resides. You have your names, phone numbers, calculations, emails, etc. stored in a List. But you need a way to show it in SharePoint. There's where Views come into play. When you add a new List, SharePoint creates a default View for you called "All Items".

So a view is simply a selection of columns that you want to present to the users. A Lookup column is a column that has a link to another SharePoint list. For example, a "task" List can have a lookup column to the "employee" List representing the employee that is performing that task. Now that we know both concepts let's get to the fun part.
Add additional fields to a View
Like mentioned before, a default View is created for you, but even this View doesn't show all of the List's columns. SharePoint has a lot more and keeps some of them automatically updated. Let's edit a view to show more columns:
- Go to "All Items" > "Edit current view".

You'll see something like this:
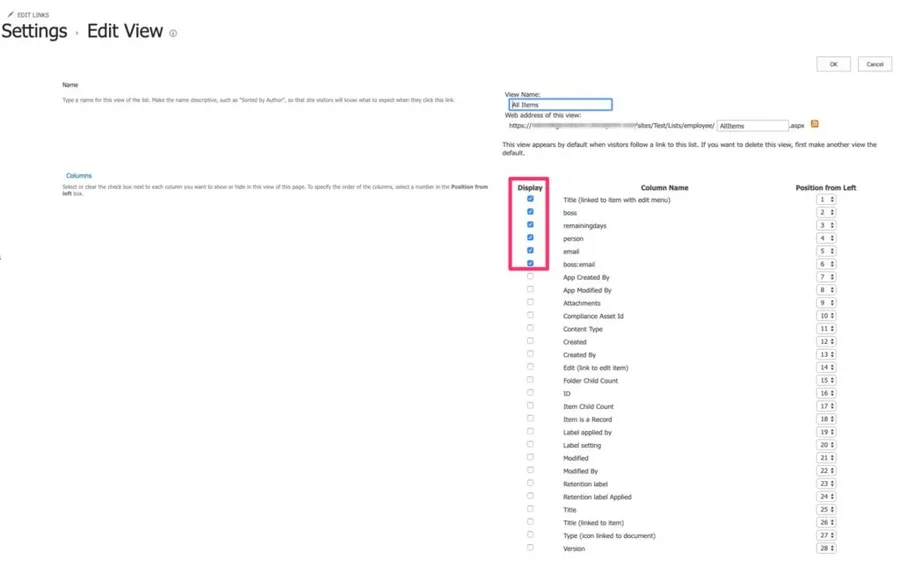
As you can quickly see there's a lot of columns that are not selected and you can take advantage of them. Just add any of the additional columns by clicking the checkbox. Let's select "Created by" to see some changes.

Success. There's not a lot more to it. If your list uses the modern experience, there's an even quicker way. Click the little arrow on any column header, go to Column settings > Show/hide columns, tick what you want, and hit Apply.
Add a new View
Different people probably want to see different things, so you can create a view for each without much work. To create a new View do the following:
- Select "All Items" > "Save view as"

- Pick a new name

Add the columns that you want by following the same steps above, and you're good to go. When you save, you'll get to choose whether the view is public (everyone sees it) or personal (just you). Worth knowing: a personal view can't be set as the list's default.
Showing additional columns based on Lookup columns
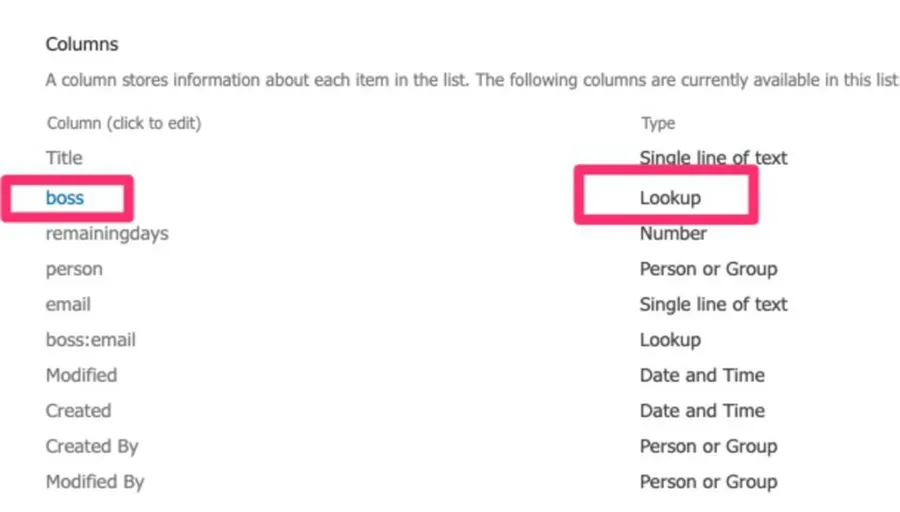
If you notice the screenshots before you'll see a "boss:email" there. I foreshadowed this section before, but this is a column that exists in the lookup table. In this specific example, I want the employee table to have the employee's details and a link to his/her boss and corresponding email. In this case, the "boss" lookup List is the employee itself (yeah you can do that, awesome huh?). Let's check how to do this:
- Go to "Settings" > "List Settings".
- Select the lookup column
- You'll see the list of columns that this table has. In our case, we want the "email," so we'll select it:
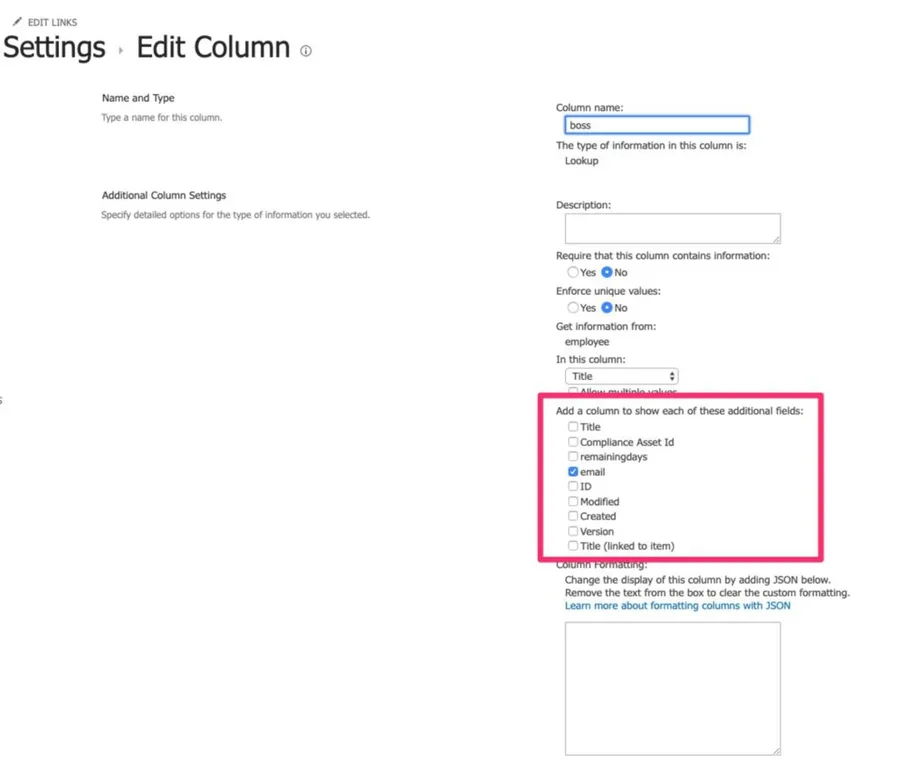
And it's done. Easy. These columns will be read-only, but you'll be able to use them as any other columns. For example, if you're building a Power App, it's handy to have these fields available so that you don't need to query the employee table multiple times to get the email. You can also combine this with the Views to display or hide the information in custom views.
Non-intuitive behaviors
Lookup columns are handy, but a couple of things about these projected fields catch people off guard.
Projected fields are read-only
These projected fields are read-only, and you can't sort or filter on them reliably. If you need to sort by an employee's email that came from a lookup, the usual trick is a calculated column in the main List.
They don't show up in forms
This one came straight from the comments, where Dinesh asked how to show these fields in the New, Edit, and Display forms. The short answer is that you can't, at least not out of the box. These extra lookup fields only show up in your list Views, not in the New, Edit, or Display forms (the "Item Properties" panel), and there's no built-in switch to bring them in. If you really need them on a form, the practical route is a custom form in Power Apps that reads the source List directly.
Microsoft confirms there's no out-of-the-box way to surface these fields on the forms: Cannot see additional fields from lookup column and How to have all the lookup column information appear in the New Item Edit window.
Limitations
The 12 lookup-column ceiling
A single view can show at most 12 lookup-type columns, and that count is sneakier than it looks. Every extra field you project from a lookup counts as its own lookup column, and so do people columns and even the "Created by" and "Modified by" fields.
Add a few lookups with a couple of extra fields each and you can hit the limit fast. If a view suddenly errors out, this is usually why, so trim the columns or split the data across a couple of views.
Final Thoughts
These are just a couple of simple examples of how you can take advantage of the data that you already have and show it in a different way depending on the usage. Explore, and you'll see that you can achieve a lot with little effort.
Photo by Paul Skorupskas on Unsplash


Unfortunately these additional columns are not shown in the "Item Properties" view. Nor are they visible in the edit form.
How to show additional fields in New, Edit and Display Form?
Hi Dinesh, Can you please detail what information you would like to see? There's some customization possible, but regarding those fields, there's not a lot. Cheers Manuel