Usually, we think of Power Automate as something that is triggered when something is changed or created, or even as a button that we press to automate a bunch of stuff. But were you aware that you can build a web service that other systems can use all around Microsoft Power Automate? All with little setup needed.
For this tutorial, we’ll build the following:
- A Flow that accepts a POST request with the ID and Name of a New Employee
- Flow saves the information to an Excel contained in a SharePoint. We’ll use the Excel as a “database,” but you can use an actual database to store the information.
It’s a simple example, but it demonstrates some of the essential concepts to get you experimenting.
Step 1 – Create an Excel in SharePoint
First, let’s add an excel file to a SharePoint instance of your choice and add the following fields:

We could add more, but it wouldn’t bring much more added value to the tutorial.
Note Please make it a table. To do so, select the columns and “Insert” > “Table.” You should see something like this:

Step 2 – Create a Power Automate
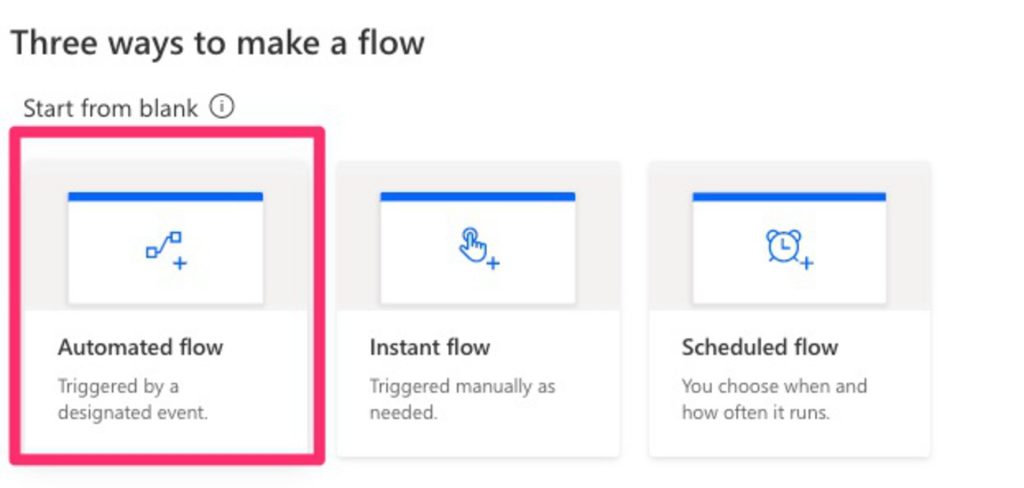
Create a new flow and select “Automated.”
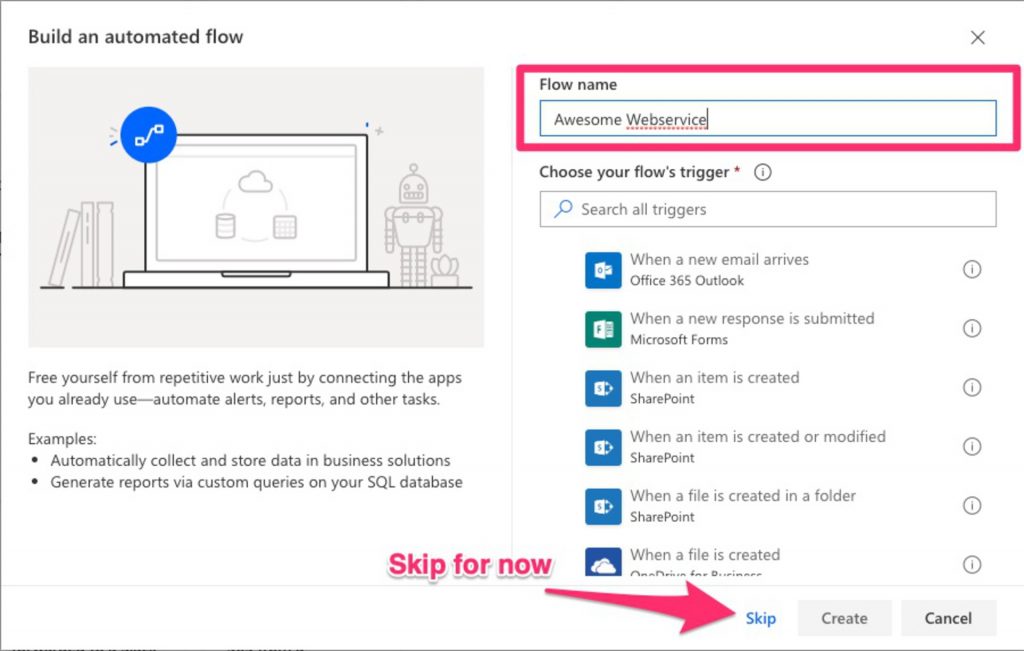
Give it a name. Let’s skip for now the trigger.
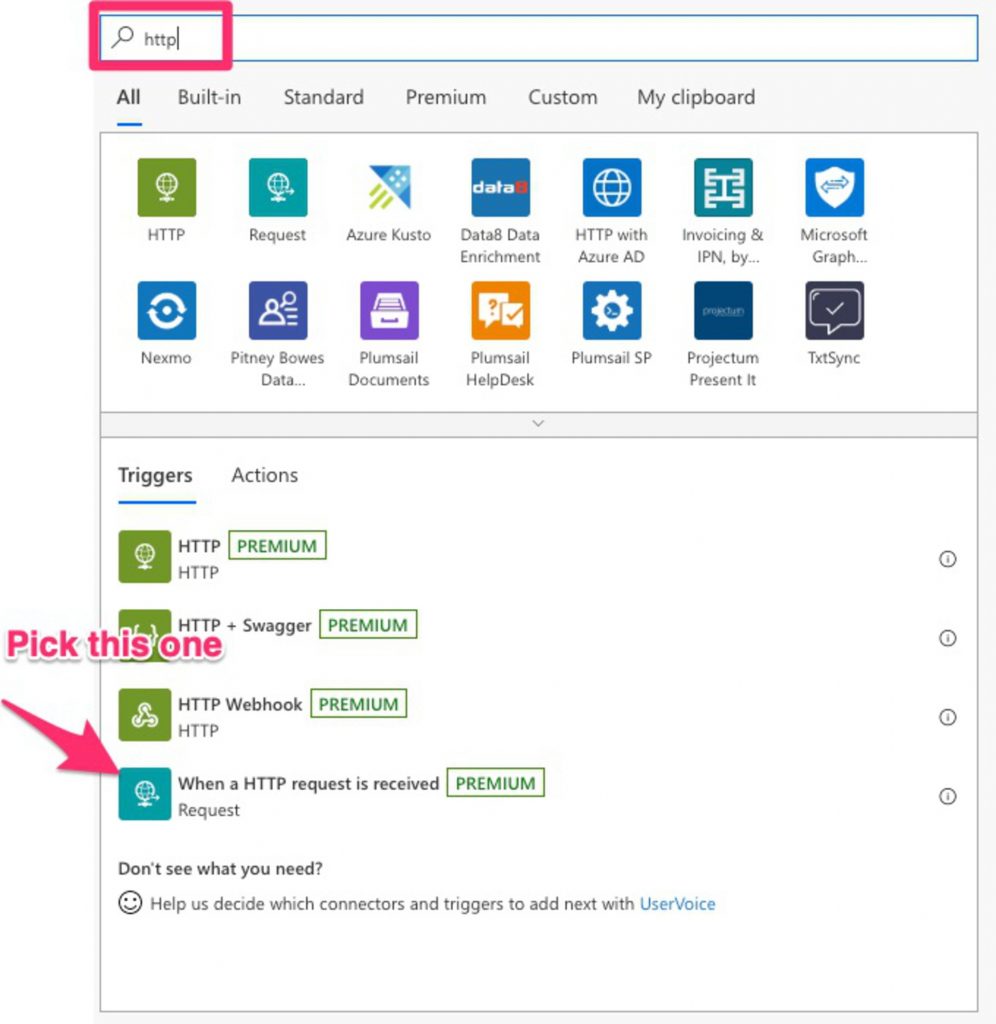
Once the flow is ready, let’s add the trigger to make it a web service. To do that, select “HTTP” and “When an HTTP request is received.”
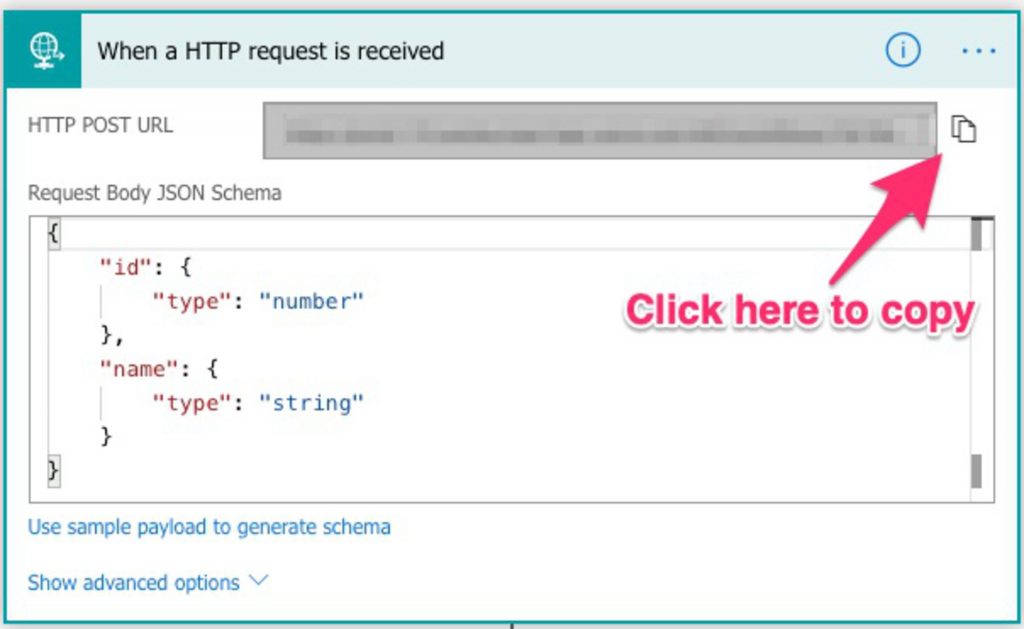
You’ll get something like this.
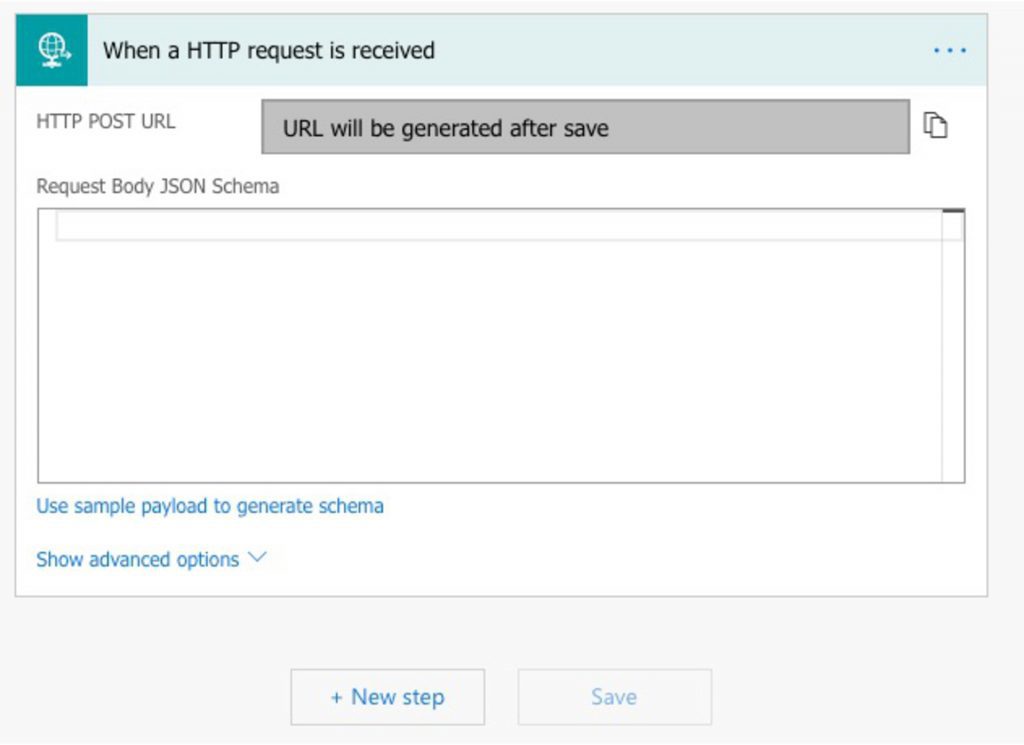
Let’s understand what’s happening here:
HTTP POST URL
After saving, you’ll get the URL that you will receive your POST Requests. They will contain information (in our case, the ID and Name of the employee), that will be defined next.
Request Body JSON Schema
The schema or the format that we’ll send the information. There are two things to understand here. The type of information should always be the same, so you cannot provide “ABC” in the “id” field. Also, the body should contain a JSON file, since it’s the defined protocol that Flow is expecting. For our example, here’s the schema:
{
    "type": "object",
    "properties": {
        "id": {
            "type": "integer"
        },
        "name": {
            "type": "string"
        }
    }
}
Quite visual and straightforward right? We want an “id” that is a “number” and a “name” that is a “string.”
(Optional but handy) Use sample payload to generate schema
If you have a sample of the JSON file, it’s good to use this option. You copy and paste it, and Flow generates the schema. JSON files can be very complicated, so having this created automatically is a blessing!
Now that we have the way to receive the data, we need to parse it. Add a new step “Parse JSON” (makes sense right?)
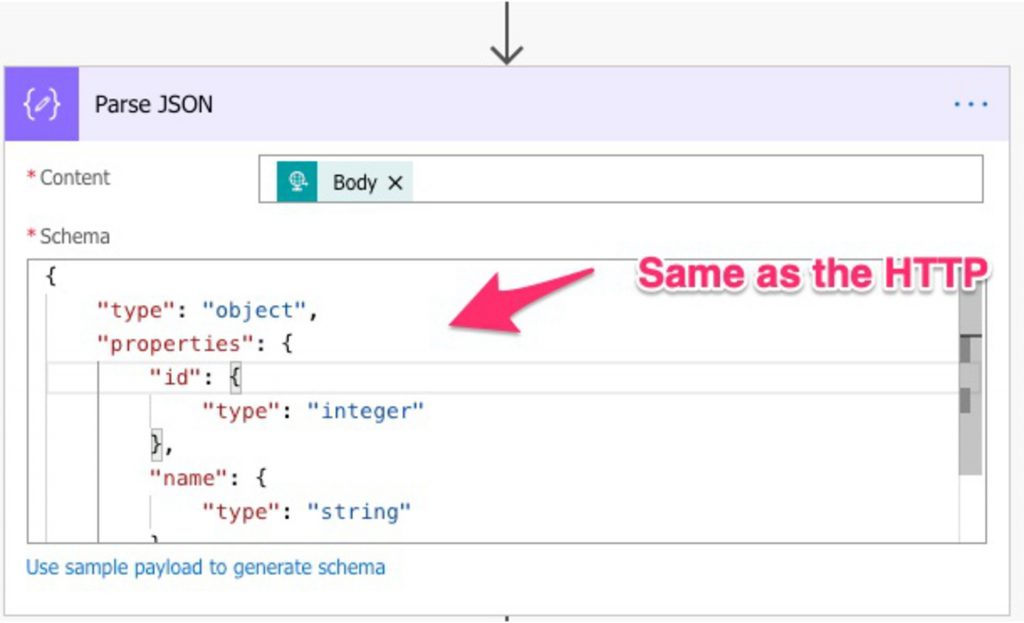
Now that we have the JSON parsed, we need to add the information to the Excel.
Step 3 – Save the information to the Excel
Add a final step ”Excel” and pick “Add row to a table.“ Fill in with the location of the excel that you created in step 1. You should get something like this:
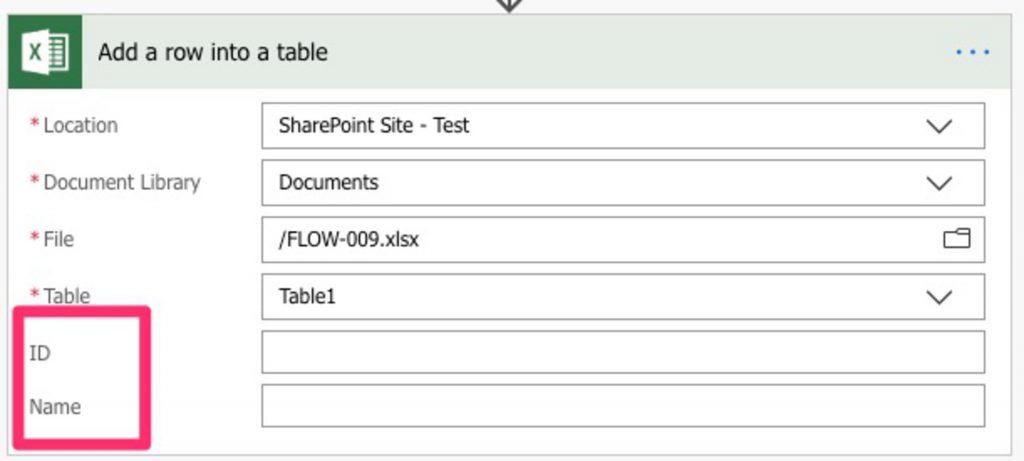
Notice that the two fields? Look familiar? Flow analyses the Excel and extracts the fields; in this case, the ones that we created before. Let’s add the values from the “Parse JSON” step before:
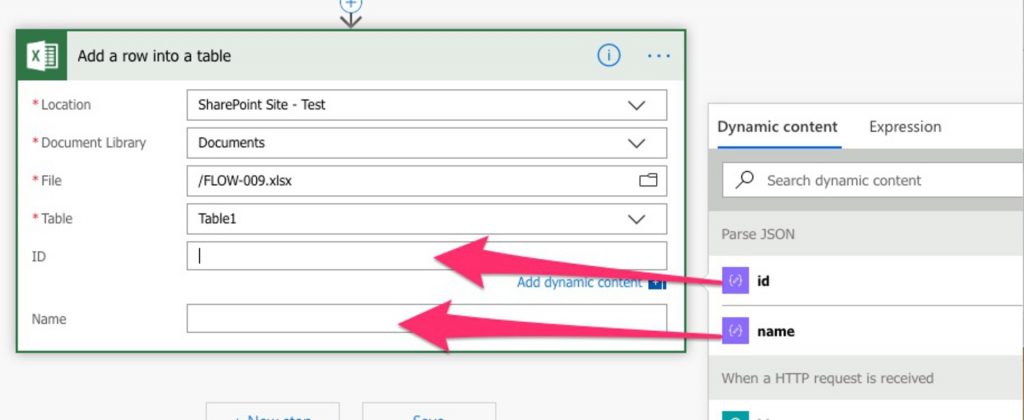
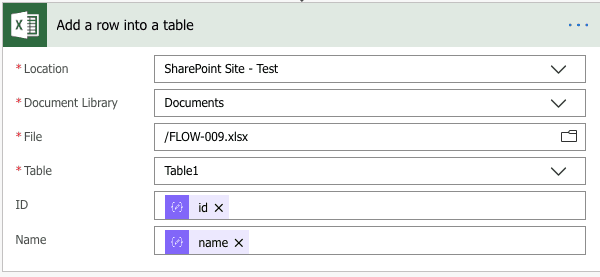
You should see something like this:
Testing the whole process
When you press save, the URL Flow creates the final URL. We’ll use it in a bit.
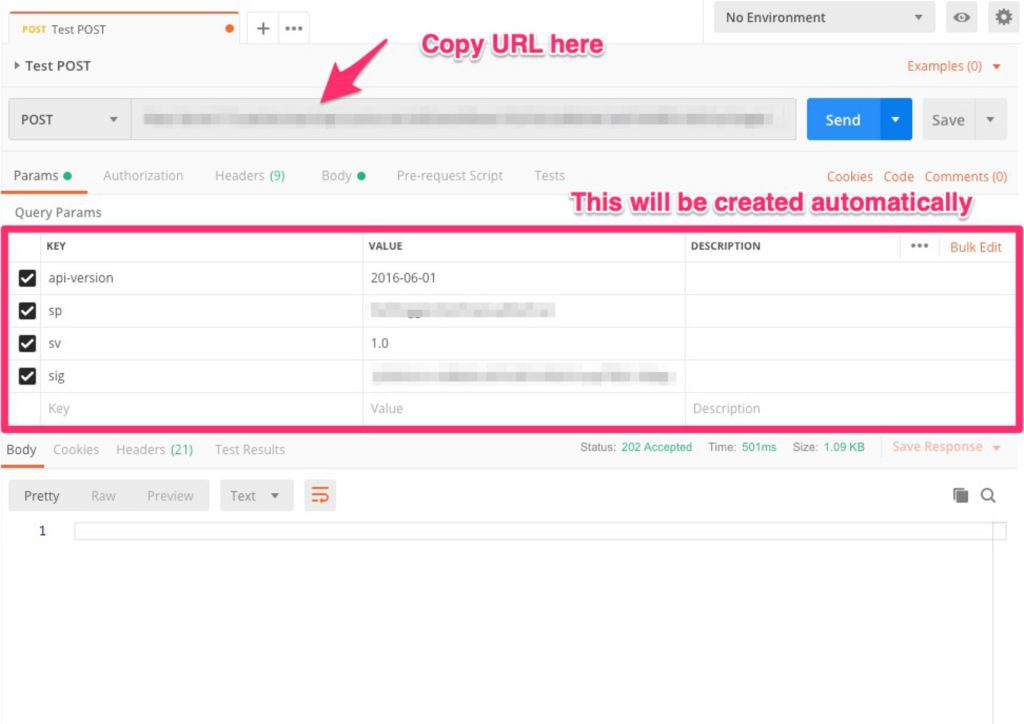
There are a lot of tools that you can use to test. I recommend using postman because it’s free, and it’s quite easy and straightforward to use.
Here’s what it looks like when I copy the URL to postman :
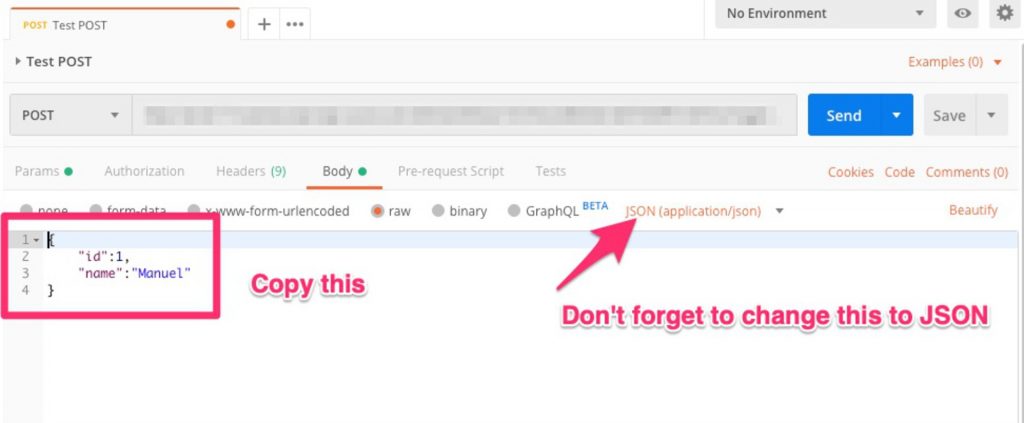
Copy the JSON to the body. It will contain the data that you want to save.
Press send and don’t worry if nothing happens. We didn’t add any step for a reply, so we’re not expecting any. You can quickly check if all went according to plan in the Power Automate’s history and the Excel file.
On the Flow side, all looks ok.

Let’s check the Excel:

Awesome! The data is there.
Now what?
You can create a lot with this. If you’re not a developer, you can build a web service that automates tasks without having to code anything and provide it to your developers to integrate into other applications. APIs are the backbone of the internet, so having something created for you so quickly is quite a powerful tool for you to have and explore.
Have a suggestion of your own or disagree with something I said? Leave a comment or interact on Twitter and be sure to check out my articles on SharePoint, Power Automate, or problem solved tutorials.
Featured Image by Rodion Kutsaev on Unsplash


Hi Manuel,
I think I found my response in your tutorial, but I can’t use it because I don’t have the Premuim version… 🙁
Thank you for your explanation.
Hi Miguel,
Oh no!!! But wait. You only need the premium version for the “Return” element. You can replicate the whole Power Automate in your own Power Automate and it will work. You can’t re-use it, but at least you would have the solution..
Try to import the template and add the actions you need and you’ll be good to go :).
Please reach out if you have issues in building your Power Automate
Cheers
Manuel