There are many available fields in DevOps, some of them are hidden but available for us to use in a few simple clicks. I stress in almost all articles that it all boils down to the process itself, so let’s explore some ideas on how to have custom fields in your project.
How to do it?
DevOps provides a clean UI that makes adding them super simple.
Create new ones
When you create a new custom field, it becomes available in your instance. This is important because if you want to use it in another schema, you can and should. Consistency is key so use your custom fields the same way as all the others and re-use them as most as possible.
Here’s how to create a new field. First, select “Organization Settings” on the bottom corner of your app.

Then select “Process.”

Select the process that you’re using:
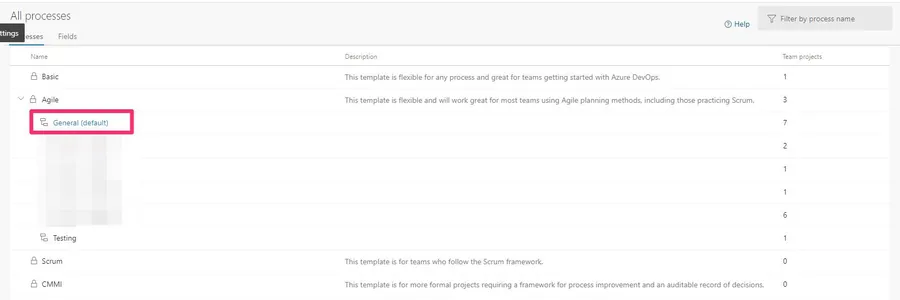
Then the type of “work item.”

Press “new field.”

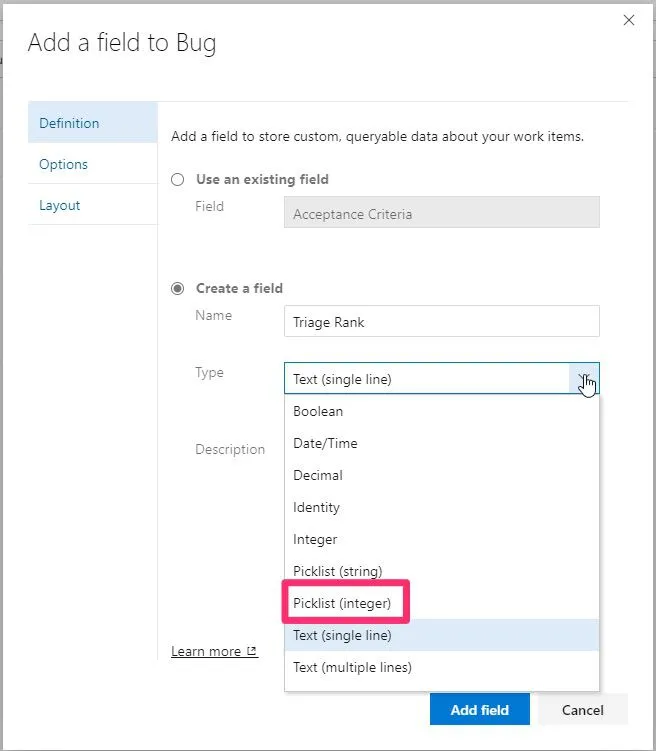
Fill in the information.

In our case, let’s do a dropdown with numeric values to pick the priority in the triage.
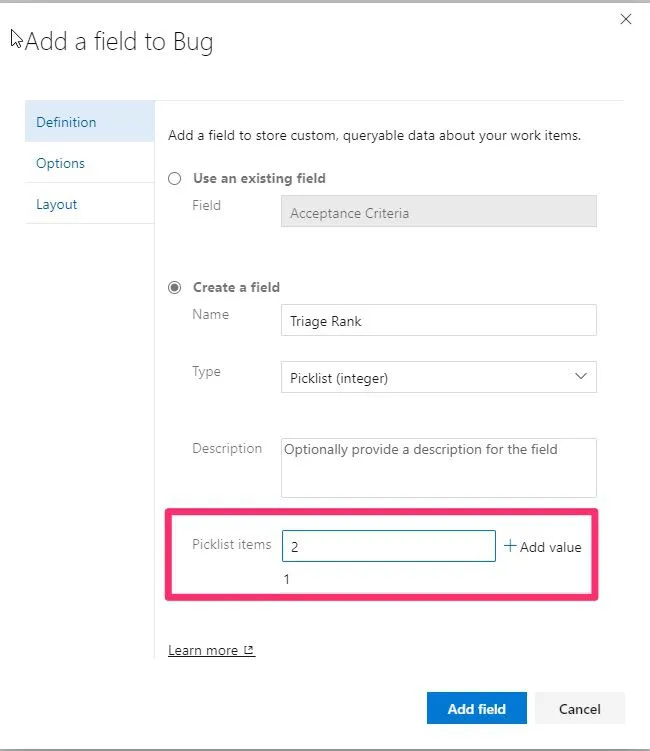
Finally, add the values that you want in the “picklist.”
Here’s what it looks like for the complete items in the “Triage.”
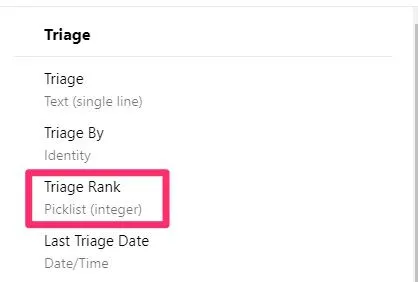
Repeat the steps to add additional custom fields.
Use the existing
DevOps provides a lot of fields to start from. Please check the list before adding new ones so as not to duplicate work. Personally, I would not edit the fields, but you can. If they don’t fit 100% my needs, I will create a new one. This is because:
- People expect the fields to have certain information, for example, if they were used "as is" in another company. I think of these as “standards” defined by Microsoft, but again, you can change them if it makes sense for your organization.
- Migrations become harder. If you need to migrate the tickets to another instance, you need to apply the custom changes to the default fields. This makes things tricky if you don’t make all the changes or make a mistake. By having separate fields, you’re sure that the “default” ones are consistent between instances.
- Suppose you want to perform queries between projects. If you change a custom field for only one project, then you can’t use that field to aggregate information from all projects. Unless, of course, you do the same change in all projects or use the same schema for all of them. But this increases the chances of issues.
Here’s how to use existing fields. First, select “Organization Settings” on the bottom corner of your app.

Then select “Process.”

Select the process that you’re using:

Then the type of “work item.”

Select from the list the field you want to use:
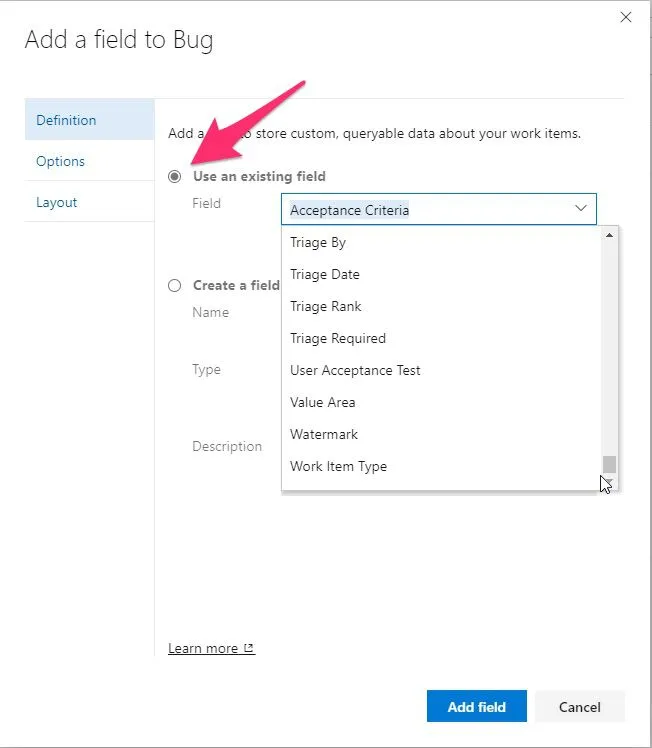
As you can see in the list, you have already listed the custom fields that you created before.
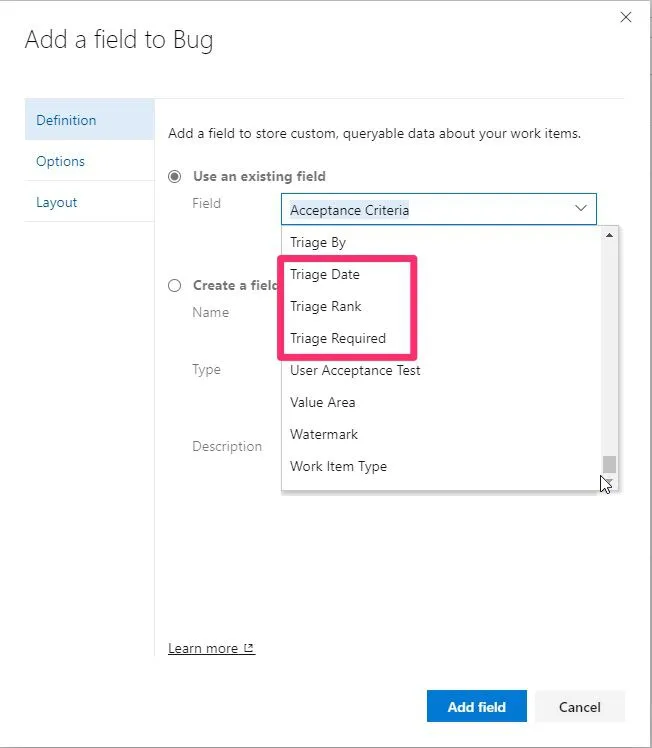
Why do I need custom values?
The reason is simple. There’s a field (or multiple) that you can’t find on DevOps that you need to fit the team’s strategy. Like we’ve seen before, there are many available fields, but let’s look at some examples of how to use them.
Triage
For high traffic instances where many tickets are being submitted, it’s important to do some triage. Think of this as a hospital. If you use a “first-in, first-out” approach, you’ll have people with a scratch being seen by doctors before other people with real emergencies. That’s why hospitals have triage, and that’s why you should also have one. Regardless of your team's strategy, like Kanban or Scrum, the strategy is the same. To have someone in the team that quickly looks at the incoming tickets and makes a quick classification. This classification is different than the person who submits it. It could be urgent, but for the team that has a global view of the platform, it can be something quite trivial compared to other topics.
Reporting
If you’re building a report based on the tickets that were solved, it’s possible that you:
- I don’t want to show the description. When people submit tickets, there’s not much care in the way things are written, so it’s not the ideal field for a report.
- You may want to exclude some. Some actions may not make sense to include in a report, like maintenance actions, team actions (that are created in retrospectives, for example), or tasks that are not in the team's scope that will receive the report.
- Include another type of segmentation. For example, you have the “Area Path” that shows the segmentation of the ticket, but this may be too technical. Having 4 to 5 areas to pick from will make the report nicer and much more readable.
You can use user Power BI or any other reporting tool to achieve this.
Filtering
Another cool feature with custom values is that you can build queries based on those fields. For example, using the “Triage Rank”:

You can use these alongside the default fields and build queries that will help you parse the data even more efficiently.
Final thoughts
Having a solid strategy to parse tickets is key in a well-run team, and that’s why I want to show you how to add custom fields. These are not essential for your team to work, but they may be useful if you want to perform actions that would not be possible before. Don’t go overboard and customize DevOps to the finite detail, but use custom fields to make your life easier.
Finally, don’t forget that you can use Power Automate to help you automate based on the information in the custom fields.
Photo by Michael Dziedzic on Unsplash


No comments yet
Be the first to share your thoughts on this article!