
Arrays are everywhere in Power Automate, and most of the time, we don't need everything inside them. The "Filter Array" action lets us take an array and keep only the items that match a condition we define. We will go deeper into recommendations and how to use it but if you have to take anything from the article is that if you've been using "Apply to each" loops with conditions inside to pick specific items, the "Filter Array" action is a much cleaner and faster alternative, making your flow, depending on the number of items, from a little to multiple times faster.
But we're getting ahead of ourselves. Let's start with the basics.
Where to find it?
You can find it in the "Built-in" actions under "Data Operations" but as always it's best to search for it.
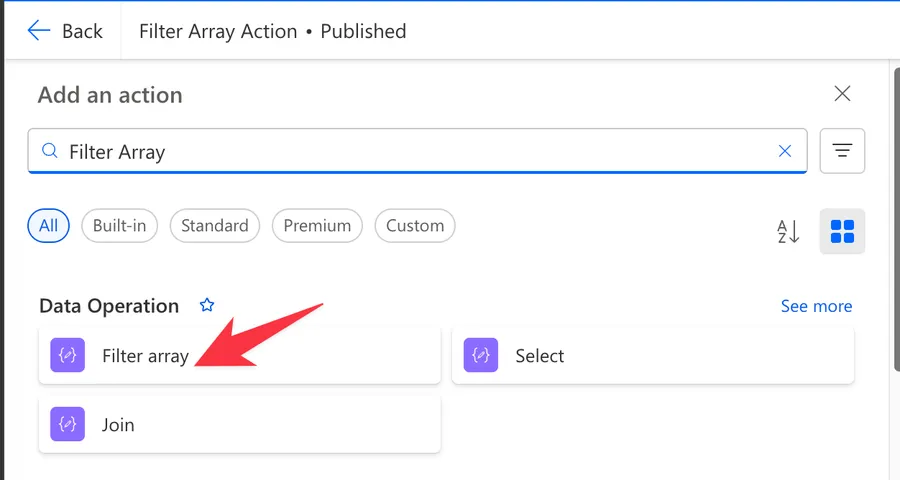
Here's what it looks like.
Power Automate tends to save the most common actions in the main screen, so check there before going through the full hierarchy. Also, you can use the search to find it quickly.
Now that we know how to find it, let's understand how to use it.
Usage
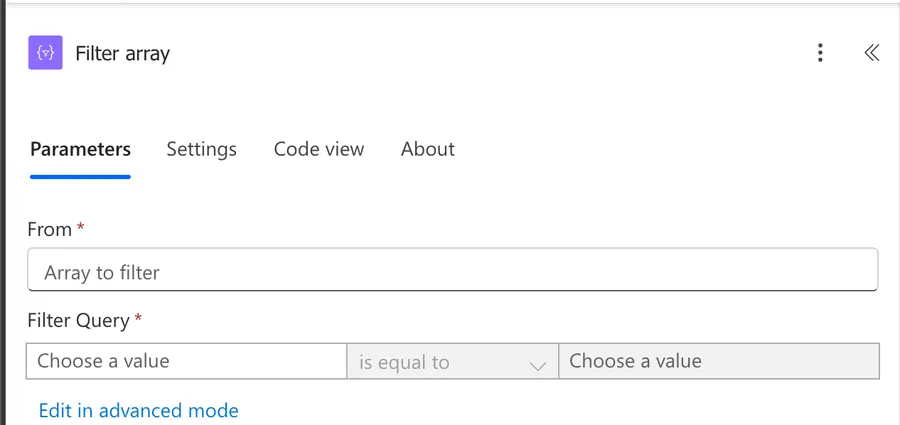
The "Filter Array" action has two main parts: the source array and the filter condition. Let's go through each one.
From
The "From" field is where we define the array we want to filter. This can be:
- The output of a previous action, like a SharePoint "Get Items" action or an HTTP request
- An array variable
- The output of a "Compose" action
Essentially, anything that gives us a valid JSON array works here.
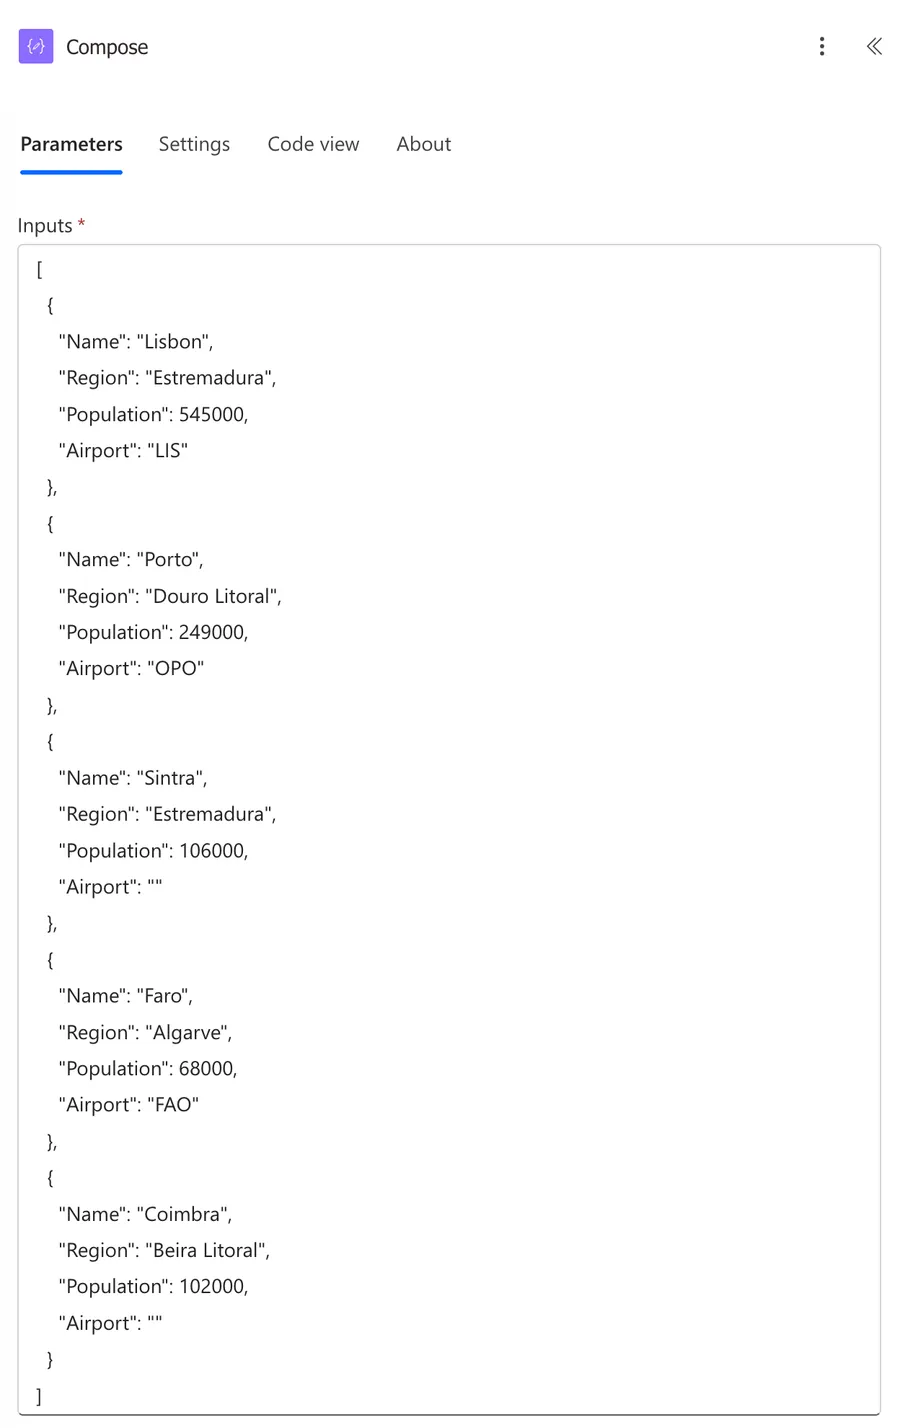
For this article, let's use the following sample array in a "Compose" action so we can see the "Filter Array" in action throughout:
[
  {
    "Name": "Lisbon",
    "Region": "Estremadura",
    "Population": 545000,
    "Airport": "LIS"
  },
  {
    "Name": "Porto",
    "Region": "Douro Litoral",
    "Population": 249000,
    "Airport": "OPO"
  },
  {
    "Name": "Sintra",
    "Region": "Estremadura",
    "Population": 106000,
    "Airport": ""
  },
  {
    "Name": "Faro",
    "Region": "Algarve",
    "Population": 68000,
    "Airport": "FAO"
  },
  {
    "Name": "Coimbra",
    "Region": "Beira Litoral",
    "Population": 102000,
    "Airport": ""
  }
]
You don't need a "createArray" function, you can just drop the array there.
Filter Query - Basic Mode
By default, the "Filter Array" action opens in basic mode. This gives us a visual condition builder with three parts:
- Left side: Select the property from each array item to evaluate
- Middle: Pick a comparison operator from the dropdown
- Right side: Enter the value to compare against
The available operators in basic mode are:
- is equal to / is not equal to
- is greater than / is greater than or equal to
- is less than / is less than or equal to
- contains / does not contain
- starts with / does not start with
- ends with / does not end with
Using our sample array, let's try a simple filter in basic mode: filter where Region is equal to Estremadura.
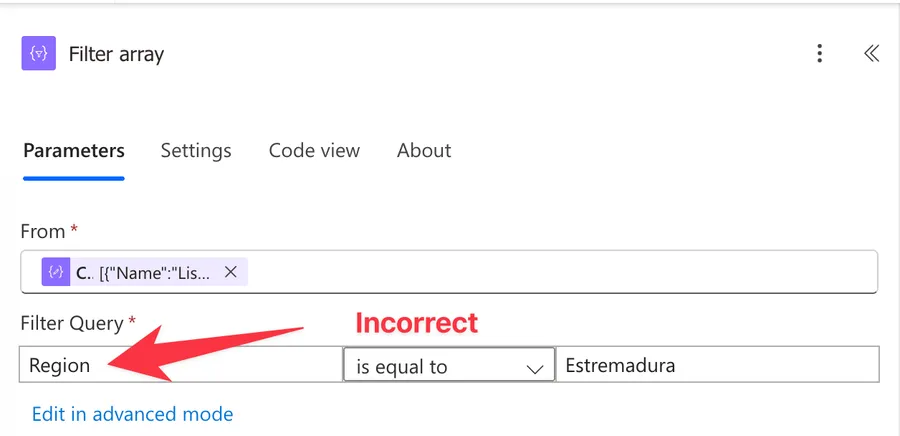
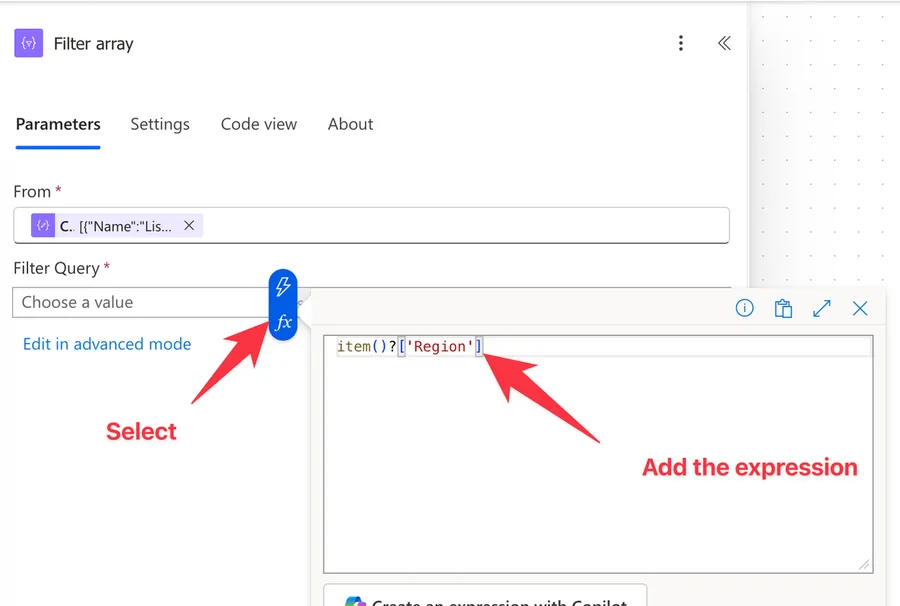
If we run this, it will run but won't return anything. This is because we can't include the value that we want to search and need to use the "item" function that references the item that we want to filter. This is important because we have multiple items and the filter array action needs a way to know what element in the array we want to filter. So the correct way to filter would be:
item()?['Region']
You can pick the element from the list if you have a "Parse Json" action before for example or an action that defines its output like a SharePoint "Get Items" action for example. In the case above we have the output of the compose and no schema defined so we need to build the expression ourselves.
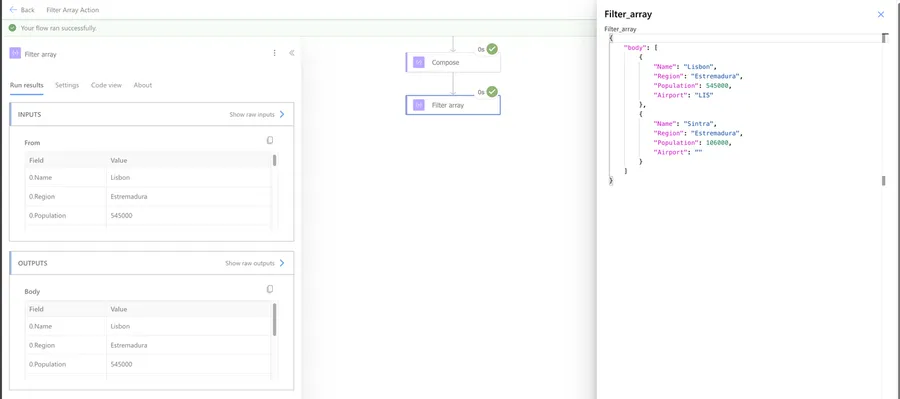
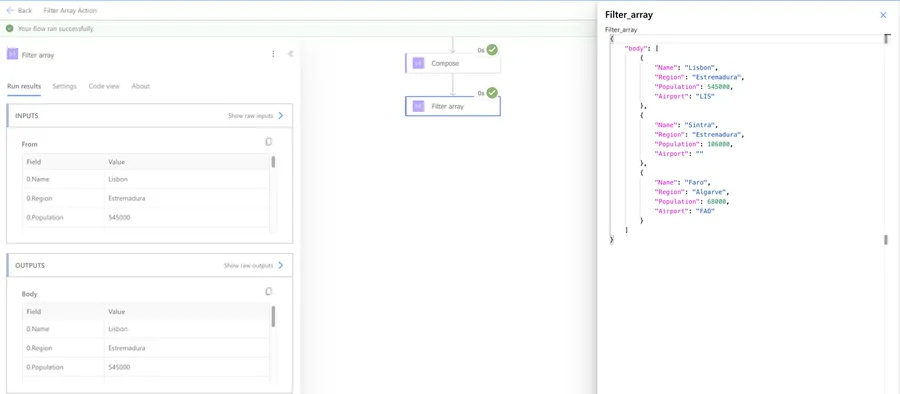
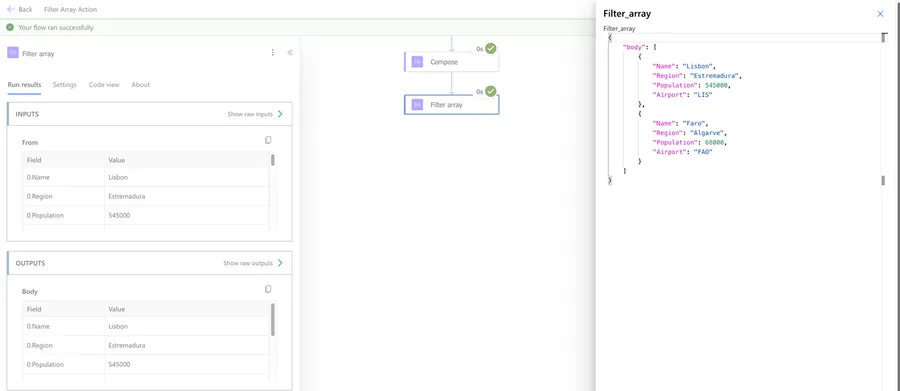
The result gives us only Lisbon and Sintra since they are the only cities in the Estremadura region:
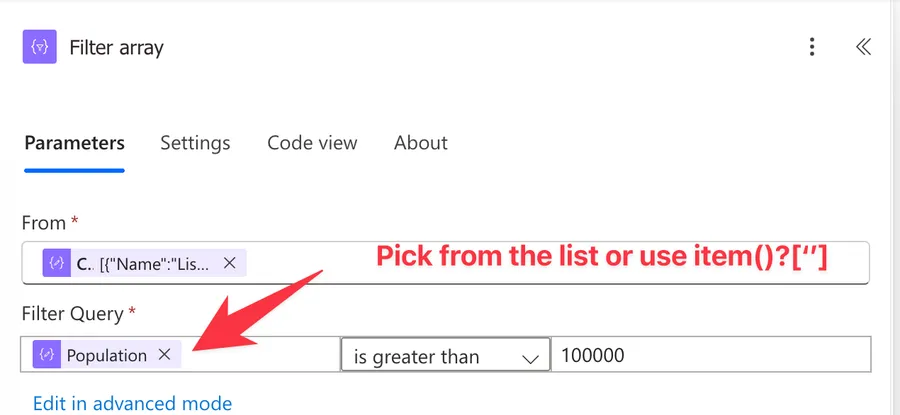
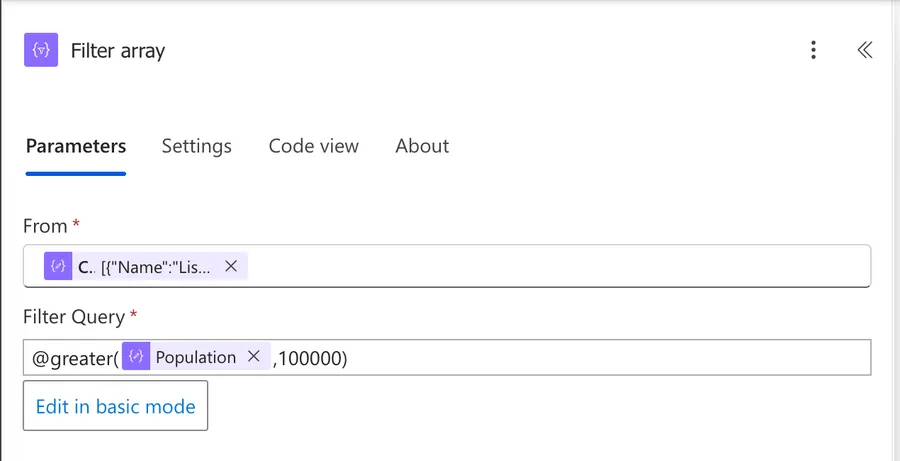
Now let's try filtering where Population is greater than 100000.
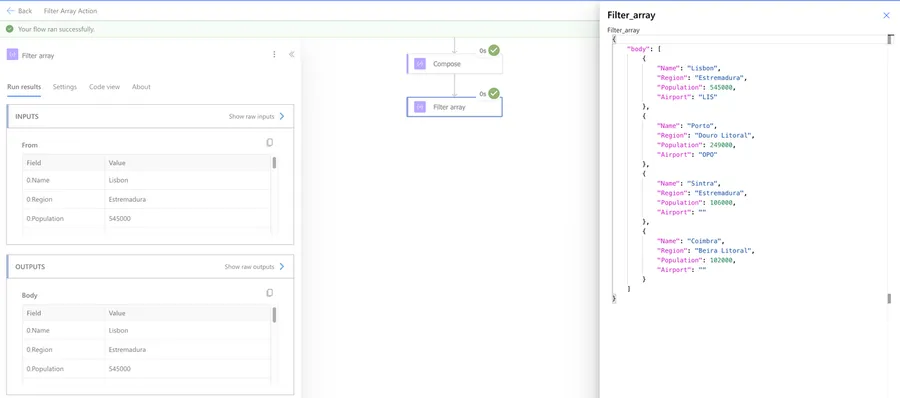
This time we get Lisbon (545000), Porto (249000), Sintra (106000), and Coimbra (102000) - everything except Faro:
Basic mode is perfect for simple, single-condition filters like these. But here's the catch: basic mode only supports one condition. If we need to combine conditions with AND or OR logic, we need to switch to advanced mode.
Filter Query - Advanced Mode
To switch to advanced mode, click "Edit in advanced mode" inside the action. If you already have a "simple" expression it will convert it to an advanced mode expression.
In advanced mode, we write the filter condition as an expression. The key thing to know is that we use item() to reference the current array item being evaluated. To access a property on that item, we use bracket notation: item()?['PropertyName'], like we did before.
Let's use our sample array to go through some common patterns, but they will look quite familiar, since these are basically expressions that we can build in any other place in Power Automate.
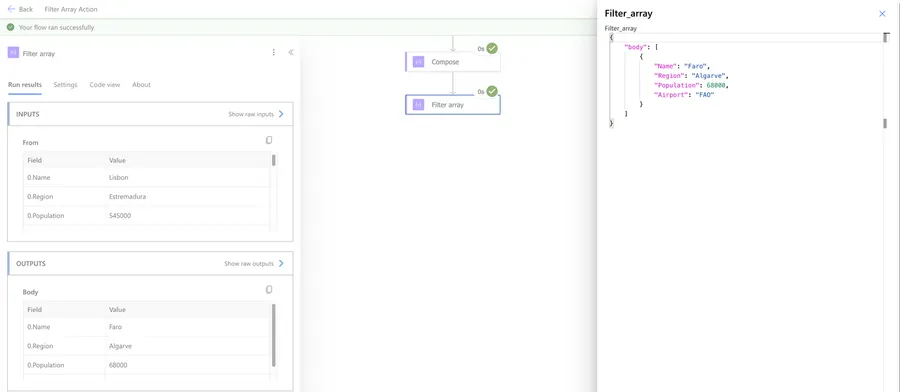
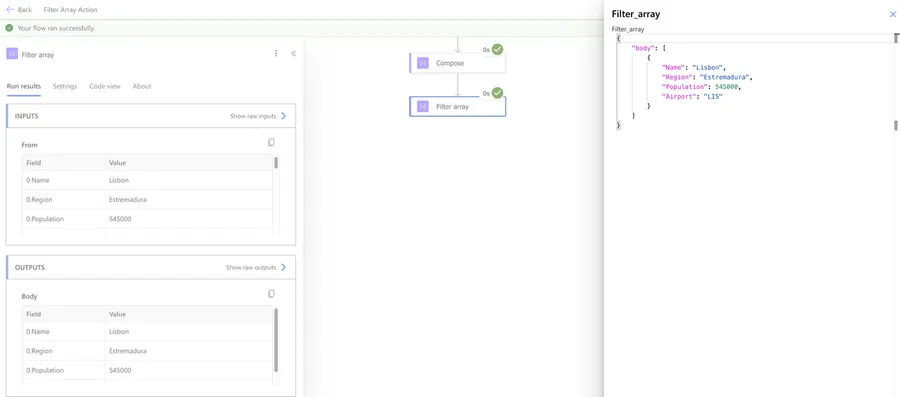
Single condition - cities in the Algarve region:
@equals(item()?['Region'], 'Algarve')
This returns only Faro.
Multiple conditions with AND - cities with an airport and population over 100000:
@and(not(empty(item()?['Airport'])), greater(item()?['Population'], 100000))
This returns Lisbon (545000, LIS) and Porto (249000, OPO). Faro has an airport but its population is only 68000, so it doesn't match. Sintra and Coimbra have populations over 100000 but no airport.
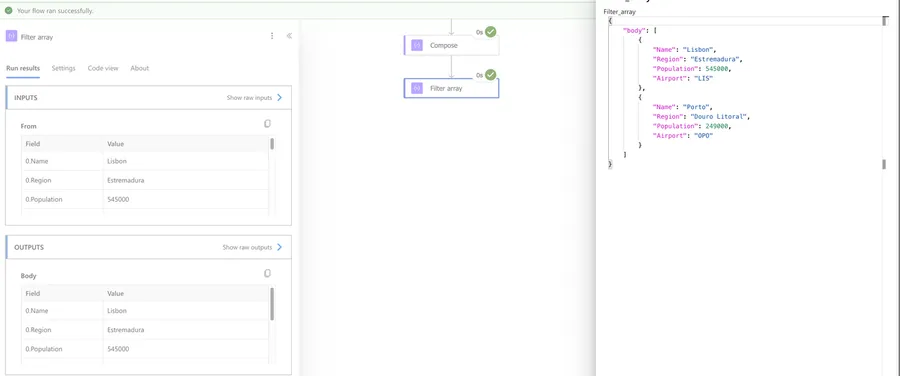
Multiple conditions with OR - cities in Estremadura or Algarve:
@or(equals(item()?['Region'], 'Estremadura'), equals(item()?['Region'], 'Algarve'))
This returns Lisbon, Sintra, and Faro.
Combining AND and OR - cities in Estremadura or Algarve that have an airport:
@and(or(equals(item()?['Region'], 'Estremadura'), equals(item()?['Region'], 'Algarve')), not(empty(item()?['Airport'])))
This returns Lisbon (LIS) and Faro (FAO). Sintra is in Estremadura but has no airport, so it's excluded.
Notice that the "and" and "or" functions accept more than two arguments, so we can chain multiple conditions directly:
@and(equals(item()?['Region'], 'Estremadura'), greater(item()?['Population'], 200000), not(empty(item()?['Airport'])))
This returns only Lisbon - the only city in Estremadura with a population over 200000 and an airport.
If you want to dive deeper into combining conditions, I have a dedicated article on multiple conditions in "Filter Array" that covers this in detail.
Working with the output
The "Filter Array" action returns a new array containing only the items that matched our condition. The items keep their original structure - the action doesn't change the shape of the objects, just removes the ones that don't match.
To use the filtered results, we can:
- Add an "Apply to each" after it and select the "Body" output
- Access the first item directly with the "first" function:
first(body('Filter_array')) - Get a specific item by index:
body('Filter_array')[0]?['Name'] - Check how many items matched with the "length" function:
length(body('Filter_array'))
It's always good practice to check if we got any results before trying to use them. We can do this with a condition:
length(body('Filter_array'))
If the value is greater than 0, we have results. If no items match the filter, the output is simply an empty array - it won't throw an error.
Non-intuitive behaviors
Dynamic content disappears after filtering
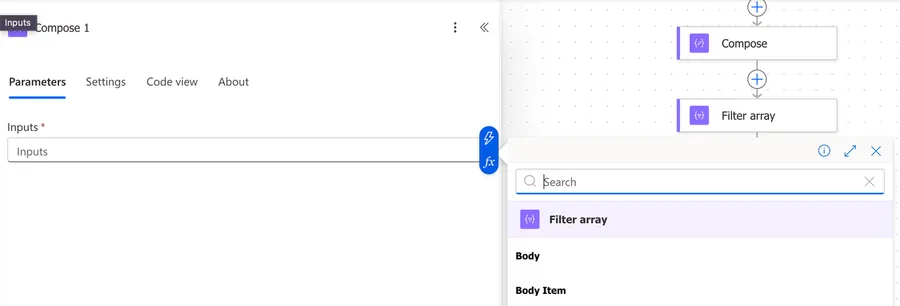
This one catches a lot of people. After the "Filter Array" action, when we try to use its output in subsequent actions, the dynamic content panel only shows "Body" and "Item."
This happens even if the thing that we're filtering has a defined schema like a SharePoint "Get Items" action for example:
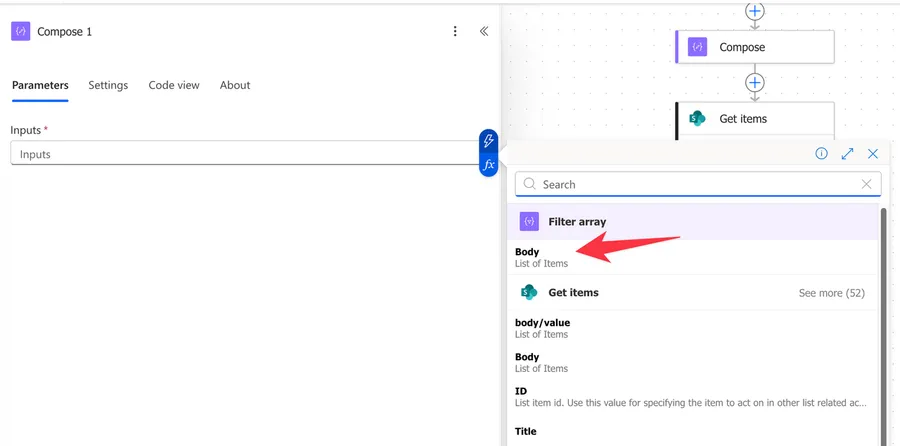
This happens because Power Automate loses the schema of the original array after filtering. The fix is to add a "Parse JSON" action right after the "Filter Array." Use the "Body" output as the content and generate the schema from a sample of the original data. After that, all the property-level dynamic content comes back.
All text comparisons are case-sensitive
Unlike OData filter queries in actions like SharePoint "Get Items" (which are case-insensitive by default), the "Filter Array" action treats all text comparisons as case-sensitive. So equals(item()?['City'], 'new york') will not match "New York."
To work around this, wrap the value in the "toLower" function or the "toUpper" function:
@equals(toLower(item()?['City']), 'new york')
The null string trap
When working in basic mode and we need to check for null values, we might be tempted to type the word "null" in the value field. But Power Automate will treat that as the literal string "null," not an actual null value. To properly check for null, we need to switch to advanced mode and use the null keyword in an expression:
@not(equals(item()?['FieldName'], null))
Or use the "empty" function:
@not(empty(item()?['FieldName']))
Property names are case-sensitive too
When using item()?['PropertyName'] in advanced mode, the property name inside the brackets must match exactly, including case. item()?['status'] and item()?['Status'] are two different things. If the property name doesn't match, the expression returns null instead of throwing an error, which can make this tricky to debug.
Limitations
Single condition in basic mode
Basic mode only supports one condition. For any AND/OR logic, we must switch to advanced mode and write the expression manually.
Cannot reshape the data
The "Filter Array" action only includes or excludes items. It cannot add, remove, or rename properties on the objects. If we need to change the shape of the data, we should use the "Select" action for that.
No nested array filtering
The action works on the top-level array only. If we have an array of objects that contain nested arrays, the "Filter Array" action cannot filter within those nested arrays. For that scenario, we need to combine it with "Apply to each" loops.
SharePoint Choice and Lookup columns need extra access
For SharePoint Choice columns, we can't just reference item()?['Status'] directly. We need to go one level deeper to get the actual value: item()?['Status']?['Value']. The same applies to Lookup columns. This catches a lot of people when they first try to filter SharePoint data.
Troubleshooting Common Errors
InvalidTemplate error
This error usually means there's a syntax issue in the advanced mode expression. Common causes:
- Missing or extra parentheses
- Forgetting the
@at the beginning of the expression - Using a property name that doesn't match the actual data
- Adding
@before each function inside the expression (only one@at the very beginning)
Double-check the expression carefully, paying attention to every parenthesis and comma.
Type mismatch errors
This happens when comparing values of different types - for example, comparing a string to a number. Some data sources (like Excel) store numbers as strings, so we may need to convert them first:
@greater(int(item()?['Amount']), 100)
Use the "int" function for integers, the "float" function for decimal numbers, or the "string" function to convert a number to text.
Wrong output reference
There's a known issue where selecting the "Filter Array" output from dynamic content sometimes inserts outputs('Filter_array')['body/value'], which doesn't exist. The correct reference is body('Filter_array') or outputs('Filter_array')['body']. If things aren't working after the "Filter Array," check the expression and fix it manually.
Recommendations
Here are some things to keep in mind.
Filter at the source when possible
The "Filter Array" action processes data that is already inside our Flow. This means all the data has already been downloaded. If we're working with SharePoint, SQL, or any connector that supports server-side filtering (like OData filter queries), we should always filter there first. Use the "Filter Array" action for additional filtering that the source doesn't support, or when working with data from variables and Compose actions.
Use Parse JSON after filtering
Since the dynamic content disappears after "Filter Array," it's a good idea to add a "Parse JSON" action right after it. This restores all the property-level dynamic content and makes the rest of the Flow much easier to build.
Always check for empty results
Before processing the filtered results, add a condition that checks length(body('Filter_array')) to make sure we got at least one result. This prevents errors downstream when trying to access items from an empty array.
Name it correctly
The name is super important in this case since we may have multiple "Filter Array" actions in a single Flow. Always build the name so that other people can understand what we're filtering and why without opening the action and checking the details. For example, "Filter Array - Active customers with email" is much better than just "Filter Array."
Always add a comment
Adding a comment will also help avoid mistakes. Indicate what conditions we're filtering on and why. If the advanced mode expression is complex, explain it in the comment. It's essential to enable faster debugging when something goes wrong.
Always deal with errors
Have your Flow fail graciously and notify someone that something failed. It's horrible to have failing Flows in Power Automate since they may go unnoticed for a while or generate even worse errors. I have a template that you can use to help you make your Flow resistant to issues. You can check all details here.
Final Thoughts
The "Filter Array" action is one of those actions that, once we start using it, we wonder how we ever managed without it. It's cleaner and faster than looping through items with conditions, and it handles most filtering scenarios with ease. Just keep in mind the case sensitivity, the disappearing dynamic content, and always filter at the source when possible. With these points covered, it becomes an incredibly reliable part of any Flow.
Back to the Power Automate Action Reference.


No comments yet
Be the first to share your thoughts on this article!