I wrote a couple of articles in the past on how to deal with Microsoft Planner tasks. You can find them at "Update task details" or the "Create a task" action. But today, let's get them all together and use this community question as an example. They want to add attachments to Microsoft Planner from a Microsoft Teams channel.
It's a fun challenge, so let's build a template to do this.
Add Attachments to Microsoft Planner from Teams
When we receive a new message in Microsoft Teams, we'll add all attachments to a Microsoft Planner.
As always, you can now download the template and play around or follow the explanation below. Here's what the template looks like:

So let's start with the trigger. We'll use the "When a new channel message is added" trigger to watch a Microsoft Team's channel for new messages. When the messages arrive, we'll do two things:
- First, parse the HTML and then add the task.
- Check if there are attachments and then add them to the task
Let's break it down into two Scope actions, one to parse the message and the other to parse the attachments.
Parse the message
The title and the description (or notes) only accept text, but since Microsoft Teams returns the message in HTML, we need to parse it. Fortunately, Power Automate provides us with the HTML to Text action that does all the work for us.

It will provide us with a clean text, but now you have a decision to make. Will the message be the title or the description of the task? If you want the task to be in the title, you must validate if the text is not greater than 255 characters. If you want the text as the description, you need to find a default title for your task, but it can always be the same if you wish.
So before you can assign it to the title, we need a "Compose" action with a "substring" function. One could think that doing the following is enough:
substring(outputs('Html_to_text')?['body'],0,255)
But if the string is lower than 255 characters, you'll get the following error:
The length of substring can't be longer than '31' which is the length of the source string.
So we need a bit more validation. If the converted HTML text is lower than 255 characters, then we'll use the string "as-is." Otherwise, we'll do the subscript to restrict it to 255 characters. Notice the wording and now let's look at how to build the formula:
if(lessOrEquals(length(outputs('Html_to_text')?['body']),255),outputs('Html_to_text')?['body'],substring(outputs('Html_to_text')?['body'],0,255))
If you think about the language before and compare it with the formula above is quite similar. Let's break it down:
- We'll use the if function to check if we have or not 255 characters
- The lessOrEquals function will make the comparison
- The length function will get the number of characters in the string
- The "substring" function will return a string that is exactly 255 characters.
OK, now that we have what we need, let's create the task.
Create the task
I'll go with the option of using the message as the title and adding the whole message in the description. To do that, let's use the "Create a task" action to create our task with the value that we limited in the previous action.
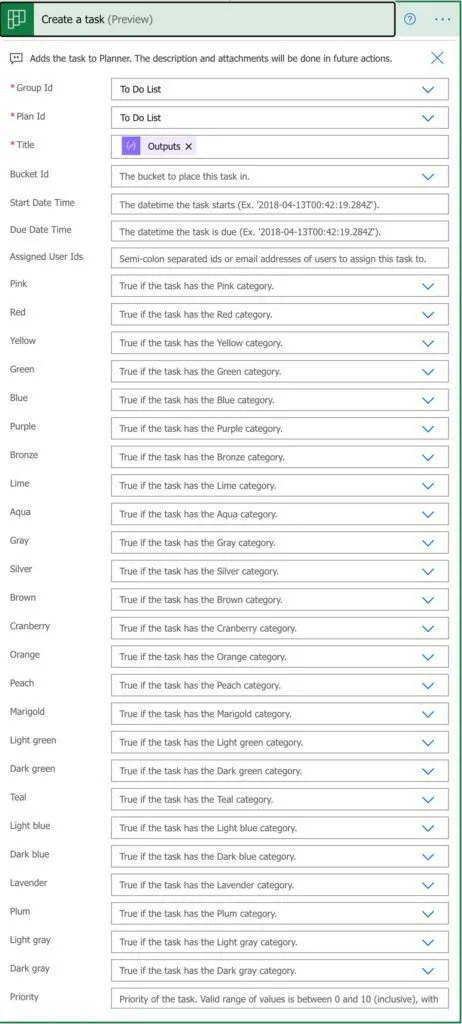
This is also the time to define any bucket or tag. Notice that we don't have a place to include the description. We need the "Update task details" action to do that, but this is also the action that we'll use for the attachments, so we'll use it later.
Create the attachments
Now that we have the task created, let's add the description and the attachments. To do that, as mentioned before, we'll use a separate Scope action to parse the attachments.
So let's add some random data and see what kind of data and structure we need.
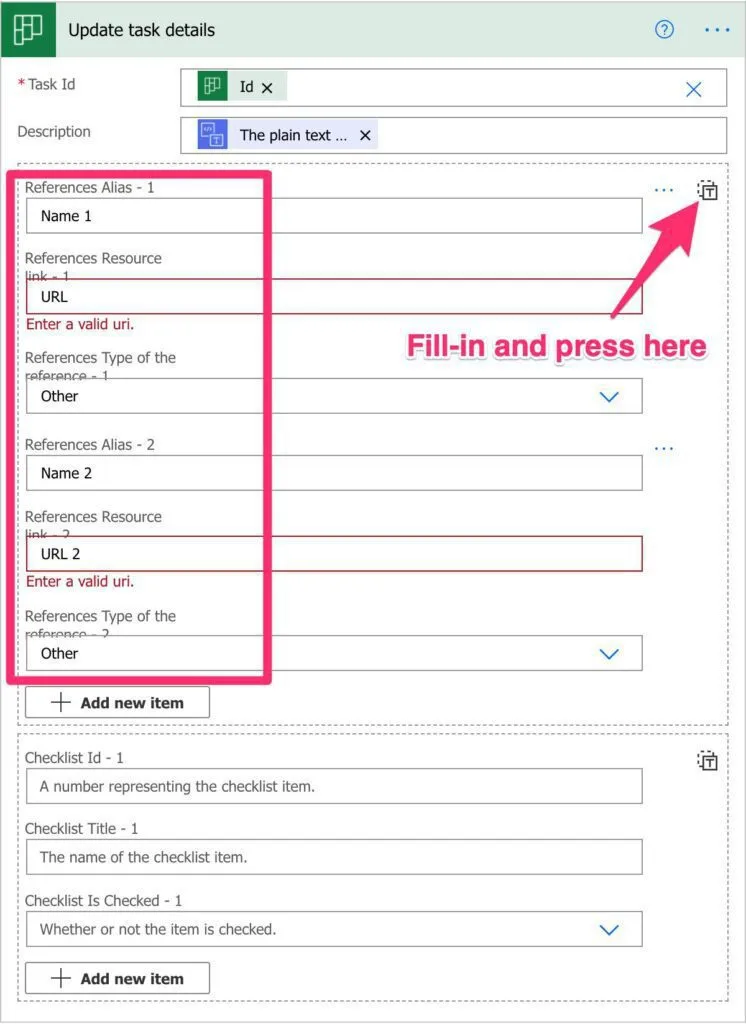
Don't worry about the data. We'll remove it in a bit, but I want to show you how to get a structure when you don't know how to do it.

So we need something like this:
[
  {
    "alias": "Name 1",
    "resourceLink": "URL",
    "type": "Other"
  },
  {
    "alias": "Name 2",
    "resourceLink": "URL 2",
    "type": "Other"
  }
]
We can store them in an array variable and then use the join function to generate the string above. So let's break it down to an element:
{
    "alias": "Name 1",
    "resourceLink": "URL",
    "type": "Other"
}
For the sake of simplicity, the first element and the last will always be the same. Since the attachments can be any type, we can add them as "Other," and all will work. Also, we can name them all the same not to make the Flow more complex than it needs to be. So we need a string like this:
{"alias": "Name 1","resourceLink": "<INSERT URL HERE>","type": "Other"}
Let's do the process then:
- Add to the array all attachments
- Generate the final string
- Use the "Update task details" action to add the description and the attachments.
Add all the attachments
Let's put it all together
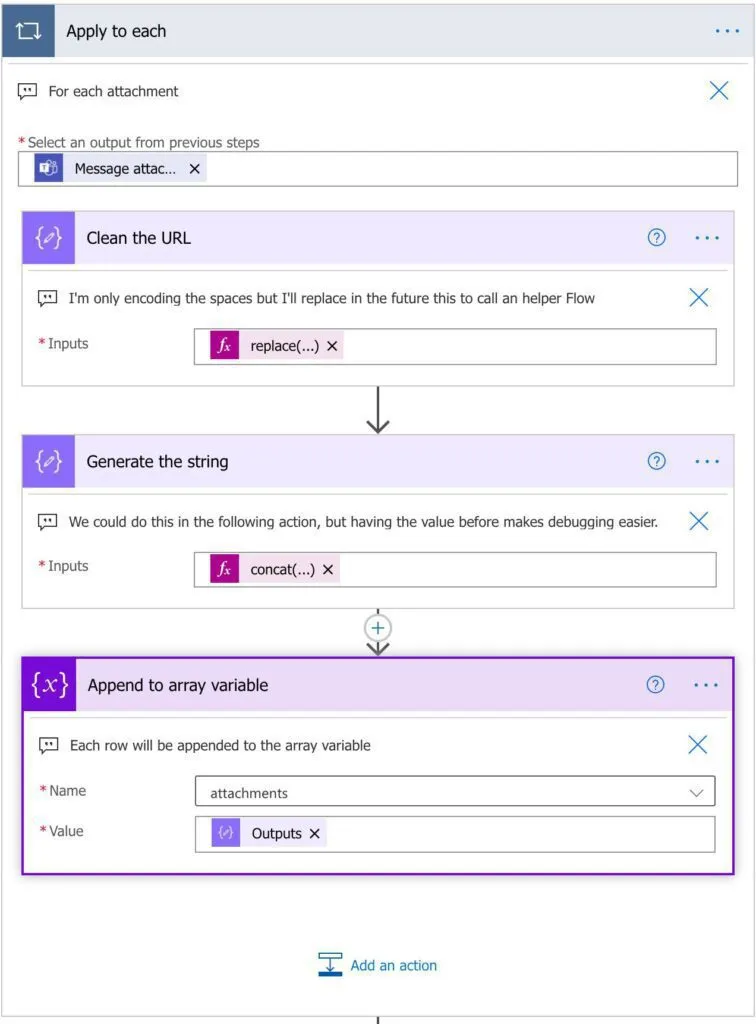
Sometimes the URL comes with spaces, so we need to convert them. Having spaces can generate some errors, so it's better to deal with them preemptively. Here's the formula:
replace(item()?['contentUrl'],' ','%20')
After that, we'll create the string for the current attachment. Here is the formula:
concat('{"alias": "Name 1","resourceLink": "',outputs('Clean_the_URL'),'","type": "Other"}')
Finally, let's add to the array:

Generate the final string
The final string needs to have two things. First, the indication is an array (with "[ and ]"), and the rows collected in the previous steps are separated by commas. Here's the formula:
concat('[',join(variables('attachments'),','),']')
We'll use both the join and the concat function to generate the string. It should look something like this:
[{"alias": "Name 1","resourceLink": "URL","type": "Other"},"alias": "Name 2","resourceLink": "URL 2","type": "Other"}]
Although without the spaces, this looks like a valid JSON. But if you use it in the "Update task details" action, you'll get the following error:
Cannot set child value ' !' on Newtonsoft.Json.Linq.JValue:'[{"alias": "Name 1","resourceLink": "https://manueltgomescom.sharepoint.com/sites/ManuelTGomes/Documentos%20Partilhados/Power%20Automate%20Test%20Channel/parts%20of%20speech%20word%20files.zip","type": "Other"}]'
This is because although it looks like a JSON, it's not one. So we need to use the JSON function to transform the string into a JSON object that the "Update task details" action will understand.
Update task
Finally, let's update the task. First, we'll update the description that we converted to text and the attachments, as we mentioned before.

Here's the formula for the references:
json(outputs('Generate_the_final_string'))
Nothing fancy here. Convert a string into a JSON object.
With this final step Power Automate will add attachments to Microsoft Planner, if they exist.
Final thoughts
The template is a bit more complex than expected since there are some small details that we need to think about for things to work. Nevertheless, I hope it's helpful to you, and if not, at least you learned some excellent concepts and fundamentals.




Thanks for the great walk through! This was exactly what I needed and then some. I tweaked it a little for my own process, but the template and tips were both really helpful.