Did you know that you don’t need to do all actions in one Flow? I would argue that you should not do everything in one Flow and should break it down into multiple more straightforward Flows that do only one task. There are many reasons for this, so today, let’s explore what is an auxiliary Flow how to design it.
What are auxiliary Flows?
Think of an auxiliary Flow as a “black box” that contains multiple complex actions. You provide inputs, and it will perform the steps for you and, depending on the Flow, returns something. The idea is for you to call them and don’t have to think about complex actions like uploading attachment files to a SharePoint list item, for example.
Auxiliary Flows are built with actions that you have at your disposal in Power Automate, but by combining them in one separate “box”, we can:
- Better Flow maintenance since any change only needs to be done in one place (in the auxiliary Flow).
- Reuse sets of everyday actions into one Flow.
- Time to build Flows is significantly reduced since we have these auxiliary Flows already prepared to use.
- Hides complexity in your Flows by making them easier to read.
Better Flow maintenance
Let’s say you do a set of actions frequently and in many Flows. For example, you have a Microsoft Form where you collect information and want to add all attachments to a SharePoint list. You have multiple Flows that do this, but one sends them by email to someone, and another triggers an approval Flow. 2 Flows with the same actions.
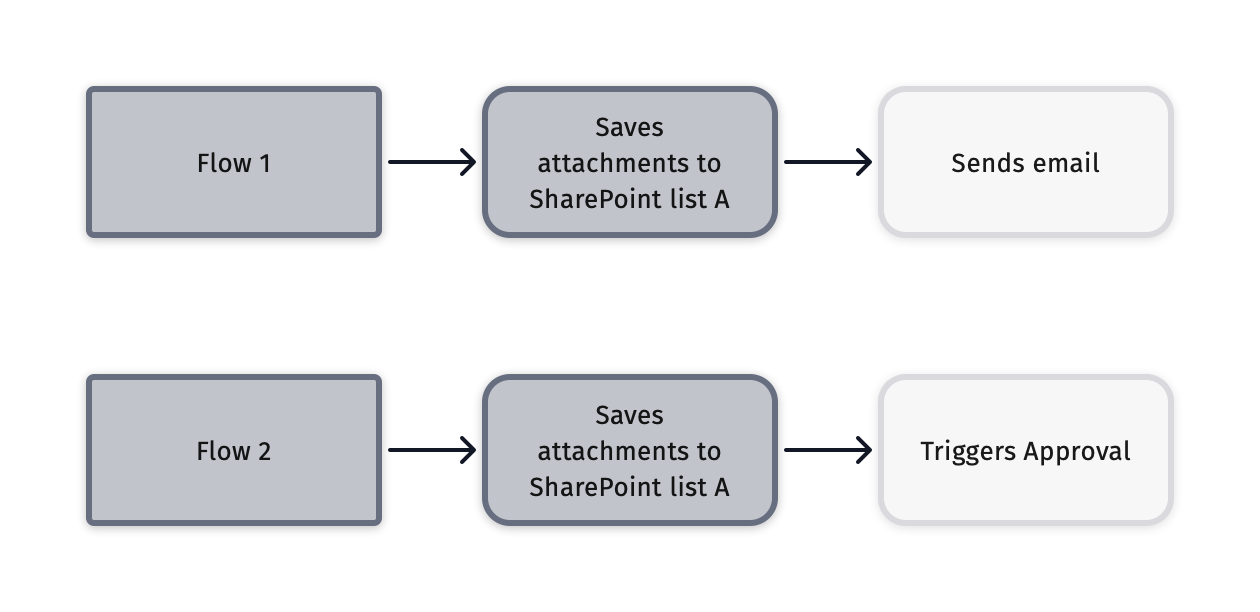
Let’s say the SharePoint list changes, so you must go to each Flow and change that SharePoint list. But what if someone else created another Flow with the same logic to save attachments to the SharePoint list but instead saves the attachments to a OneDrive folder?
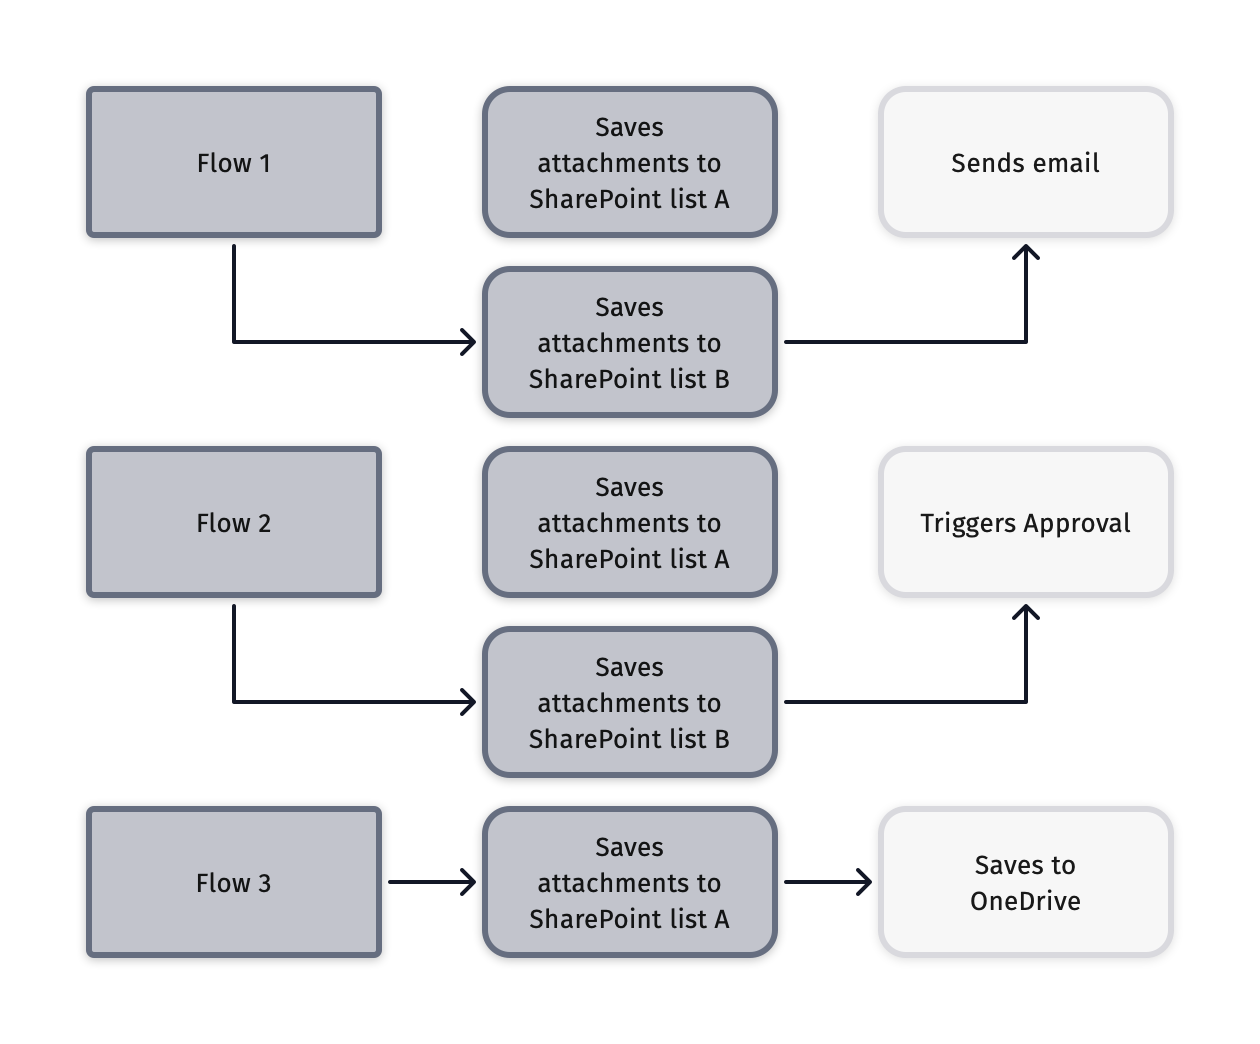
The third Flow will save files to the “old” SharePoint location, whereas the previous ones would save the files the “new” SharePoint list. We’ll generate a mistake since the Flows are all doing the same tasks but duplicating the steps. If we have an auxiliary Flow, then we would only need one change in one place, and everyone would get it automatically, like this:
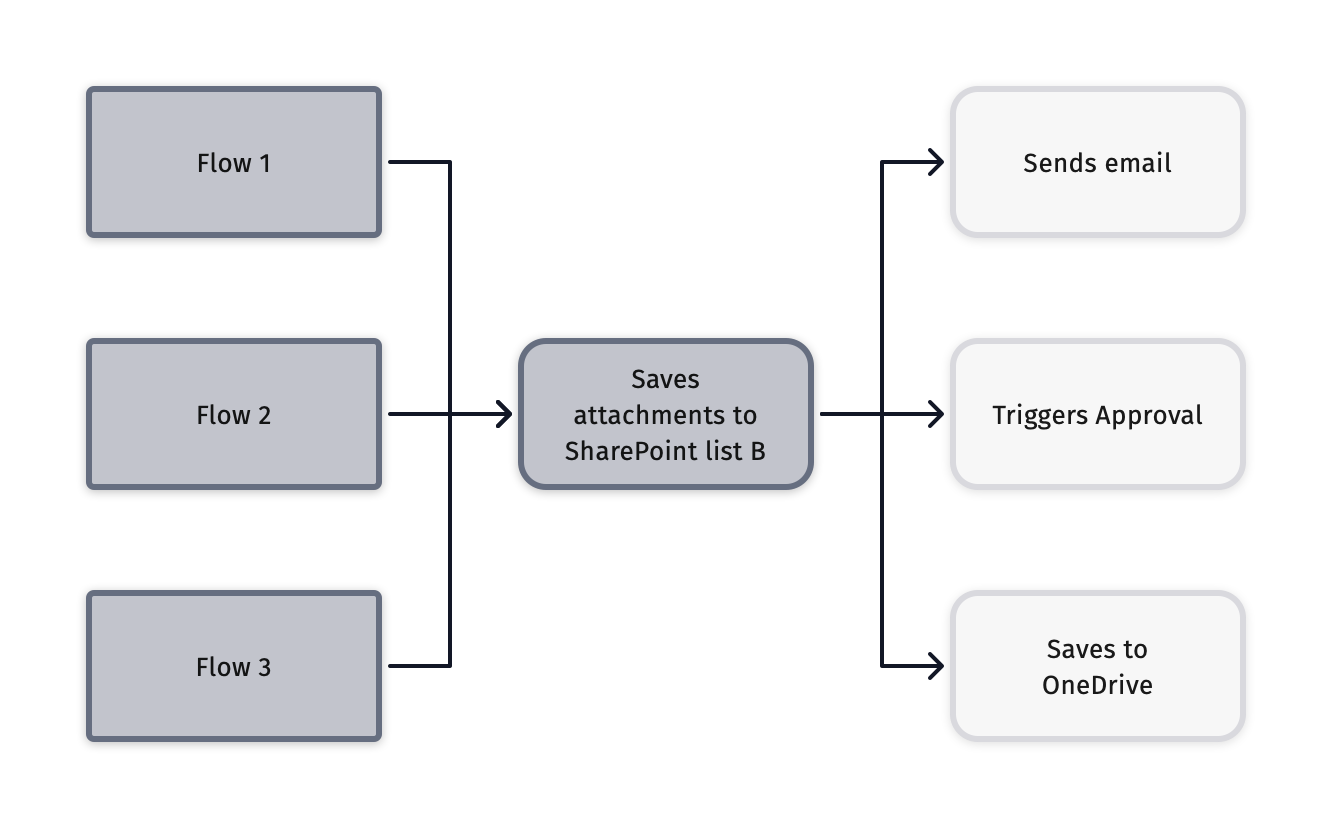
It can be 5 minutes change, but if you “forget” one Flow, the impact can be huge.
Reuse sets of everyday actions
Still building on the previous example, the “save attachments to SharePoint list” is an everyday task that multiple people need to do. I suggest you look at your Flows and I’m sure you’ll find at least 1 or 2 cases of blocks of Flows that you can transform into auxiliary Flows. Check your Flows and make a list. If you can get a few in auxiliary Flows, you would save time because you won’t need to copy these actions repeatedly. And speaking of that.
You will reduce significantly the time to build a Flow
Since we don’t need to copy the actions repeatedly, the time to build Flows will be significantly reduce. Think of the first example. The other person generating the Flow to save to OneDrive will only need to focus on that part. It will take them 2 minutes to generate the “save attachments to SharePoint list” even if they don’t know how to do it. And some operations can be super complex to achieve, so we can abstract the complexity and help other people build Flows.
Hides complexity in your Flows
Since complexity is inside our “black box,” people with less proficiency in Power Automate can write complex Flows using the “complex” part in only one action. If we look at our example, it’s pretty easy to generate a Flow that “saves attachments to a SharePoint list” and saves them to a OneDrive folder, especially if you can call a Flow that does the first part for you. The Flow becomes quite simple to read because you have one action that is doing a lot under the covers.
How to do it?
To do them, we need to use solutions because we’ll need the “Run Child Flow” action. I go over a lot of detail on how it works so that you can check the complete reference here.
Auxiliary Flows are “normal” Flows that you can call from other Flows, as we mentioned before. So if we have a Flow with a “Manual Trigger a Flow” trigger , it will show up in the list of the Run Child Flow actions.
To create an auxiliary Flow, all you need to do is the following:
- Create a Flow that contains the “Manual Trigger a Flow” trigger (you can also use the “When an HTTP request is received” trigger , but this requires you to have access to premium connectors)
- Have all your actions inside.
- Have a “Respond to a PowerApp or flow” Action – The “parent” Flow needs to know when the “child” Flow is finished, so this will signal to them when it’s done.
That’s it. You have an auxiliary Flow created.
Here’s how you can access them.
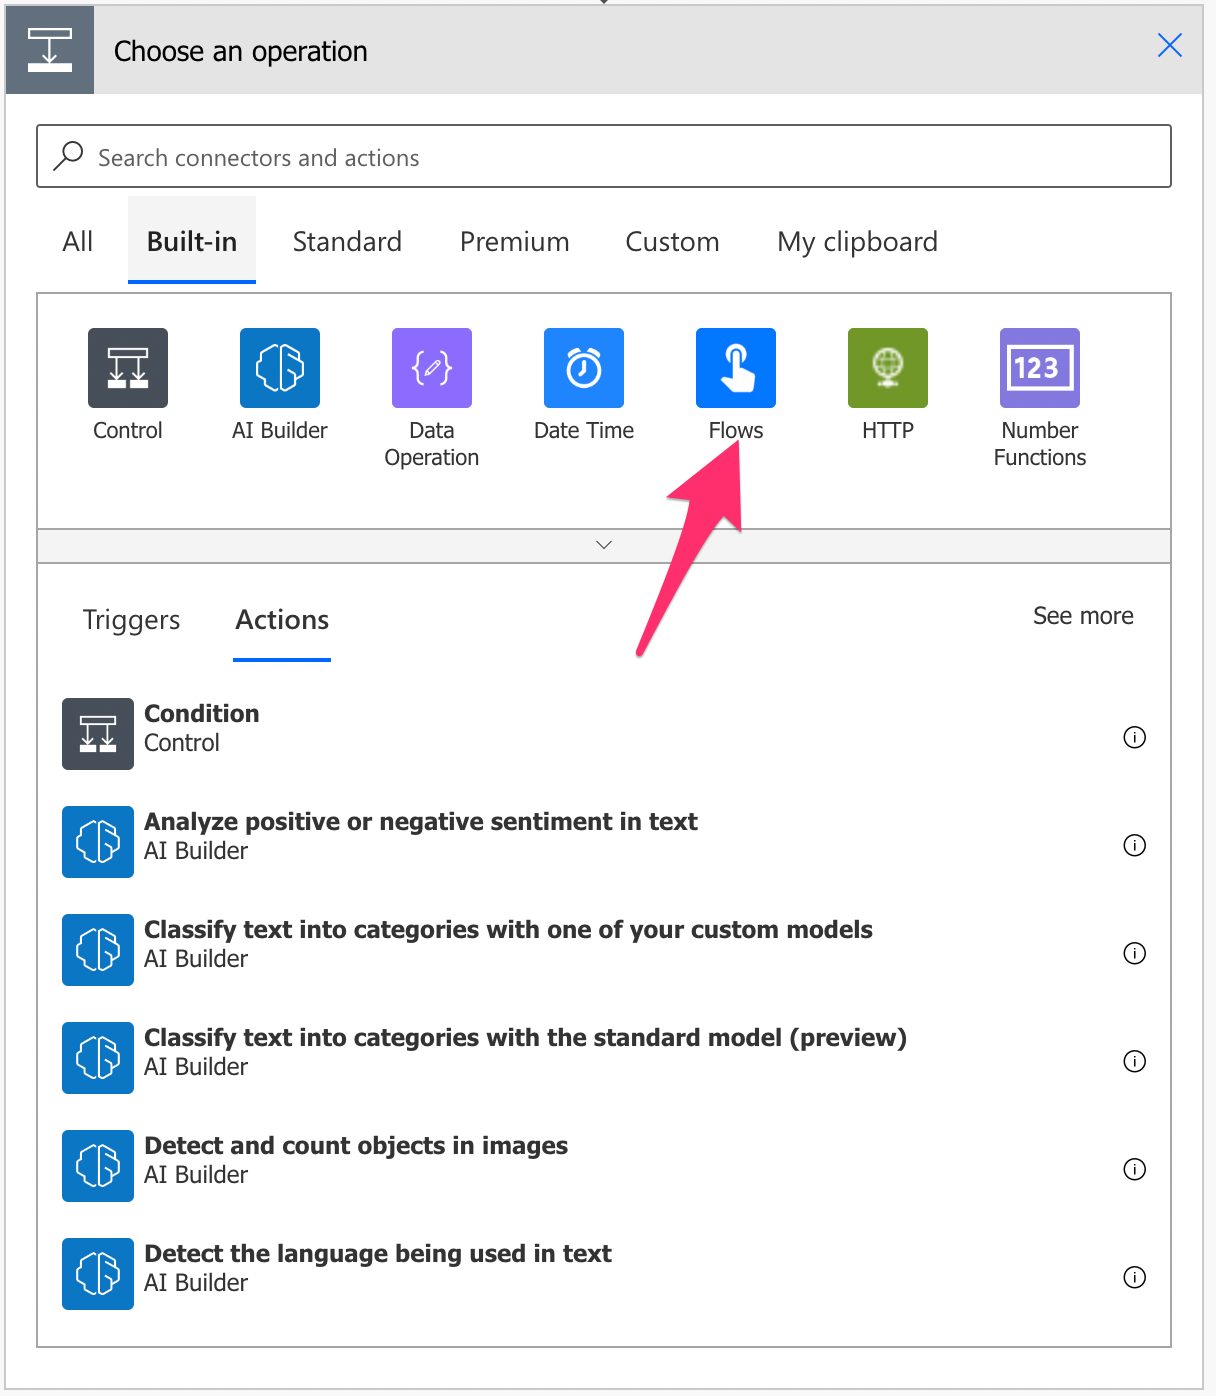
Select the “Run Child Flow” action in any step of your Flow. You can find it under “Standard”:
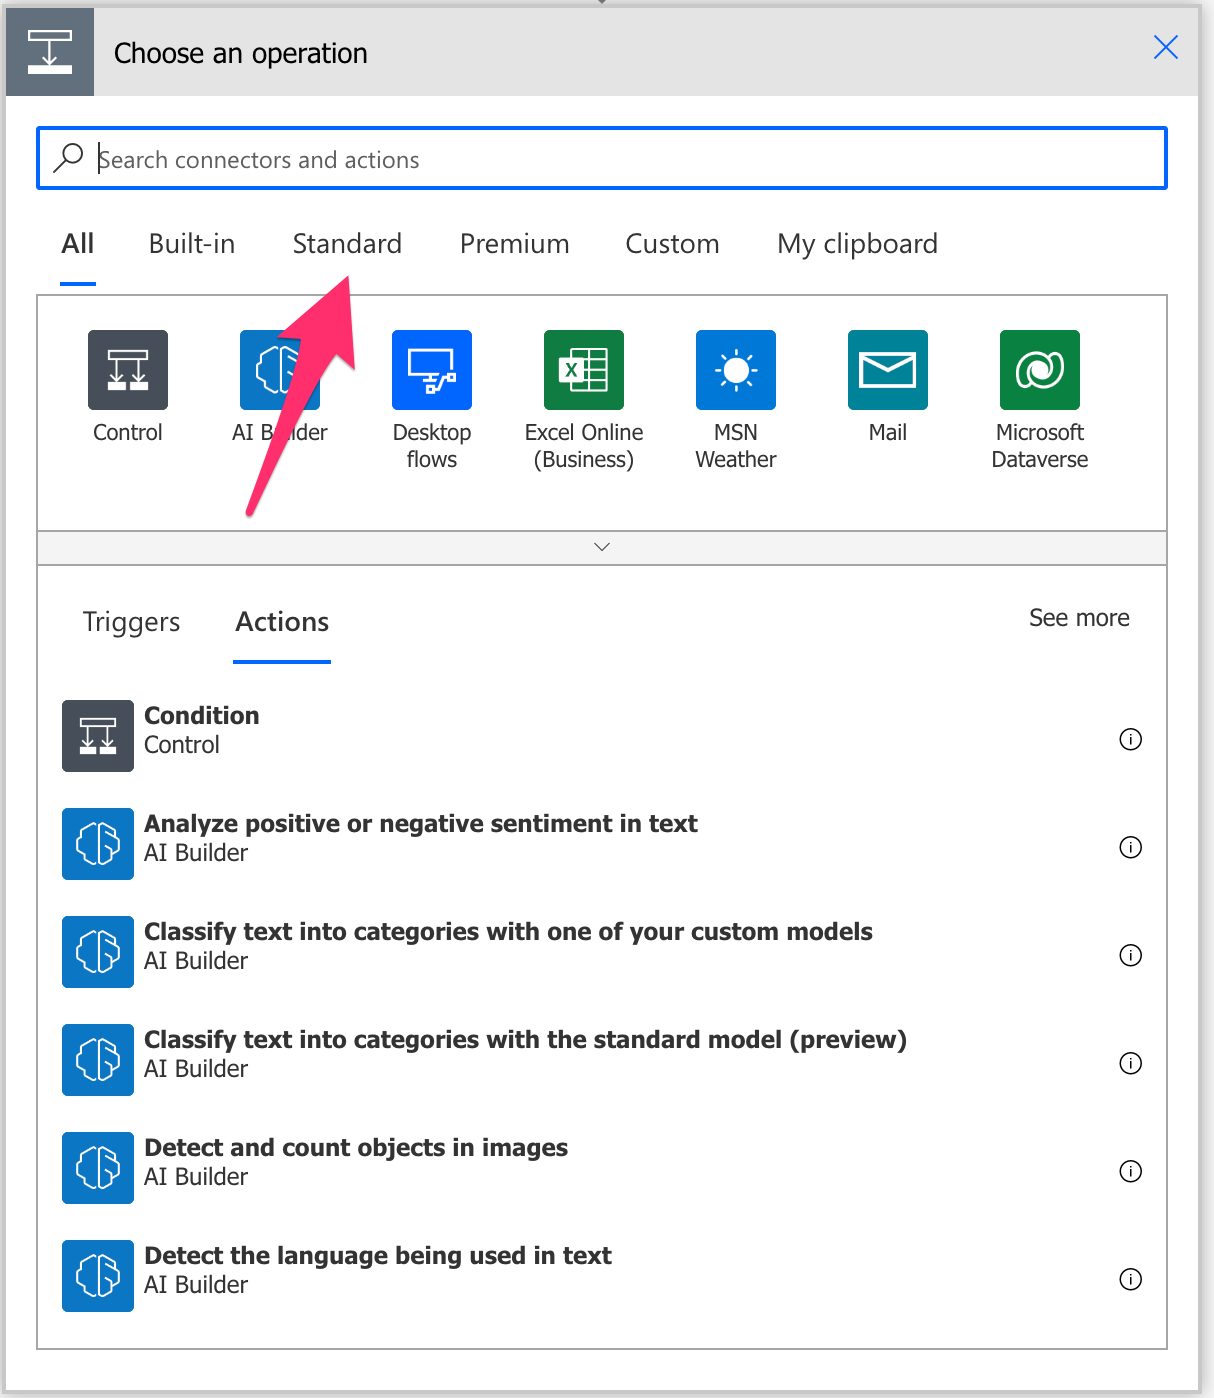
Select “Flows”.
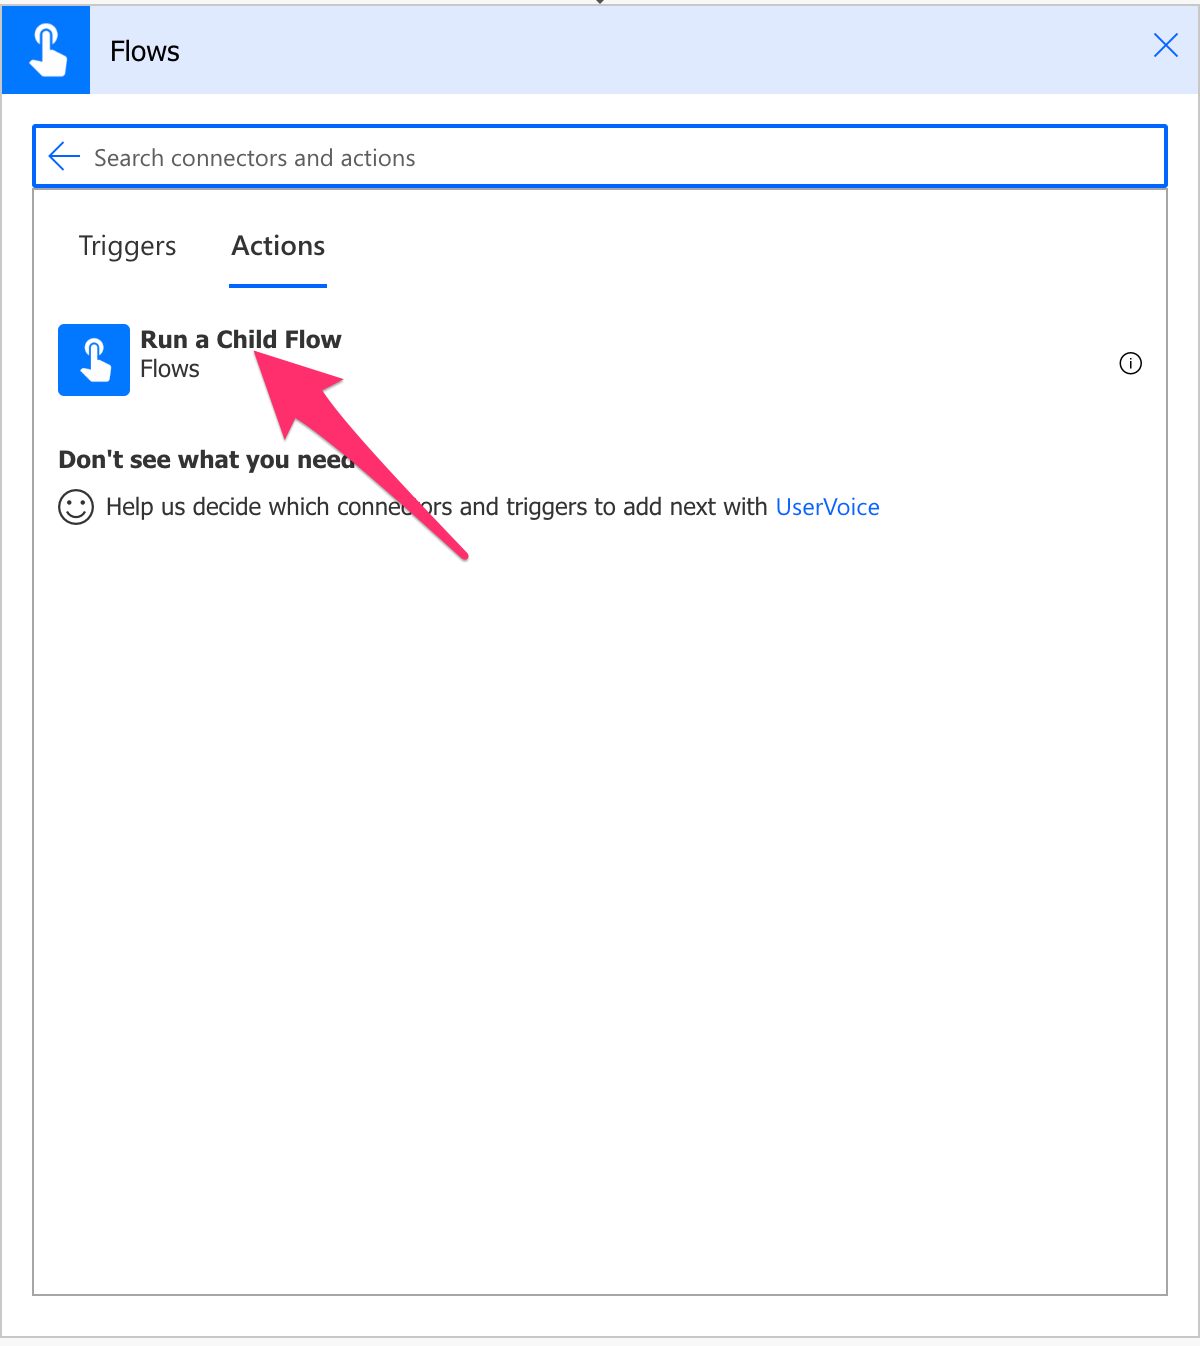
Select “Run a child Flow”.
Here’s what it looks like. Pick the auxiliary Flow from the dropdown. We’ll use the “Remove Rows by Column” for this example.

Once you select it, Power Automate will update it with the fields you need to provide for the Flow to work.
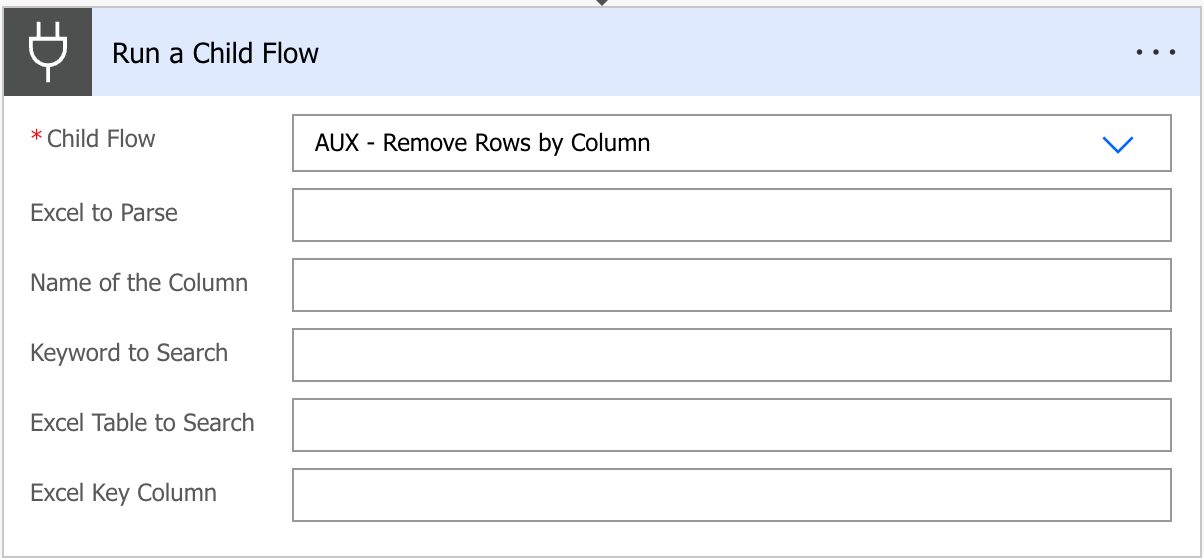
Provide the necessary parameters and test your Flow.
Some auxiliary Flows will return data. To access it, you can go to the dynamic properties in any action and pick them from the list. In the previous example, we’ll get a new file, so here’s how to get the data:
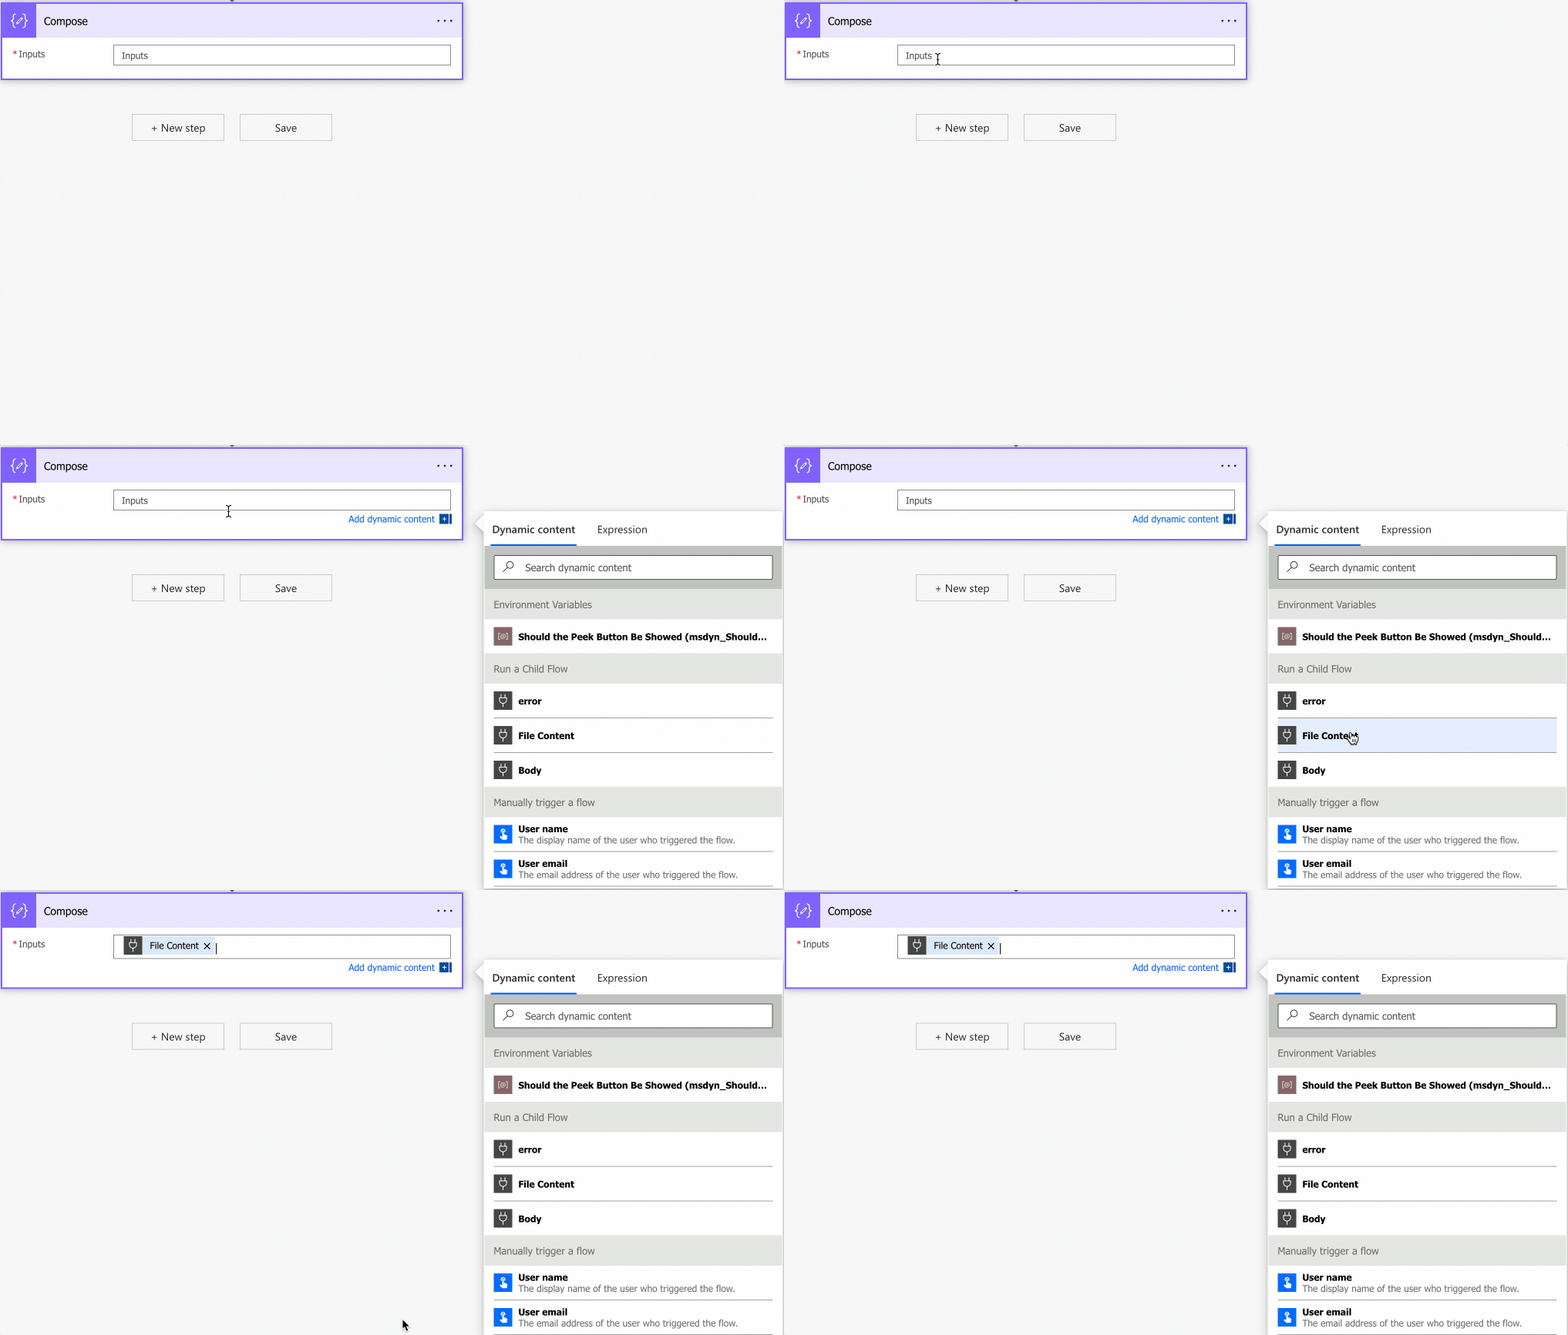
Easy right?
Some suggestions
Not everything is perfect, so here are a few suggestions to make your life easier.
Add a prefix to the name
As you’ve seen in the examples above, I use the prefix “AUX” to the Flow to indicate that it’s an auxiliary Flow. This is not required, but I believe it helps signal that it’s an auxiliary Flow so that the team knows how to use it. It is also an excellent way to differentiate from other Flows that are triggered using the “Manual Trigger a Flow” trigger that is not an auxiliary Flow.
Don’t nest an auxiliary Flow
It’s tempting to do it but don’t nest child Flows. What I mean by nesting is having 3 Flows (Flow A, B, and C) where Flow B calls Flow C with a Run Child Flow action, and Flow A calls Flow B with another Run Child Flow action. If you continue adding Flows D and E as nested calls, you would have a problem quickly with:
- Quota limitation – Since Power Automate will run so many actions, you would hit a limitation wall quickly. Be careful and monitor your Flow runs.
- Maintenance hell – Hidding too much complexity can be hurtful since, if something doesn’t go as planned in Flow A, for example, then you need to open Flow B to check if the problem is there and if the problem is not there then you would need to go down the chain. It’s complex.
The idea here is to keep only one level in auxiliary Flows. If they are auxiliary, they can’t call other auxiliary Flows so that you know that you only need to go down “1 level” to understand what’s happening.
Final thoughts
I use and create auxiliary Flows a lot since it speeds up my development time. I don’t particularly appreciate doing things twice, so having one Flow that was developed and tested and does precisely what I need is amazing, because I only need to call it and not worry about anything else.
Finally, it’s good to share and provide them to the team. They will benefit from your work and won’t need to “reinvent the wheel” if they need to do a set of actions that you’ve done in the past.
Photo by Toa Heftiba on Unsplash


