
Today, let's look at a premium trigger, but not just any trigger, in fact one of the most useful in my opinion.
The "When an HTTP request is received" trigger is special because it enables us to have Power Automate as a service. What I mean by this is that you can have Flows that are called outside Power Automate, and since it's using standards, we can use many tools to do it.
I have a "Power Automate as a Webservice" article that can show you how to better take advantage of it and see how it can be used in a different way than you're used to.
So let's explore the "When an HTTP request is received" trigger and see what we can do with it.
Where to find it?
To find it, you can search for "When an HTTP request is received" or pick the "Request" section.
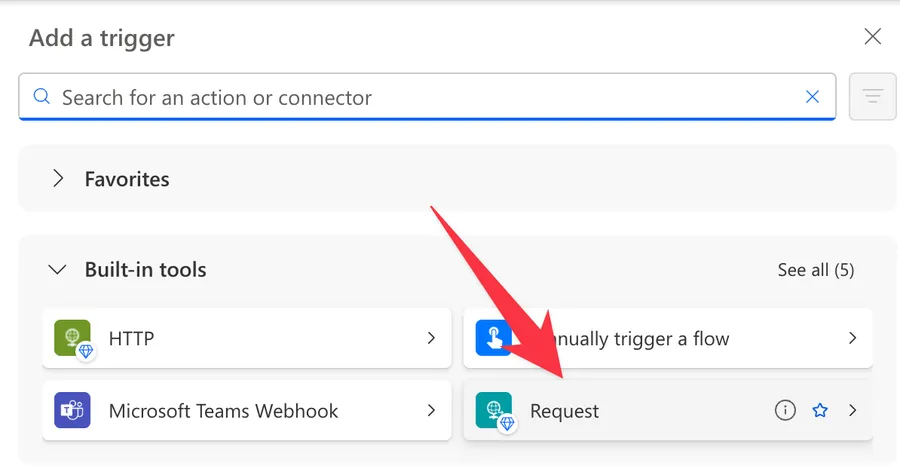
Pick "When an HTTP request is received".
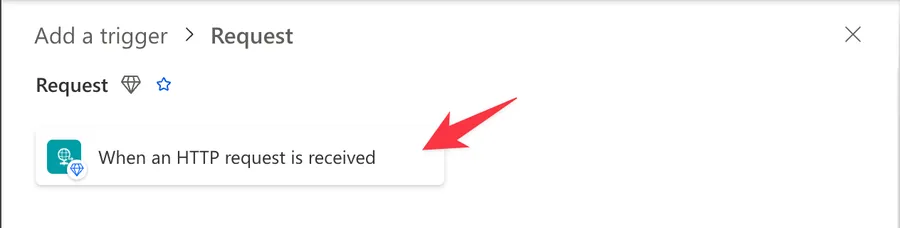
It looks like this:
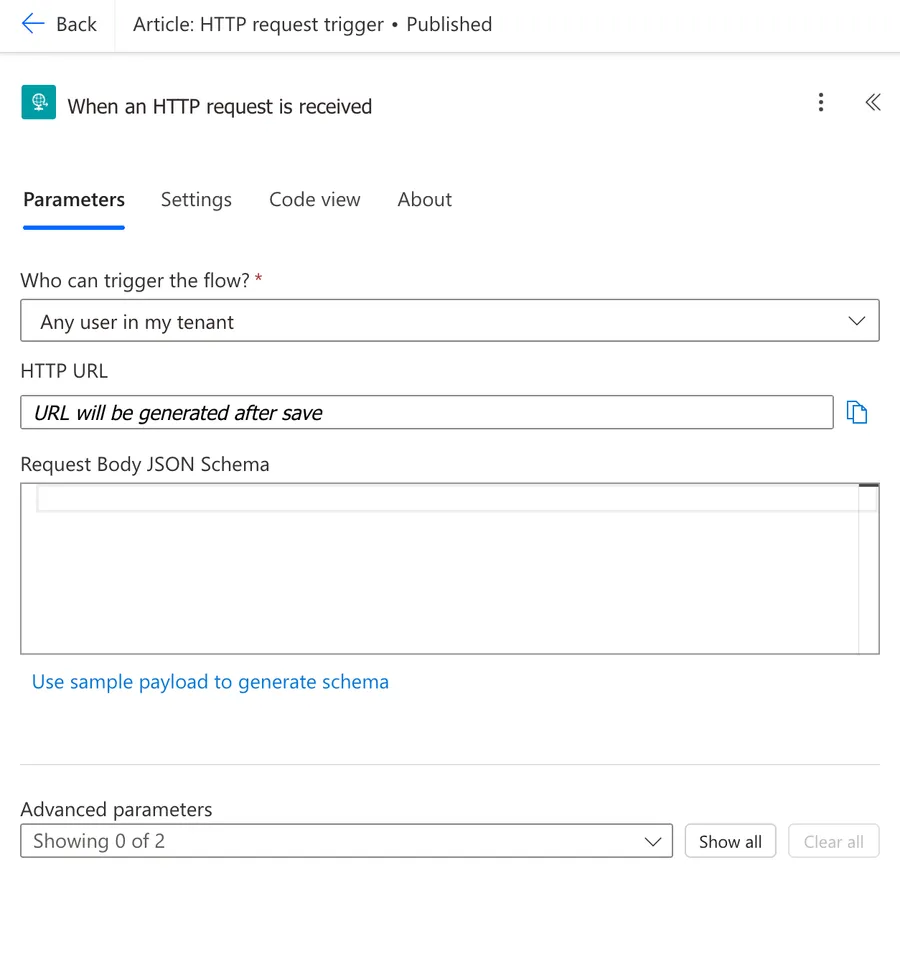
Please be careful when searching because it's tempting to pick "HTTP" but this is something entirely different. This is the "HTTP" action, not the trigger that we want to use.
Usage
To use it, we have to define the JSON Schema. I go into massive detail in the "What is a JSON Schema" article, but you need to understand that the trigger expects a JSON to be provided with all parameters. JSON can be pretty complex, so I recommend the following. Use the "Use sample payload to generate schema" to help you do this.
Here are some examples to get you started. In this case, we'll provide a string, integer, and boolean.
{
	"parameter1":"string parameter",
	"parameter2":1,
	"parameter3":false
}
Copy it to the "Use sample payload to generate schema."
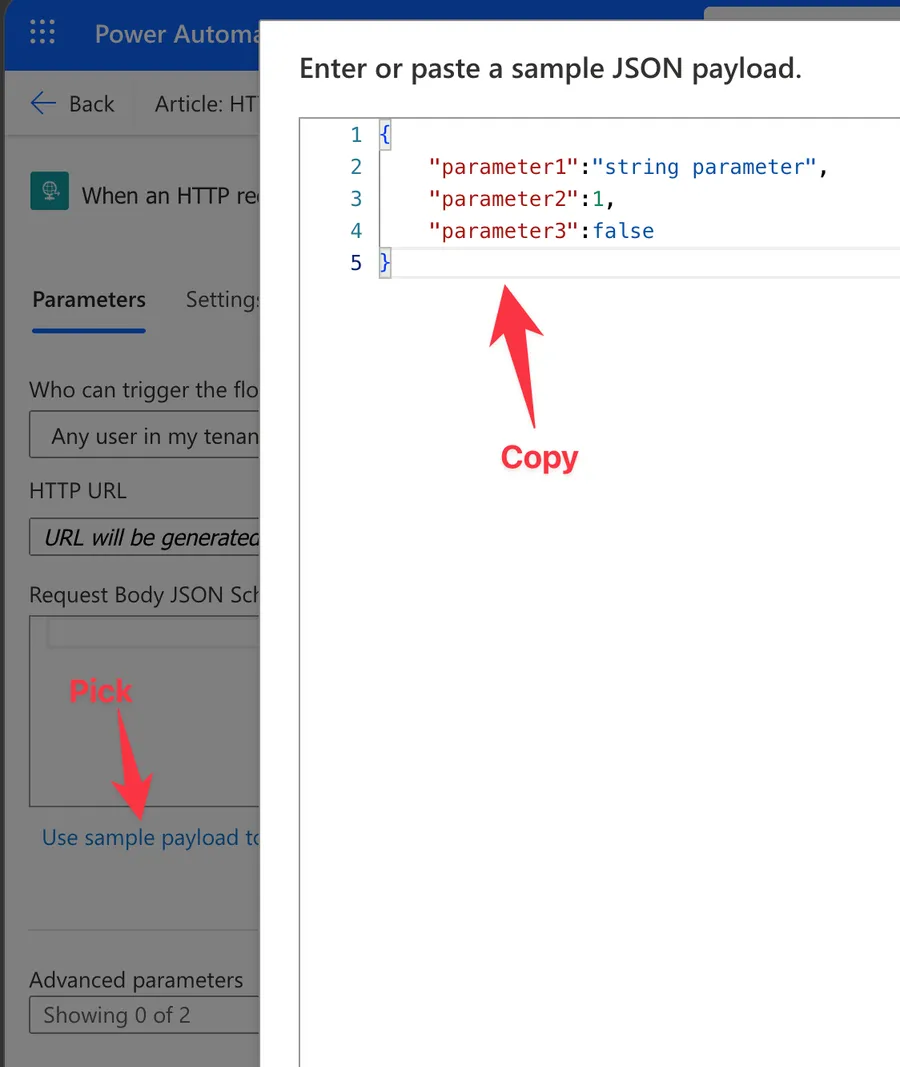
It will generate the following:
{
    "type": "object",
    "properties": {
        "parameter1": {
            "type": "string"
        },
        "parameter2": {
            "type": "integer"
        },
        "parameter3": {
            "type": "boolean"
        }
    }
}
The properties need to have the name that you want to call them. For example, I'll call for "parameter1" when I want the string. But the value doesn't need to make sense. Power Automate will look at the type of value and not the content.
Let's look at another example. In this case, we'll expect multiple values of the previous items. We'll need to provide an array with two or more objects so that Power Automate knows it's an array. Here's an example:
[
    {
        "parameter1":"string parameter",
        "parameter2":1,
        "parameter3":false
    },
    {
        "parameter1":"string parameter",
        "parameter2":1,
        "parameter3":false
    }
]
We get:
{
    "type": "array",
    "items": {
        "type": "object",
        "properties": {
            "parameter1": {
                "type": "string"
            },
            "parameter2": {
                "type": "integer"
            },
            "parameter3": {
                "type": "boolean"
            }
        },
        "required": [
            "parameter1",
            "parameter2",
            "parameter3"
        ]
    }
}
Please note that the properties are the same in both array rows. If you make them different, like this:
[
    {
        "parameter1":"string parameter",
        "parameter2":1,
        "parameter3":false
    },
    {
        "parameter4":"string parameter",
        "parameter5":1,
        "parameter6":false
    }
]
You'll get the following:
{
    "type": "array",
    "items": {
        "type": "object",
        "properties": {
            "parameter1": {
                "type": "string"
            },
            "parameter2": {
                "type": "integer"
            },
            "parameter3": {
                "type": "boolean"
            },
            "parameter4": {
                "type": "string"
            },
            "parameter5": {
                "type": "integer"
            },
            "parameter6": {
                "type": "boolean"
            }
        },
        "required": []
    }
}
Since the properties are different, none of them is required.
Receiving file uploads (multipart/form-data)
The trigger's schema only validates JSON, but you can still receive file uploads through multipart/form-data. The trick is to leave the JSON Schema empty in the trigger (since the body won't be JSON) and read the file from a different expression.
Inside your Flow, use triggerMultipartBody(0) to grab the first part of the multipart body, then convert it to binary with base64ToBinary(triggerMultipartBody(0)['$content']). From there you can pass it to a "Create file" action in SharePoint, OneDrive, or wherever you need it.
It's a bit of a workaround, but it works well once you know the expressions.
Trigger the Flow
There are a lot of ways to trigger the Flow, even from your phone.
I'm hiding the URL on purpose because, to test, we enabled Anyone mode. Anyone with this URL could run this flow. This is possible because we don't enable any authorization. If you're using tenant authentication (which I'll cover in a moment), callers also need to pass an Azure AD bearer token in the Authorization header.
To test, we'll use the iOS Shortcuts app to show you that it's possible even on mobile. We'll provide the following JSON:
{
	"parameter1":"string parameter",
    "parameter2":1,
    "parameter3":false
}
Here's the template. We'll use Apple's "Shortcuts" to make things easier and to show you that we don't need to use Power Automate for everything and also that we can use it for other automations "on the go".
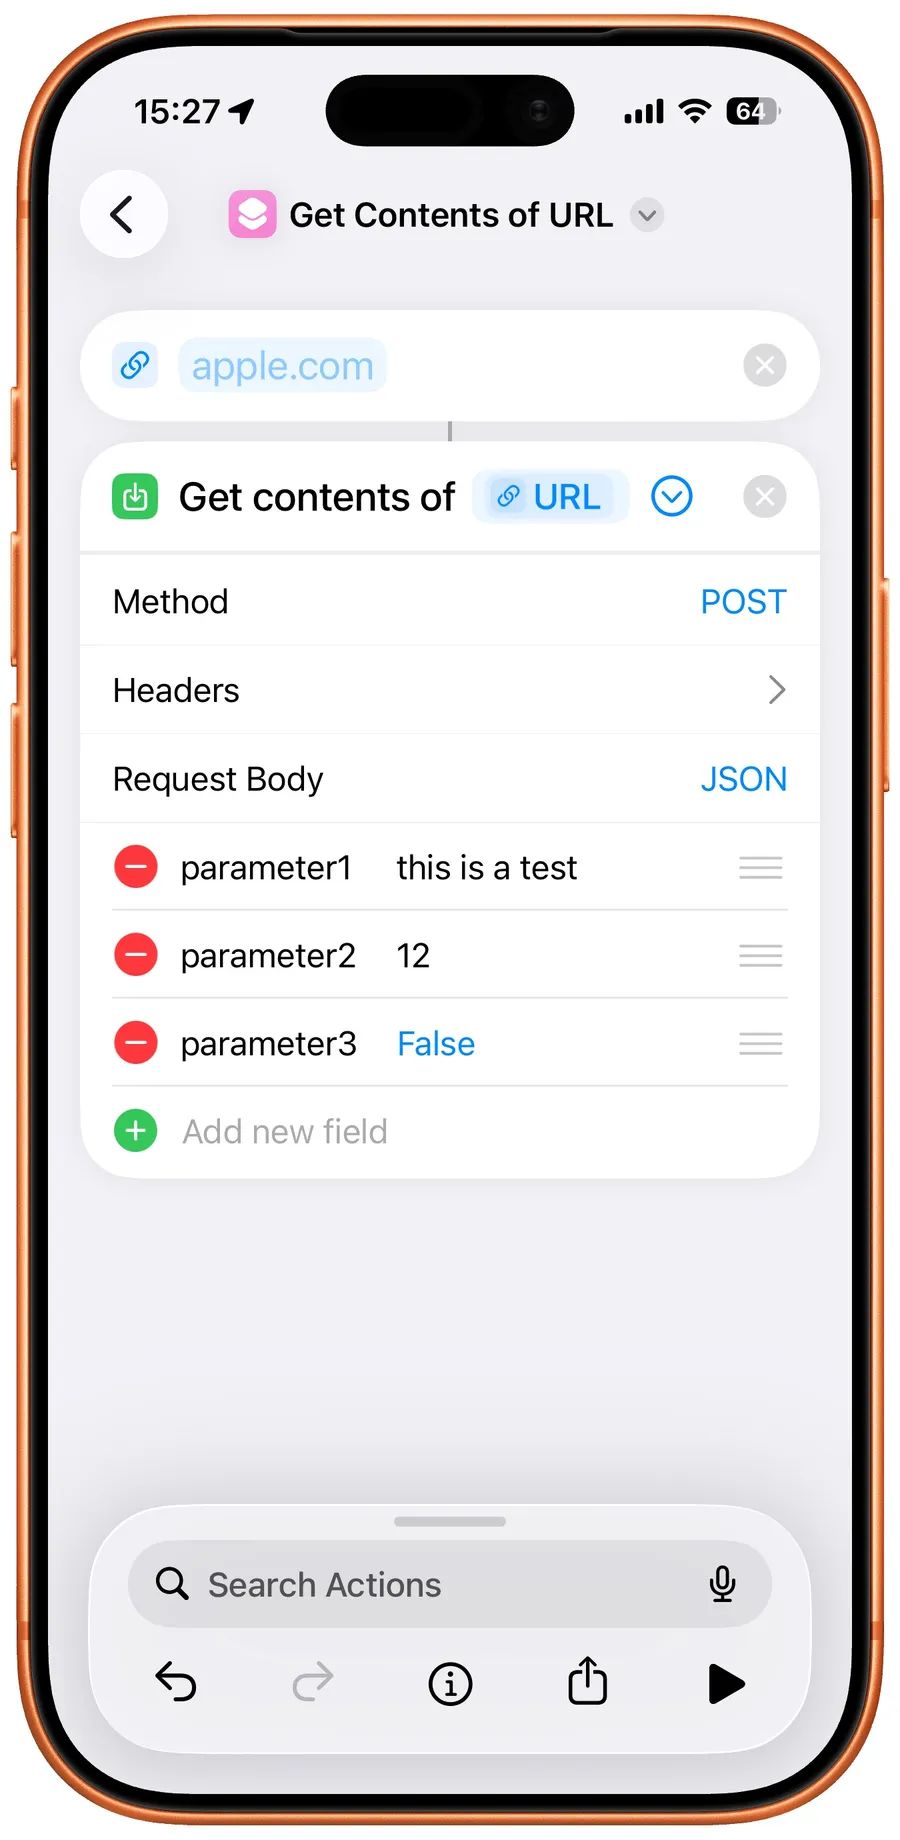
We get on Power Automate:
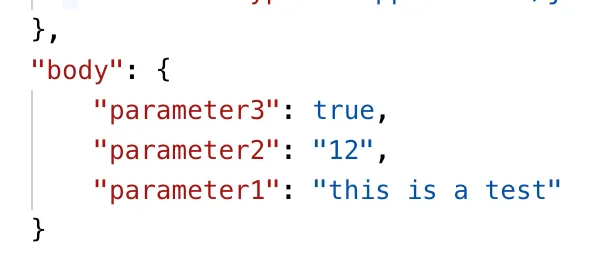
All good.
Other requests
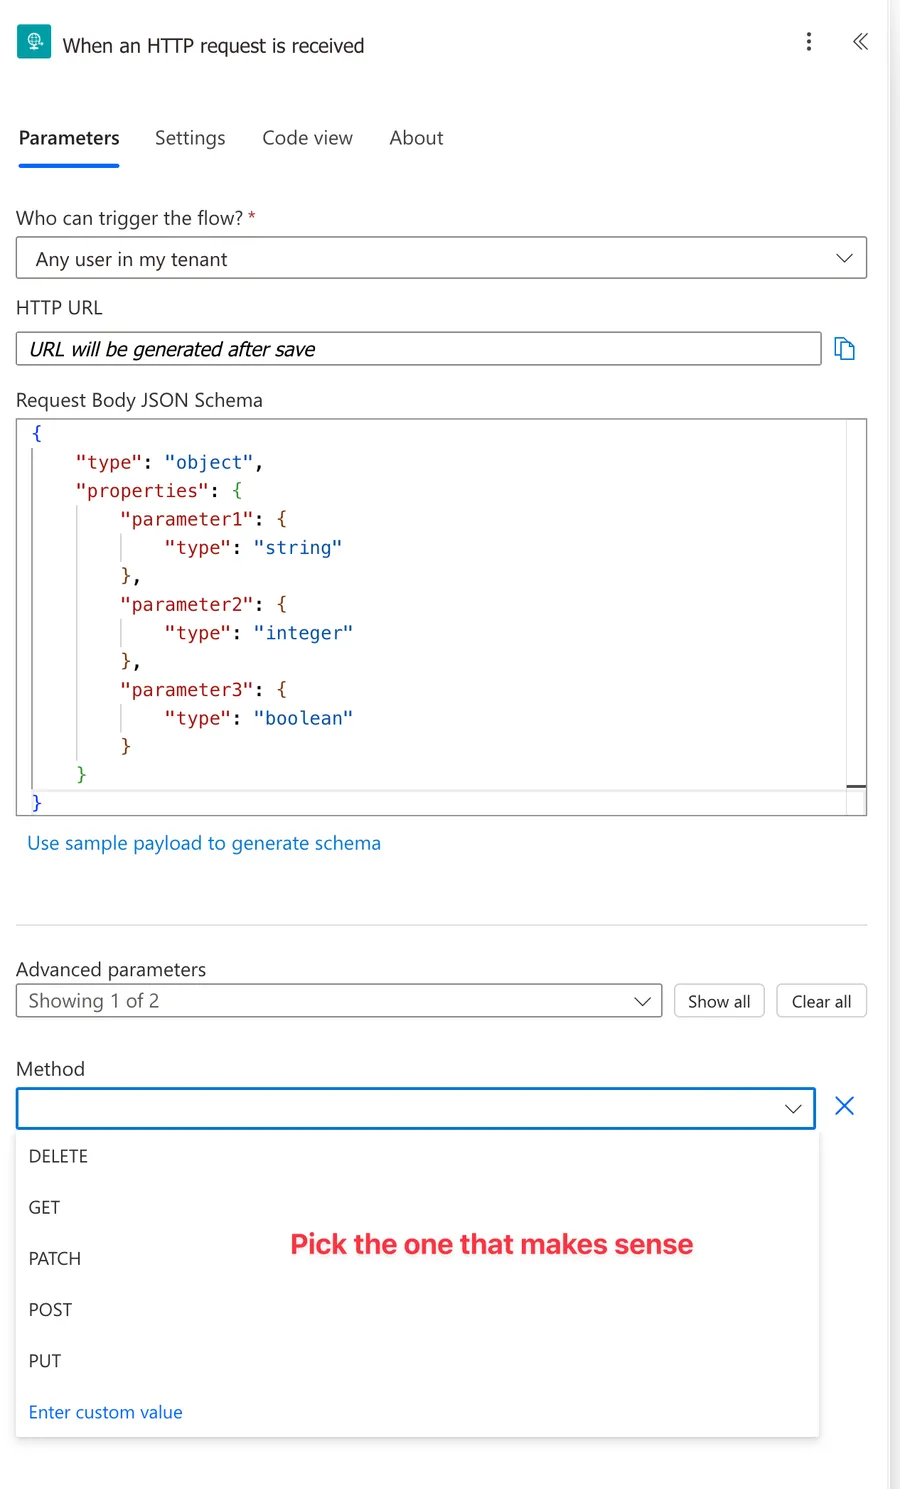
"POST" is the default, but it's not the only option. If you expand the Advanced options of the trigger, you'll find a Method dropdown where you can pick GET, PUT, PATCH, or DELETE instead. This is handy when you want your Flow to behave like a proper REST endpoint, for example, a GET that returns data without accepting a body.
If you want to read more about the HTTP methods themselves, here's a good article that explains everything based on the specification.
Who can trigger the flow?
This is super important and if you're not careful you can get into all types of trouble. When you create the trigger, you'll find a "Who can trigger the flow?" setting with three options:
- Any user in my tenant. The default for new flows. Anyone signed in to your Microsoft 365 tenant can call it, and the request needs a valid Azure AD bearer token in the Authorization header. This is the safe default for internal automations.
- Specific users in my tenant. Same as above, but you whitelist specific email addresses. Use this when only a handful of people or service accounts should be allowed to call the Flow.
- Anyone. The classic behavior. The URL contains a SAS token (the long
sig=...at the end), and anyone with the full URL can trigger the Flow. Use this only when you truly need an anonymous endpoint, like a public webhook from a service that can't authenticate against Azure AD.
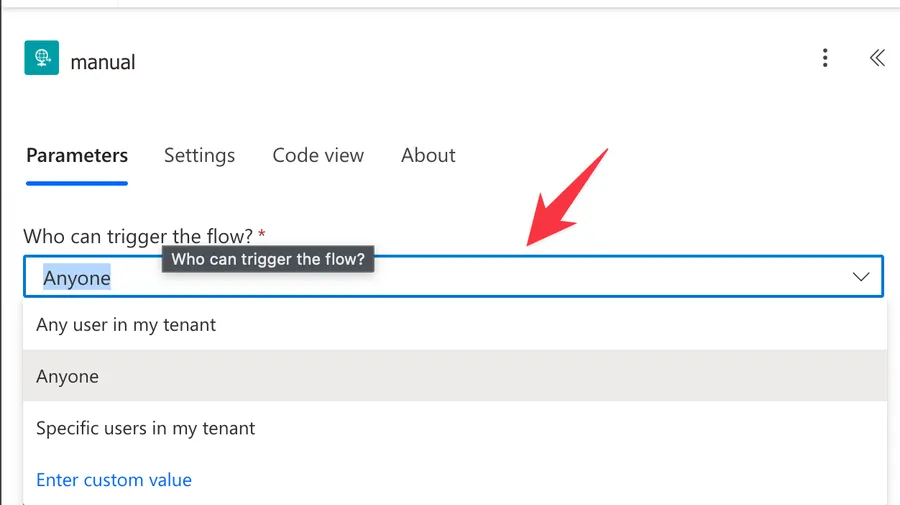
If you pick Anyone, treat the URL like a password. It's the only thing standing between the world and your Flow. If it leaks, you can regenerate the SAS key to invalidate the old URL, but brace yourself, there's no button for it. I cover the full process in the Resetting the URL section below.
How to get an Azure AD token to call the Flow
If you pick "Any user in my tenant" or "Specific users in my tenant", the caller needs a valid Azure AD bearer token in the Authorization header. There are two details that catch most people off guard.
The first is the scope. You need to request a token with the scope https://service.flow.microsoft.com//.default (yes, double slash, that's intentional, not a typo). Use any other scope and you'll get an "invalid scope" error.
The second is that service principals are supported. The Allowed user list accepts both user emails and Azure app object IDs, separated by semicolons. So if you have an app registration calling the Flow with its own client credentials, just add its object ID to the list and the Flow will accept its token.
Child Flow
Power Automate allows you to use a Flow with a "When an HTTP request is received" trigger as a child Flow. Then, you can call it, and it will even recognize the parameters.
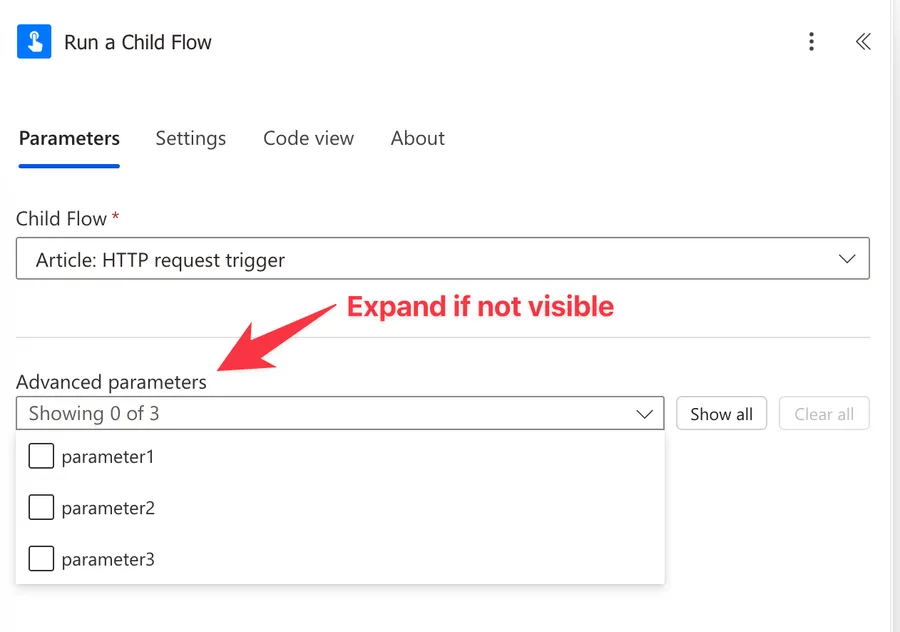
It works the same way as the "Manually trigger a Flow" trigger, but the child Flow needs to end with an action that tells the caller it's done.
You have two choices and they are not interchangeable:
- The "Respond to a PowerApp or Flow" action returns typed values back to the parent Flow or to a PowerApp. Use this when the parent is another Flow calling this one as a child, or when a PowerApp is calling it.
- The "Response" action returns an HTTP response (status code, headers, body) to an external HTTP caller. Use this when the Flow is being called like an API from outside Power Automate.
Pick the one that matches who's calling. If you mix them up, the caller either gets nothing or gets something it can't understand.
Outputs
The trigger returns the information that we defined in the JSON Schema. So, for the examples above, we get the following:
{
    "headers": {
        "Connection": "keep-alive",
        "Accept": "*/*",
        "Accept-Encoding": "br,gzip,deflate",
        "Host": "prod.westeurope.logic.azure.com:443",
        "User-Agent": "",
        "Content-Length": "80",
        "Content-Type": "application/json"
    },
    "body": {
        "parameter1": "string parameter",
        "parameter2": 1,
        "parameter3": false
    }
}
Since the "When an HTTP request is received" trigger can accept anything in a JSON format, we need to define what we expect with the Schema. Anything else won't be taken because it's not what we need to proceed with.
What gets returned if you don't add a Response action
This one trips up a lot of people. If you don't put a "Response" action in your Flow, the caller doesn't get nothing back, they get a 202 Accepted immediately, along with a Location header pointing to a URL they can poll to get the final result.
That's the asynchronous pattern, and it's actually really useful when your Flow takes a while, since the caller doesn't have to sit and wait for it to finish. But if you were expecting a 200 OK with your data, you'll be surprised. To return a proper synchronous response, add a "Response" action with the status code and body you want.
Non-intuitive behaviors
The November 2025 URL migration
If you have older flows, this one will catch you off guard. Microsoft migrated the HTTP trigger URLs from logic.azure.com to a new domain under <environment>.api.powerplatform.com, and the old URLs stopped working after November 30, 2025.
In practice, anything calling the old URL silently fails. If you're inheriting flows from before the migration, open each one in the designer and re-save it, that regenerates the URL on the new domain. Then update everywhere where you use the old URL to call this Flow.
New Flows you build today already get the new URL by default, so this is mostly a "fix the old ones" concern.
Query string parameters and the new URL format
This is a fun one that came along with the migration above. On the old logic.azure.com URLs, you could send ?foo=bar and read it inside the Flow with triggerOutputs()?['queries']?['foo']. After the migration, the new URLs don't auto-populate the queries object the same way, so flows that relied on it stopped working overnight.
The simplest fix is to switch to the body. Define your parameters in the JSON Schema and send them in the body of a POST. If you really need query parameters (because of an external system you can't control), test it carefully against the new URL format before you ship anything.
Concurrency Control is a one-way door
In the trigger's settings, you'll find a Concurrency Control toggle. Turn it on and you can limit how many instances of your Flow run in parallel (default 25, range 1 to 100). Sounds harmless, right?
This action cannot be undone. Be sure you want to do it otherwise the only way out is to recreate the Flow.
Once you turn it on, you cannot turn it off.
You will see the limit and will be able to toggle it off, but when you do you'll get this error:
The trigger 'manual' of current version of workflow '08c78f74-78c3-4581-b4c8-31a618b924a6' has concurrency runtime configuration specified. Trigger concurrency runtime configuration cannot be removed once specified.
The only way to remove concurrency control is to recreate the Flow from scratch. So before you flip that switch, be very sure you want the limit, and be very sure about the parallelism number you pick.
Resetting the URL (regenerating the SAS key)
Microsoft includes at the end of the URL the ?sig that will have a random key that will validate that it's you. It's not safe but at least it's a way to allow people not to guess the Flow's URL and then start trying to break your Flows.
The frustrating bit is that there's no button for it anywhere in the Power Automate UI. You have to send a small JavaScript command from your browser's developer tools. It sounds scarier than it is, so let me walk you through it.
Before you blame me for the complexity, these are the official instructions from Microsoft on how to do this, so don't blame the messenger. I'm only trying to translate them so it's easier for people to understand, but Microsoft couldn't have made this harder if they tried.
Step 1: Note the current SAS signature
- Open your Flow in the Power Automate designer.
- Open the "When an HTTP request is received" trigger and copy the URL.
- Make a note of the value after
sig=. You'll use it at the end to confirm the new key is actually different.
Step 2: Capture the authorization token from the browser
- Go to the Flow's Details page (not the designer).
- Open your browser's developer tools (F12 in Edge or Chrome).
- Switch to the Network tab.
- Clear the network log (Ctrl+L) and start recording (Ctrl+E).
- Refresh the page (Ctrl+R).
- Filter the requests for
api.flowand look for one that starts withruns?api-version=. - Click that request. On the Headers subtab:
- Copy the full Request URL.
- Copy the Authorization header (careful to only select the Authorization line, not the next header).
Step 3: Build and execute the regenerate request
Take the Request URL you copied and replace the word runs with regenerateAccessKey. Then open the Console tab in developer tools and paste this:
fetch('<regenerateAccessKeyUrl>', {
  method: 'POST',
  headers: {
    'Content-type': 'application/json; charset=UTF-8',
    'Authorization': '<AuthorizationHeader>'
  }
})
.then(result => result.json())
.then(console.log)
Replace <regenerateAccessKeyUrl> with the URL you just built, and <AuthorizationHeader> with the Authorization header you copied. Hit Enter.
Step 4: Verify
Go back to the Flow in the designer and open the trigger. The sig= value should now be different from what you noted in Step 1. That's it. The old URL is dead, the new one is live.
If the console command comes back as Rejected, don't panic. The key may still have been updated. Check the sig= value in the designer before retrying. If it changed, you're done.
For the full official walkthrough with screenshots, Microsoft has a dedicated page on regenerating the SAS key.
Limitations
There are a few things to keep in mind before you build your integration around this trigger.
The 120-second response timeout
If your Flow needs to return data to the caller (using a "Response" action), it has to reach that Response action within 120 seconds. Anything longer and the caller gets a ResponseTimeout error. The Flow itself keeps running in the background, but the HTTP caller has already walked away.
If you can't guarantee a quick response, use an asynchronous pattern: return a 202 Accepted immediately with a job ID, and let the caller poll for the result (or push it somewhere the caller can pick up later).
Payload size
The overall request payload has to stay under roughly 100 MB. We consider the payload everything that we send to the "HTTP" trigger. That's generous for most JSON, but if you're passing files or base64-encoded images, you'll hit it faster than you'd expect. For large files, upload them somewhere (SharePoint, OneDrive, Blob Storage) and pass a reference in the JSON instead, so that you can use an action like "Get File contents" for example to get the file, if possible of course. This way the Flow will trigger faster and then you can use the proper action to fetch the file, avoiding issues in the process.
URL exposure (Anyone mode)
When you use the "Anyone" authentication mode, the URL is the security. Here's an example of what one looks like (values are random, of course).
https://prod-00.westeurope.logic.azure.com:443/workflows/00000000000000000000000000000000/triggers/manual/paths/invoke?api-version=2016-06-01&sp=%2Ftriggers%2Fmanual%2Frun&sv=1.0&sig=XXXXXXXXXXXXXXXXXXXXXXXXXXXXXXXXXXXXXXXXXXX
If this URL ends up in a Git repository, a chat message, or a browser history on a shared machine, anyone who sees it can run your Flow. The good news is that you can regenerate the SAS key to kill the old URL. The bad news is that it's not a one-click operation. See Resetting the URL above for the full process, and keep it in your back pocket for the day something leaks.
No CORS support (no direct browser calls)
The HTTP trigger does not return CORS headers. That means you can't call it directly from JavaScript running in a browser, the browser will block the response with a CORS error.
If you need a browser to call your Flow, you have to put something in front of it. The usual options are Azure API Management (which can add the right CORS headers), an Azure Function, or any other server-side proxy. They call your Flow with the right authentication and forward the response back to the browser with proper CORS headers in place.
Downstream throttling (600 calls per minute)
The trigger itself is fine accepting requests, but the actions inside your Flow share a connection budget of 600 API calls per connection per 60 seconds. Go over that and you start getting 429 Too Many Requests errors on the downstream actions, not on the trigger.
If your Flow does a lot of per-request work (loops over items, calls multiple SharePoint or Microsoft Graph actions per call), the math adds up faster than you'd think. A rough rule, keep Parallelism × Actions × Items per minute under 600 and you'll be fine. Above that, you'll start seeing throttling kick in.
The URL is environment-specific
When you import a Flow into another environment (dev, test, prod), the trigger generates a brand-new URL. That means any external caller pointing at the old URL stops working the moment you move the Flow.
The right way to handle this is with environment variables. Store the URL in an environment variable and reference it from your calling apps. When you import the solution into a new environment, update the variable in one place instead of hunting through every integration. Future-you (and your colleagues) will thank you.
Workflow headers leak in the response
By default, every response from the trigger includes a bunch of x-ms-workflow-* headers, the workflow ID, run ID, tenant info, and a few more. Inside your tenant nobody cares, but on a public endpoint those are a small but real information leak about your internals.
There used to be a Suppress workflow headers toggle in the trigger's settings, but the new designer doesn't expose it anymore. If you really need to strip these headers from public-facing responses today, you have to put something in front of the Flow (Azure API Management, an Azure Function, or any other proxy) and have it remove the headers before forwarding the response.
Premium connector
Last but not least, this is a premium trigger. You'll need a Power Automate Premium license to use it. It's worth mentioning because it's easy to build a prototype with it and then realize it won't run for the rest of your team.
Recommendations
Here are some things to keep in mind.
Don't generate the schema manually
There's no great need to generate the schema by hand. It's tricky, and you can make mistakes. Instead, always provide a JSON and let Power Automate generate the schema. It's a lot easier to generate a JSON with what you need.
Two small things to watch when you do, though. First, Power Automate will mark every property in your sample as required. If a property might be missing in a real call, the Flow will reject the request with a "did not match its schema definition" error. Either remove that property from the required array by hand, or include a sample where the optional fields are missing.
Second, if a property can sometimes be null, change its type from a single string ("type": "string") to an array that includes null ("type": ["string", "null"]). The schema generator can't guess this from a single sample, but a small manual edit saves a lot of debugging later.
Default to tenant authentication
Unless you specifically need an anonymous endpoint, pick "Any user in my tenant" or "Specific users in my tenant" when creating the trigger. It's the single easiest thing you can do to stop a leaked URL from turning into an incident. Only switch to Anyone when a non-Microsoft system on the other end literally cannot send an Azure AD bearer token.
Consider wrapping it in a Custom Connector
If multiple Flows or apps end up calling the same HTTP-triggered Flow, you're going to repeat the same URL, the same authentication setup, and the same payload structure in every caller. A Custom Connector wraps all of that into one reusable, typed connector that shows up in the same picker as the official Microsoft connectors.
The catch is that you need an OpenAPI 2.0 (Swagger) definition for your Flow. OpenAPI 3.0 isn't supported, so don't waste time generating the newer format. Once you have the 2.0 definition, you can import it as a Custom Connector and call your Flow with a friendly typed interface from anywhere in your tenant.
Practice the SAS key reset before you need it
If you're using Anyone mode, the day the URL leaks is the worst possible day to learn the reset process for the first time. It's not a button, it's a browser dev-tools dance (see Resetting the URL). Do a dry run on a test Flow now, bookmark the Microsoft docs, and add the steps to your incident response checklist. Future-you will be grateful.
Name it correctly
The name is super important since we can get the trigger from anywhere and with anything. Always build the name so that other people can understand what you are using without opening the action and checking the details.
Always add a comment
Adding a comment will also help to avoid mistakes. Indicate your expectations, why the Flow should be triggered, and the data used. Again, it's essential to enable faster debugging when something goes wrong.
Final Thoughts
The "When an HTTP request is received" trigger opens Power Automate to the outside world, turning your flows into tiny web services you can call from anywhere. Just remember to guard that URL, anyone with it can run your flow. Pair it with a well-defined JSON Schema and you have a flexible, reusable building block.
Back to the Power Automate Trigger Reference.
Photo by Ibrahim Rifath on Unsplash



Hi I'd like to trigger a power automate flow from a powershell script in my release dev ops pipeline. Would it make more sense to use a json file like your example as i don't any data from the pipeline but i'm guessing i need to put some dummy data in to trigger the flow?
Hi , with this when a HTTP request recieved trigger the POST URL is changing when I open the flow in edit mode ..and saying "URL will generate on Save" ,but I want to retain the old one always because of this issue I can't modify the flow much ... how can I avoid this issue ...Please reply.
can this trigger be used to receive multiple parameters and a file (or for example a parameter with "file name" and "file content" )? I want to implement this but dont know if it is possible and how the new JSON schema would look like. Any thoughts?
Hi, If an outlook email needs to be trigged after the http request is received, with the body of the email having the request payload OR just the parameters and their values then how can that be achieved? Thanks.
I'd like to validate requests that are received using the schema. I've gone into settings and turned that feature on. Yet when I make a request it still seems to accept it and return a 202 response. My schema uses an enum for one of the properties to list acceptable values for that particular property. I'm pretty limited in my understanding of schemas. But Power Automate does not seem to enforce any limited set of values for that property with my current setup. Any ideas?
Any advice on what to do when you have the same property name? For instance, you have an object with child objects, and each child object has an 'id'. how do I know which id is the right one?
Hi Luis, I don't think it's possible. Power Automate will consider them the same since the "id" is the "key" of the object, and the key needs to be unique to reference it. When you try to generate the schema, Power Automate will generate it with only one value. For example: <code>{ "id":1, "id":2 }</code> will result in: <code>{ "type": "object", "properties": { "id": { "type": "integer" } } }</code> Having nested "id" keys is ok since you can reference it as triggerBody()?['id']?['id'] for example Cheers Manuel
Thank you for When an HTTP request is received Trigger. We have created a flow using this trigger, and call it via a hyperlink embedded in an email. Clicking the sends a GET request to the trigger's URL and the flow executes correctly, which is all good. However, because we've sent the GET request to the flow, the flow returns a blank html page, which loads into our default browser. We want to suppress or otherwise avoid the blank HTML page. POST is not an option, because we're using a simply HTML anchor tag to call our flow; no JavaScript available in this model. Does the trigger include any features to skip the RESPONSE for our GET request? In a perfect world, our "click" will run the flow, but open no browsers and display no html pages. Advice?
You're welcome :). Your reasoning is correct, but I don't think it's possible. My first thought was Javascript as well, but I wonder if it would work due to the "authentication" process necessary to certify that you have access to the Flow. I'm not sure how well Microsoft deals with requests in this case. I can't find a suitable solution on the top of my mind sorry :(
Hi Manuel, Do you know where I can programmatically retrieve the flow URL. I need to create some environmental variables for devops so I can update the webhook in the Power Platform as we import it into other environments.
Hi Mark, It's a good question, but I don't think it's possible, at least not that I'm aware of. If someone else knows this, it would be great. Thanks!