I like SharePoint's Gallery View a lot. With it, we can display the data nicely to the user, and it’s a great way to see a lot of data instantly without feeling overwhelmed.
But sometimes, we see something like this when visiting our SharePoint gallery.
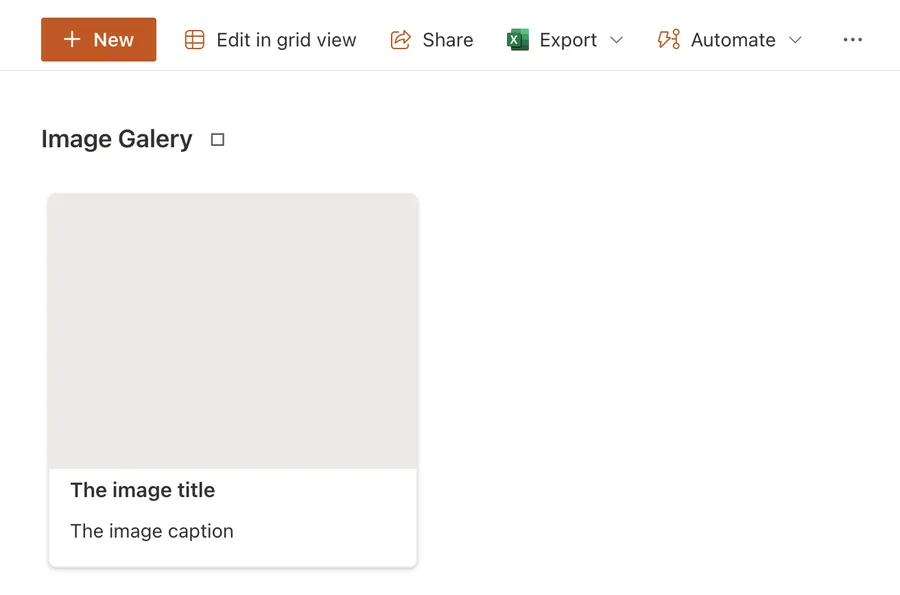
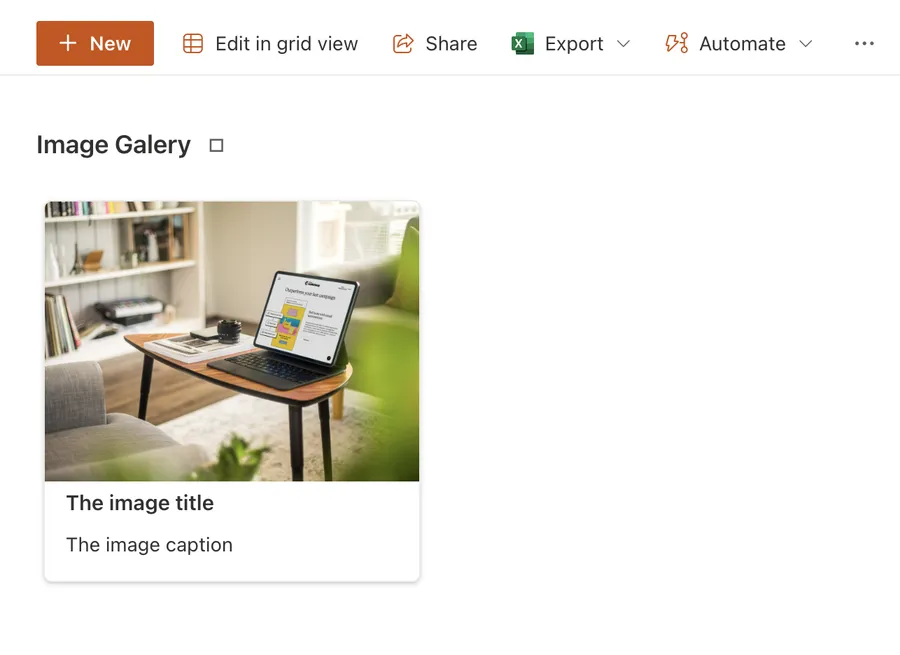
The image is not showing. We want something like this.
Let’s see how to fix it.
Solutions
There are a few solutions, depending on your problem, so let’s look at some of them.
Validate the data in the image column
One of the problems is that we don’t have an image present. Look at your SharePoint list and check if you have an image column and it has data like this:

Don’t forget that the image columns could be hidden. Since the names of the columns could not represent their content, let’s check if we have an image column in the settings. Let’s go to the top corner and press the “gear” and then “list settings”.

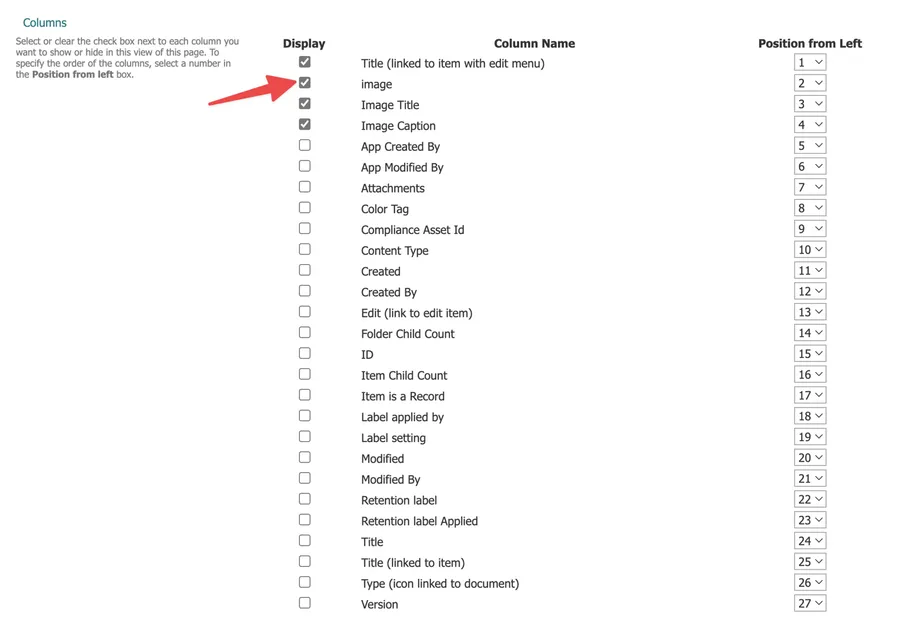
Now let’s find an image that is a “Thumbnail” like this:
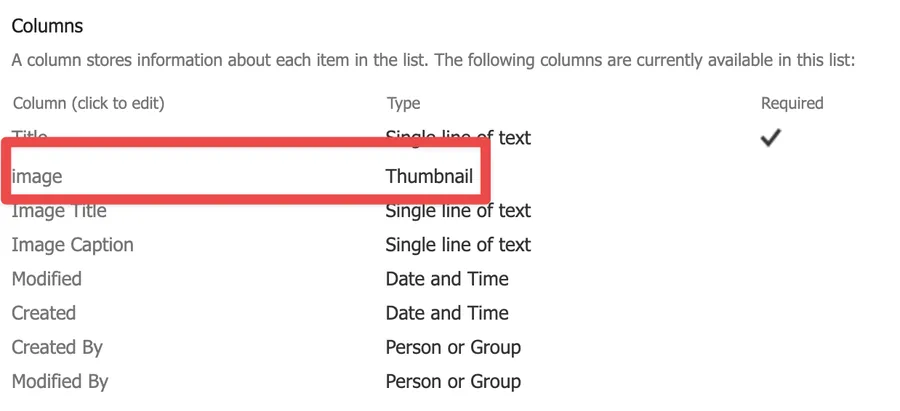
In our case, it’s called “image” but in your case could be something entirely different.
Now that we have the name, let’s check if the column is being displayed. To do that, we have two ways. We can select “Edit current view” like this:
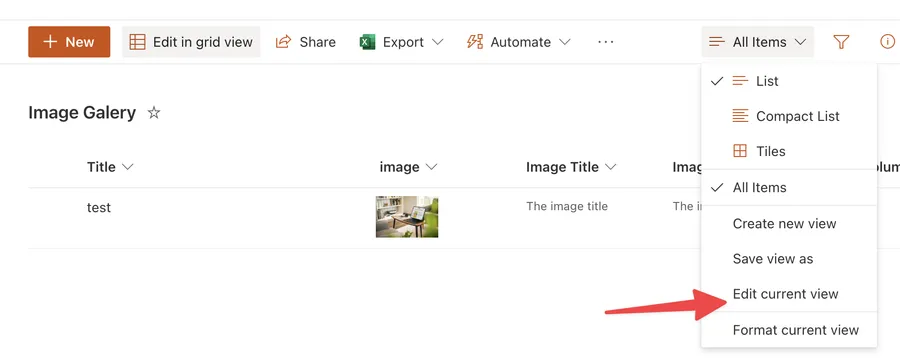
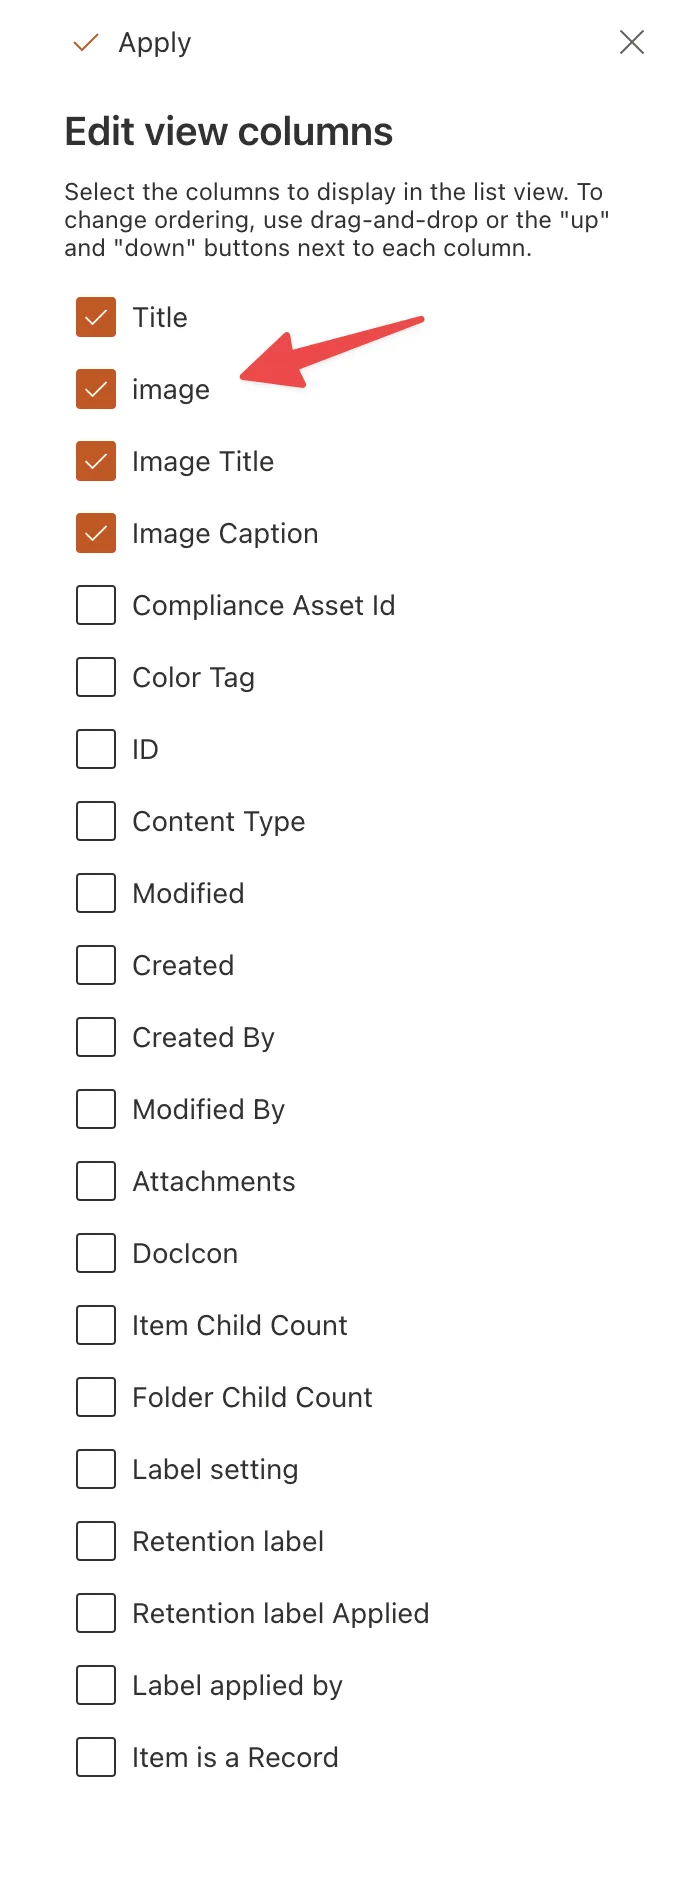
If the “image” field is not checked, we can check it to display it in the view.
The other way is to use the “Add column” and then “Show or hide columns”.
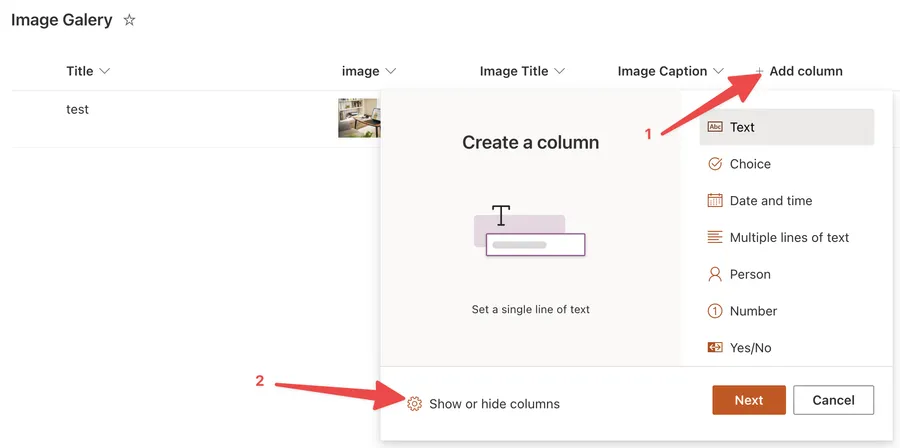
You can then select the “image” field to be displayed.
If the image was not loaded, you only need to load it and see if it shows in your gallery view; otherwise, your problem is solved.
But if you still have issues here's another solution.
Map the image in the Gallery View
Another problem is that the image column you want to use is not mapped correctly in the gallery view. For example, let’s say that you have two image columns called “Site Thumbnail” and “Test Image”, but you only loaded images on “Site Thumbnail” and not on “Test Image”, but the “Test Image” is the one mapped in the gallery.
To check, let’s go to the gallery and check what’s mapped. To do that let’s press “All Items” (or the name of the view you’re using) and then “Format current view”.
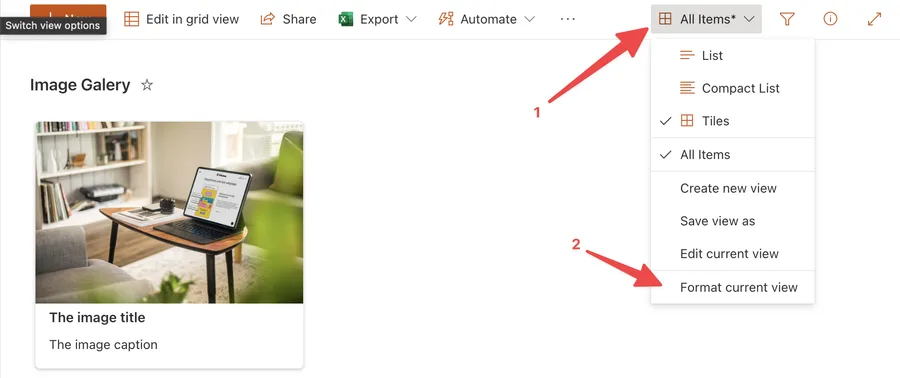
Click “Edit card”.
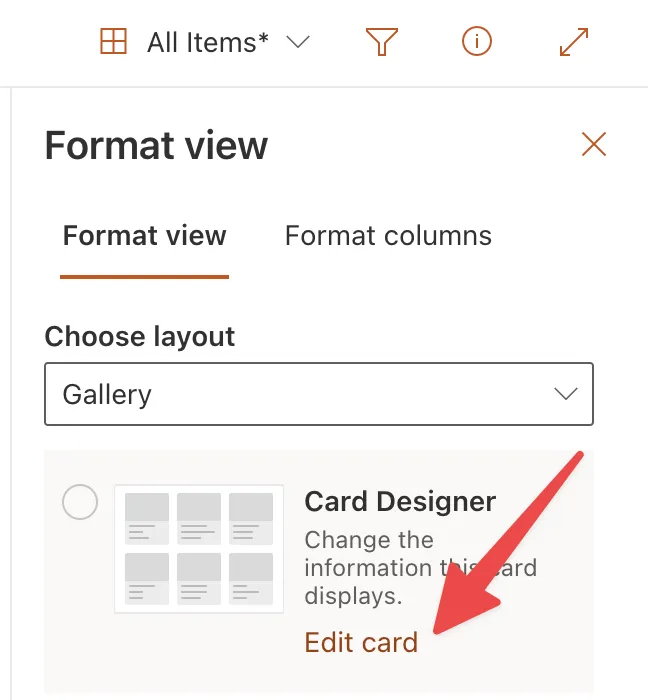
Now check if the “image” field you want to display is selected. Also, ensure that the “show preview” is enabled; otherwise, it won’t appear correctly.
Select it. Do you see an image in your Gallery View? If not, we have another possible solution below.
Check if the path is correct.
We tried the easiest ones, so we must go a bit lower to check if something is incorrectly configured. For example, the issue could be that the configuration file that displays the images has an invalid parameter, and then the image is not displayed correctly.
Although it will look a bit technical, I’ll guide you through the process so that you can understand what you’re doing.
Let’s get to the “Format current view”.
Select the “Advanced mode” at the bottom.
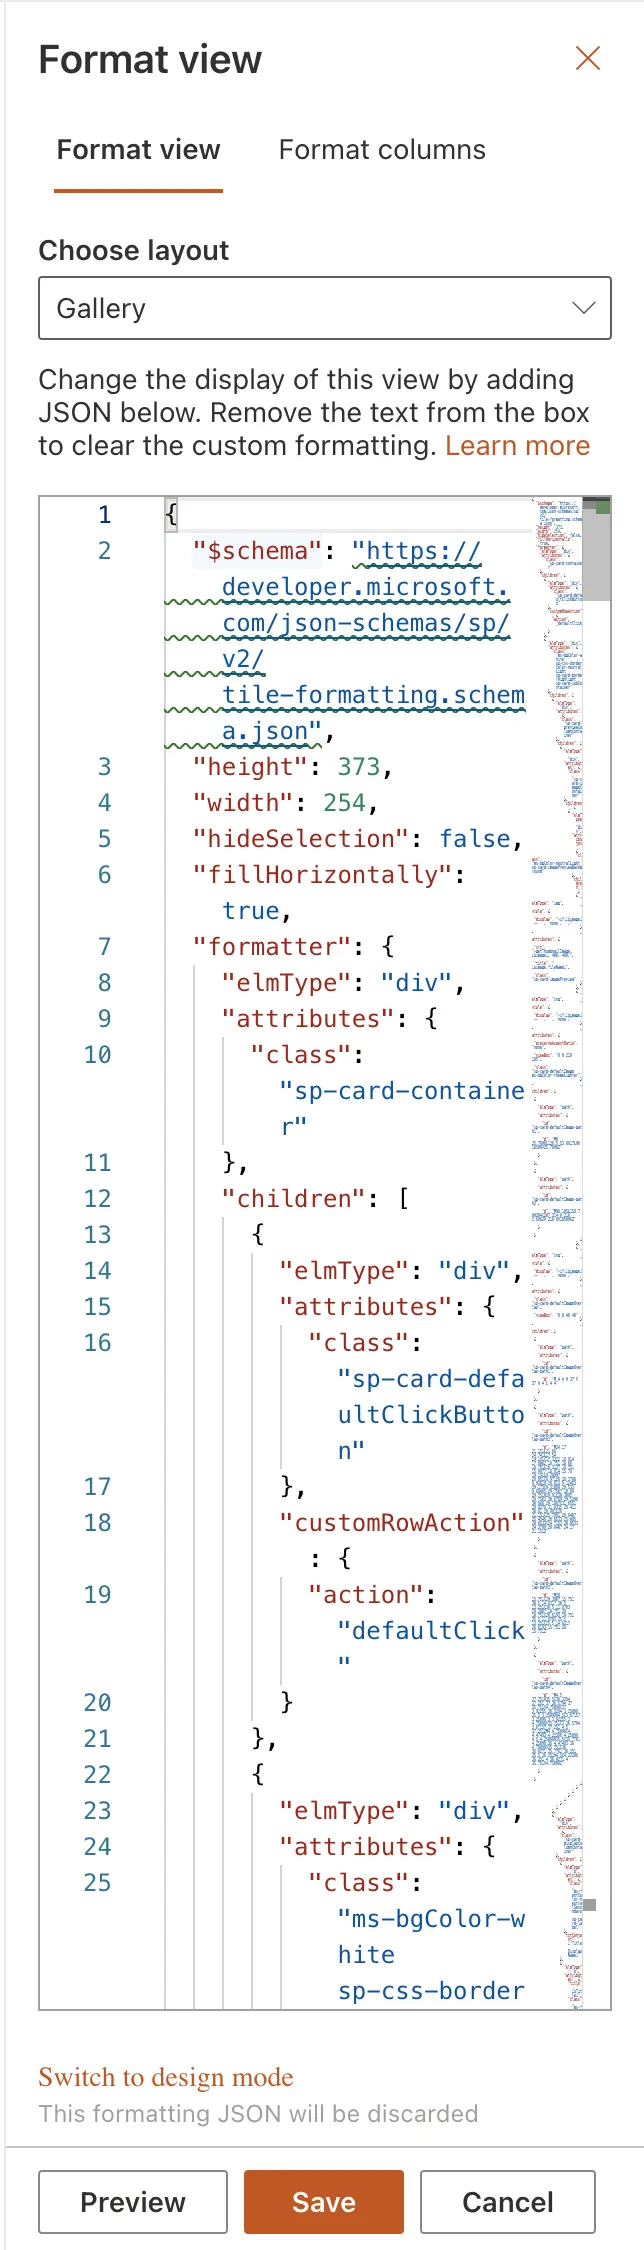
Now copy all text that you see to a text file. It will serve two purposes. First, you’ll have a backup of your configuration in case something goes wrong, and it will be easier to edit.
Now find a place that contains the line “sp-card-previewColumnContainer”.
You’ll see something like this. 😱
"children": [
    {
        "elmType": "div",
        "attributes": {
            "class": "sp-card-previewColumnContainer"
        },
        "children": [
            {
                "elmType": "div",
                "attributes": {
                    "class": "sp-card-imageContainer"
                },
                "children": [
                    {
                        "elmType": "div",
                        "attributes": {
                            "class": "ms-bgColor-neutralLight sp-card-imagePreviewBackground"
                        },
                        "children": [
                            {
                                "elmType": "img",
                                "style": {
                                    "display": "=if([$image] == '', 'none', '')"
                                },
                                "attributes": {
                                    "src": "=getThumbnailImage([$image], 400, 400)",
                                    "title": "[$image.fileName]",
                                    "class": "sp-card-imagePreview"
                                }
Why this? Because we want to check why the image’s preview is not working, we need to access the code part of that element. Now look down, and you’ll see the “src” part. This will indicate to SharePoint where to find the image. Remember before we searched for the name of the image’s column name; in our case, it is called “image” (no points for imagination here, I know). You can see the reference to that column in this line.
=getThumbnailImage([$image], 400, 400)
The “$image” is how SharePoint references the “image” column.
If you don’t see the code above, try replacing that line (don’t forget the double quotes) with the one above. For example, let’s say that your column is called “Preview” Here’s what you need to replace:
=getThumbnailImage([$Preview], 400, 400)
If your column name has spaces, you must be careful and replace the spaces with “_x0020_”. For example, if your image is called “Site Preview” you need to replace it with
=getThumbnailImage([$Site_x0020_Preview], 400, 400)
Let’s try it out. Press “Preview” and see if the image shows up in the gallery.

The preview won’t save the final data; it only allows you to test changes before committing them. It’s handy when testing since the changes won’t be propagated to users. If the image is shown, then your problem is solved. Press “Save” to commit the changes to everyone.
Finally, some users indicated that they found another issue in the code above, where they don’t see the “getThumbnailImage” but something else. If so, try the following code instead of the above.
[$image.serverRelativeUrl]
This will indicate to SharePoint that you want to fetch the image differently by using the image’s URL relative to your server name.
Now press “Preview” to test if it solves the problem. Do you see the image in your Gallery View?
Final thoughts
These are all the solutions that I’m aware of, but there could be others. So if you have another solution, please let me know, and I’ll add it here for the community to benefit. And if you want to contribute with your nice-looking galleries, be my guest 😀.
Photo by Zalfa Imani on Unsplash


This is about a web part from an "Image Galery" list. What if you are trying to use a modern page, which has an "Image Gallery" web part built in, but it doesn't give you properties to go fetch your images when you click Edit? I think what you did was the old way.