
Today a simple template, but quite powerful if you extend it to your needs. I mentioned this example briefly in my “Create a task” action reference article, but I want to expand on the idea and the strategy that can be used. So here's how to receive an email and add it to Planner using Power Automate.
[su_icon_panel background="#e6e9b8" color="#34480B" border="1px solid #6A8E46" shadow="0 5px 15px #A0B02E" icon="icon: leaf" icon_color="#A0B02E" icon_size="48"] Featured Functions in this article:
length
split function
item function
join function
If you want more functions, please check my Power Automate Function Reference.
Featured Actions in this article:
”Condition” action
”Compose” action
”Apply to Each” action
“HTML to Text” action.
“Create a task” action
“Update task” action
“Update task details” action
"Get User Profile" action
If you want more actions, please check my Power Automate Action Reference.
[/su_icon_panel]
Where do we save time?
We want to react to emails that arrive and automate creating tasks, assigning people, and archiving the email. This way, you’ll save time by removing the following actions:
- First, read the email and check if it fits the rules to create a task.
- Then, create a new planner task.
- Copy the values to the planner task
- Assign to the people in the email
- Add tags to the task based on the rules
- Archive the email in the folder.
It’s a lot of tiny tasks that add up over time. With this template, you don’t have to do any, so we can automatically receive an email and add it to Planner.
The Template
We will start with the “When a new email arrives” trigger. We’ll leave it as is, but you should look at the parameters if they need to be changed to fit your rules.
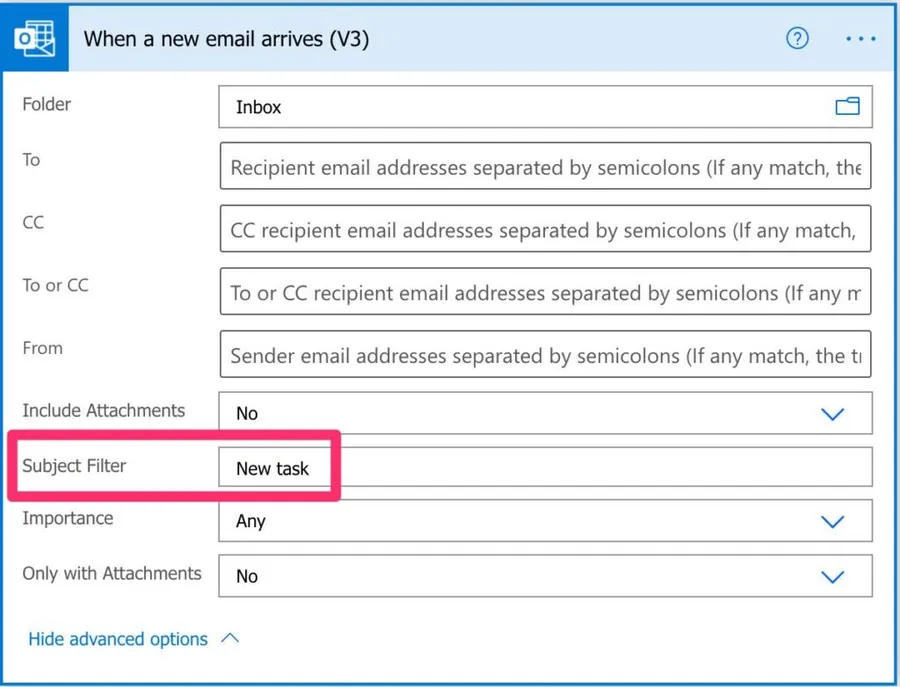
We only want to get emails containing that string in the subject, but your filters may change.
Get and check the emails.
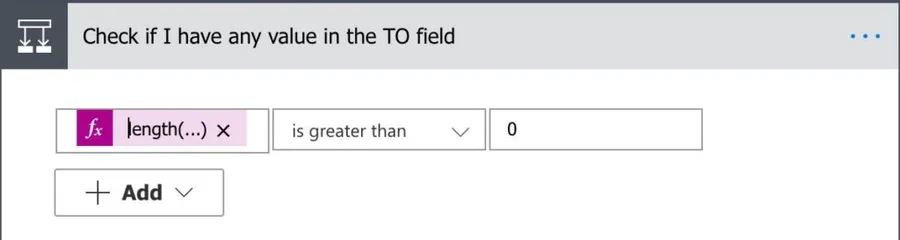
Now that we have a trigger, let’s check the people that are in the TO field. To do it, we’ll use the length function in a” Condition” action.
length(triggerOutputs()?['body/toRecipients'])
Since the toRecipients contains a string and not an email; we need to break it into an array of emails using the split function.
split(triggerOutputs()?['body/toRecipients'],';')
You can use a ”Compose” action since we’ll only need an array to check and add to the list of emails.

If they exist, we’ll check if they exist in our organization.
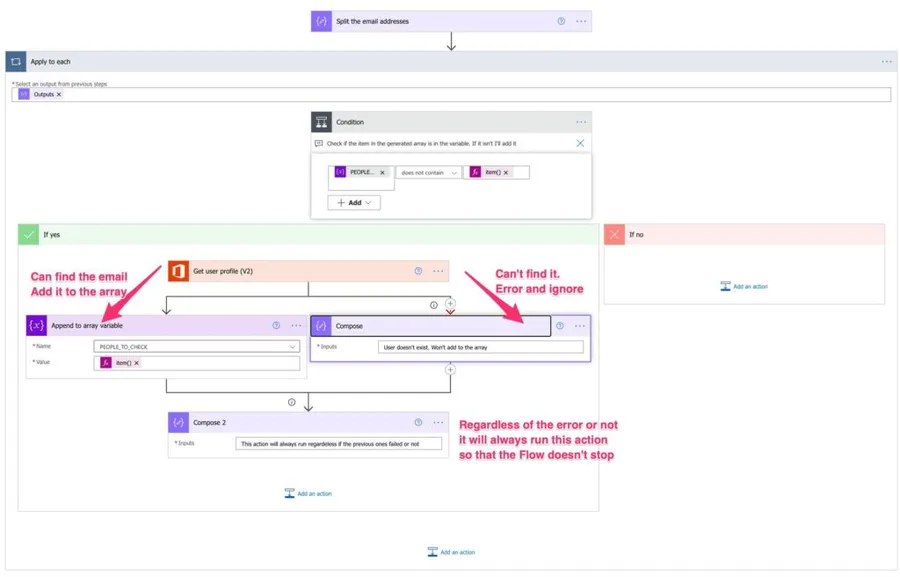
We’re doing a bunch of stuff here. First, we’re using an ”Apply to Each” action to check all values that the split function returns inside the compose action. After that, we’re using a ”Condition” action to check if the array doesn’t contain the email. If it doesn’t, we can use the “Append to Array Variable” action to get the values in the array.
There's one point that I want to explain a bit more and that's the "Get user profile" action. The action will return an error if it can't find the person in the organization. Since any mail can be inserted we're checking if it fails and if it does ignore it. After that, we need a second "Compose" action so that, regardless if we have an error or not the "Apply to Each" action will continue. Otherwise, we'll go into the right branch but since there was an error the Flow will fail regardless.
Please notice that we’re using the item function to both checks and add to the array. Please check the item function reference for more details on why we’re doing this.
If you want to add the CC
You can extend this template to get the CC emails as well. Your need to copy and paste the “Check if I have any value in the TO field” to do the same action if you want to do it. Please note that the trigger will only return the CC field when CC values are in the email. So you need to check if the cc field exists before making the comparison; otherwise, your Flow will fail.
Add the task
Now that we have everything ready, let’s add the task with:
- The subject of the email as the title without changing it
- The body of the email is the description, but first, we’ll convert the HTML into text using the “HTML to Text” action.
- Add the people as assigned.
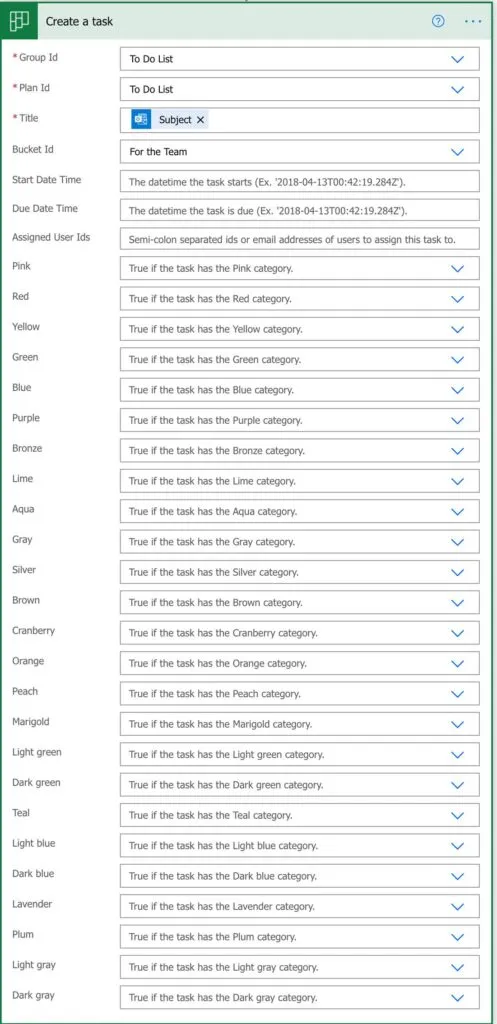
We have to use 3 actions to do add all elements to the task:
- “Create a task” action to set the title and the bucket.
- “Update task” action to set the assigned users.
- “Update task details” action to set the description.
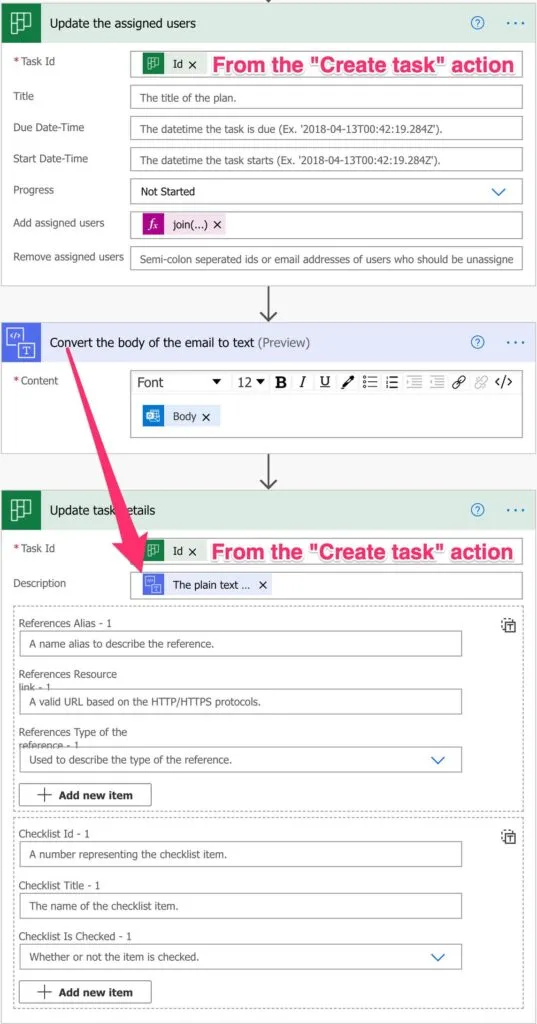
To get the email is easy. We only need to use the join function with the semi-colon as the separator:
join(variables('PEOPLE_TO_CHECK'),';')
Final thoughts
I like this template a lot because I can showcase a lot of functions and actions. Also, I like that we can receive an email and add it to Planner automatically, without having to do any time-consuming and boring tasks while saving a ton of time in the long run.
Finally, I left you a link for each, and the template is fully commented so that you can learn a bit from it.
Photo by Volodymyr Hryshchenko on Unsplash


No comments yet
Be the first to share your thoughts on this article!