
Continuing with Microsoft Planner's fundamentals, today, we’re going to explore the grouping options available. Although with some quirks, it’s an amazing way to organize your information and have multiple views of the same data.
We’re all used to grouping based on something we add to the items, like tags, but Microsoft Planner goes a step further. It enables you to group by “Labels” as well as “Buckets.” Buckets are bigger classifications (more on this later) that you can use to organize your data.
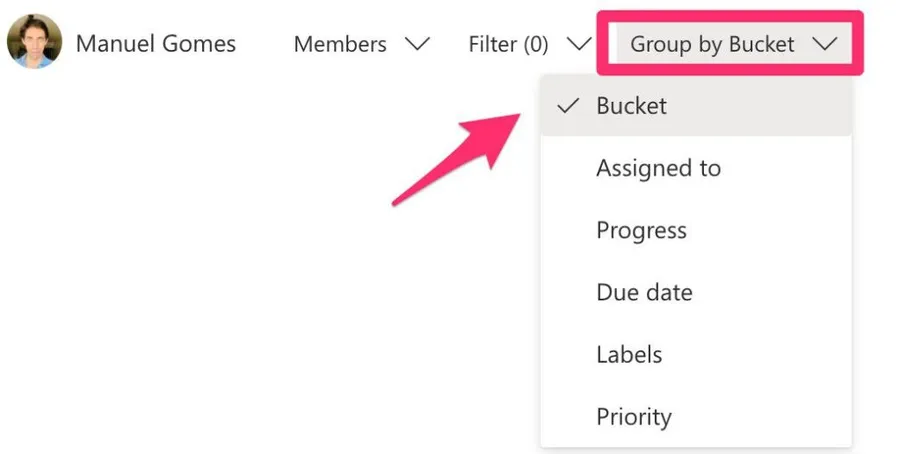
But you can also organize things that you don’t usually use to aggregate information, like “Assigned To,” “Progress,” or even “Priority.” This is a wonderful way to, depending on the needs, change the grouping and work on the items of that group. You can sort by the label and tackle all related tasks or only pick the ones assigned to you. Simple and amazingly effective.
If you want a rule, and oversimplifying a little, think of them as ways to display the tasks into columns. Then you have specific contexts to work on.
Buckets
I want to detail a little bit more the concept of “Buckets” because people may confuse them with tags. Buckets are big groups of information that you can assign tasks to. Notice that you can only assign one bucket to a specific task while you can have multiple tags. For example, think of a Kanban board where you can have “Waiting for feedback” or “On-hold.” I would recommend, though, not using it to track progress since there’s a field for that (more on that later). Buckets are a wonderful way to make big classifications of tasks, like departments, business areas, major types of tasks, etc.
You can create multiple buckets and then group them in a nice view.

You can create a lot, but you may get lost in the huge number of columns and don’t really know where to put a task. Be strategic in creating “Buckets”; otherwise, they’ll do more harm than good.
Labels
We’re all used to labels, and they are an amazing way to classify one item with multiple contexts. They can be anything, and we’re used to using them quite often, and it’s more than possible that you may have hundreds of labels in the tools you use.

Microsoft Planner provides labels, and you can assign multiple to the same task, but there’s one “strange” limitation. You can only have 6 labels. 🙀. Why? I Don’t really know since you can go “bananas” creating buckets to sort your data. It’s a strange decision from Microsoft and one you should be aware of.
Progress
In the “Buckets” section, I mentioned that you shouldn’t use status, and that’s because we have the progress.

This is the least flexible field since we cannot edit the labels or change or add status. But the ones we have are quite useful when used wisely with “Labels” and “Buckets.”
I use this to check what I have ongoing and drag them to the “Completed” state when I finish them.
As a rule of thumb, you should not have more than 2-3 in progress; otherwise, you’ll not be able to focus on the tasks at hand. The only exception is if you’re waiting for information to proceed, so use “Labels” and “Buckets” wisely so that you don’t get lost.
Due date
It would be best if you kept an eye on this one. Tasks can sneak up on you, and when you least expect, you have late tasks.
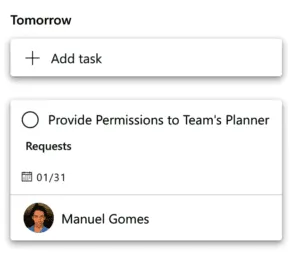
This view has something that I really like. The grouping by due date only shows "states" that exist. For example, if you only have tasks for tomorrow, you’ll only have a column called “Tomorrow,” as you can see above.
Priority
As mentioned before, you should keep an eye on the priority—nothing worse than spending time on “Medium” tasks when you have urgent tasks waiting for you.

Talk with the team and don’t abuse the “Urgent” tasks. In our team, we consider the “Urgent” tasks to stop everything you are doing and tackle.
I would recommend not mixing this with the “Due Date.” A task may be late, but it’s ok because it’s a “Low” priority, but it should not become “Urgent” just because it’s late.
Final thoughts
Having multiple ways to classify the data is amazing since, with a simple toggle, you can have the data grouped in the way that best suits you at that time. But all depends on the team’s
Have a suggestion of your own or disagree with something I said? Leave a comment or interact on Twitter and be sure to check out other Microsoft Planner-related articles here.
Photo by Julian Myles on Unsplash


No comments yet
Be the first to share your thoughts on this article!