Calendar invitations are some of the most used features by everyone, especially now that we’re all doing remote meetings and having many of them. These calendar events are usually ICS calendar event files attached to your email, and that your email provider knows how to interpret and add to your calendar. Also, you never have to generate them because your email client takes care of that for you.
But were you aware that you can quickly build and send one using Power Automate if you need to send an invitation to someone? It’s quite simple, so let me show you how to do it.
Post Updated
6th August 2021: Major rewriting of the article with new components and more information.
24th August 2020: Big thanks to Rob from the Power Automate Community for catching a big mistake in this article.
The structure
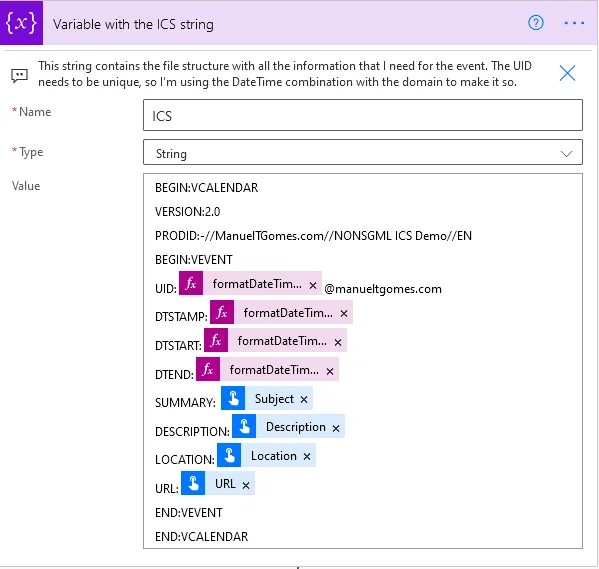
An ICS calendar event is a text file with a defined structure. Once you know it, it’s easy to build one, and, thankfully, the whole process is quite simple. Here’s an example:
It’s quite self-explanatory, but let’s go through the items and check the structure of each one of the above. If you want to go deeper, I recommend checking Wikipedia’s entry on this with a lot more detail, but let’s keep it simple.
BEGIN:VCALENDAR
VERSION: 2.0
BEGIN:VEVENT
The PRODID can be static but needs to be defined. In my case, I've defined my website, but you can provide any string that makes sense to you.
PRODID:-//ManuelTGomes.com//NONSGML ICS Demo//EN
The application starts reading the file and knows that this is a Calendar (VCALENDAR) file with version 2 (V2.0) of the structure, and it has an even (VEVENT). So consider this as the start of the definition of the event.
UUID:
Some platforms require that the calendar event has a unique identifier. In our case, we're generating one based on the date so that we can ensure that there's uniqueness.
DTSTAMP:
The timestamp that the calendar event is being generated. It should not be the same as the start or end of the event, but the instant we generate the ICS file.
URL:
Some events have URLs for stuff like meeting rooms, websites, and more, so here’s where you put the URL that you want your calendar to point to. You can add this to the description also.
DTSTART:20201224T141711Z
The "DTSTART" has the start date of the event. Note that the date format must be in the ISO 8601 (catchy name, right?!?! 😀) above. YYYYMMDDThhmmssZ, so I the example:
YYYY - The full-year 2020
MM - Month 12 with always two characters.
DD. Day 24 with always two characters.
T signals the time comes after
hh - The hour in 24-hour format and always with two characters.
mm - The minute with always two characters
ss - The seconds with always two characters
Z - indicates that is the UTC (0h offset)
DTEND:
The same above but for the end date of the event.
SUMMARY:
Usually, the summary will be the title of the event in your calendar entry.
DESCRIPTION:
This field represents the description or body of the calendar’s entry. Note that you don’t need to use double quotes or quotes in this field. You can add the text freely, but be aware of the carriage returns. It means that it won’t translate into a new line in the description if you press enter on the text. So you should include instead n if you want to do that.
LOCATION:
The location of the event in a text format. Some applications can translate this into addresses and other things, but the basis is always a text entry.
END:VEVENT
END: VCALENDAR
When the app reads this part, it knows it's reading the end of the file.
How to do it in Power Automate
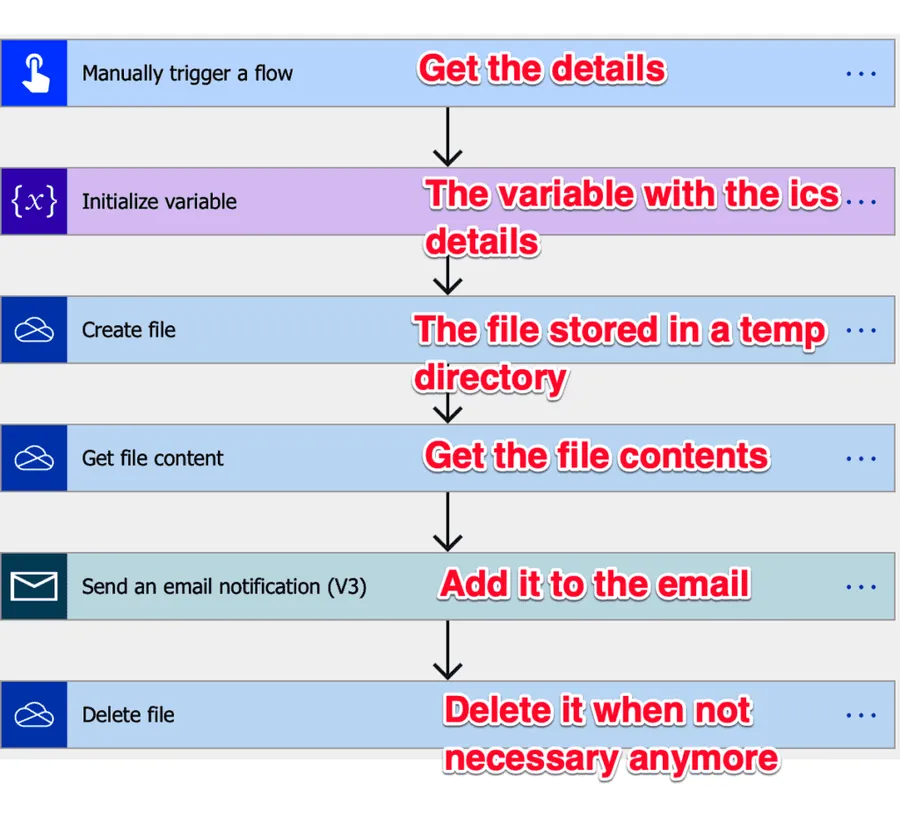
After seeing the structure, you can understand how easy it will be to generate the file. For that, you need only to create a text entry with this, save a file with the .ics, and send it. Here’s the full Power Automate, and then we can go step by step.
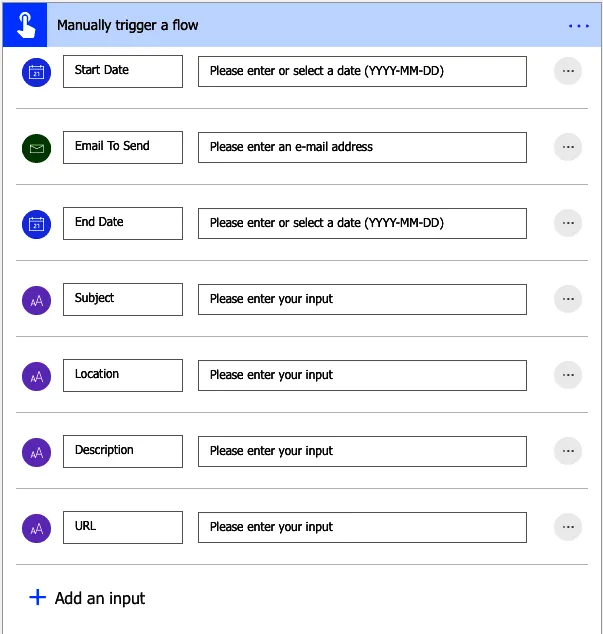
The trigger is simple to get all the information that we need:
You can easily see that these are the fields that we need for our example file above.
Now let’s form the ICS file:
Super easy, right? The only caveat is that we need to be careful to convert the date to the format:
Easy also. We get the date from the trigger and define the ISO format that we need.
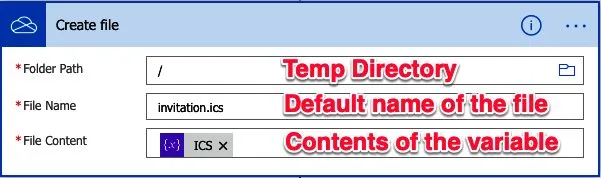
Now let’s generate the ICS calendar event:
The directory is not essential. We’ll delete the file later. The name is also not crucial, but it’s the one that the user will see, making it user-friendly.
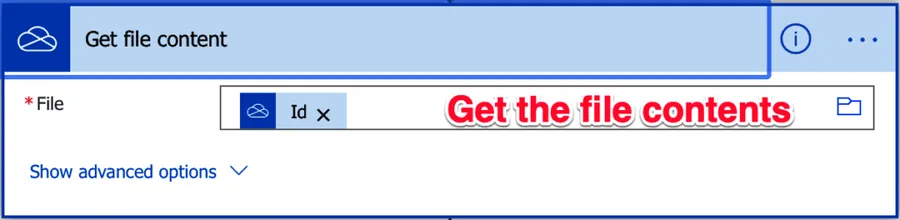
Get the file contents:
We do this because, above, we don’t have a file but only a text string. So, to send a file attached in the email, we need to create it, and that's what's happening here. Then, you can fetch it using the ID from the previous step.
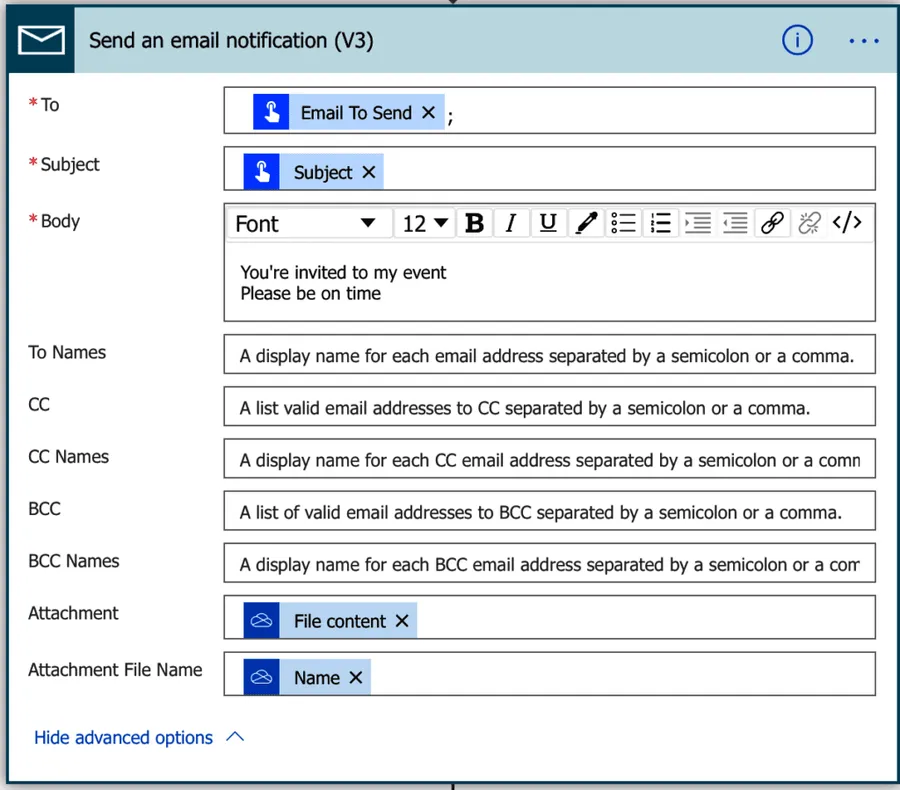
We can send an email as simple as this:
And finally, let’s delete the file:
Final thoughts
As you can see, it’s not hard, and it’s beneficial to generate these invitations dynamically. I have a template area where I publish stuff that you can import and use without putting it all together if you don't know. So take a look and let me know if there’s one that you would like to be featured there.
Disclaimer: This article was inspired by a question that I answered on the Microsoft Power Automate Community.
Have a suggestion of your own or disagree with something I said? Leave a comment or interact on Twitter and be sure to check out other Microsoft Power Automate-related articles here.
Photo by Alex McCarthy on Unsplash
Spotted a mistake or have a better approach? Let me know. I read and reply to every one.
A
Abonae
Hi Manuel
Thanks so much for this. I was able to add an ics attachment really easily. One thing though, there was no need to actually create a file in this example - just using the name and the value of the ics variable in the email was enough.
Abo
Hi Abonae,
Indeed you're right! :)
Well done my friend.
Manuel
J
Jay Lindell
Manuel, this is helpful; thanks.
I'm relatively new to PA and am struggling with whether and how your approach can accommodate a wrinkle in my situation. Hoping you or someone else can help.
I've developed a recurring flow that sends an email to people (from a SharePoint list) reminding them to send in their reports on a specific date that is always 7 days from the email trigger date. I want to include an all-day ICS that is also set for 7 days from that trigger date.
Hopefully that makes sense 😉
Thanks to you or anyone for your thoughts on this.
Hi Jay,
It makes perfect sense. You have to do two things to make it all day:
1. Remove the DTEND (since it's an all-day meeting, you only need the DTSTART)
2. In the DTSTART, use "DTSTART;VALUE=DATE:@{formatDateTime(addDays(utcNow(),7),'yyyyMMdd')}" (You can copy what's inside the " and paste it in the "Initialize variable"). The date needs to be in the format 20210215 (year, month, and day without the time). Your ICS should have, in the DSTART something like this "DTSTART;VALUE=DATE:20210222"
The formula will dynamically check what day is today, add it 7 days and format the data in the format that the calendar needs to interpret it as a "full-day event."
Can you please check if and let me know if you have any questions?
Cheers
Manuel
J
Jay Lindell
Hi, Manuel--
Thanks for getting back so quickly. I wanted to verify a few things and also indicate what I tried and what happened:
Since this is a recurring trigger, i didn't include the whole first part of your manually triggered solution, knowing I would hard-code those in the initialized variable
As Abonae suggested, I didn't use the steps to build the file
In the initialized variable itself:
1) you said I can remove DTEND, but I wasn't sure if I should also remove the other items I don't need (i.e., URL, Description and Location), so I kept them and just left each of them blank. (see http://jaylindell.com/ICS/ScreenShot_1.png)
2) I could not paste your above DSTART code (it just wouldn't take it), so I entered it manually (see same screen shot as in #1)
- If I pasted it into an expression (see http://jaylindell.com/ICS/ScreenShot_2.png), it threw an error: "Fix invalid expression(s) for the input parameter(s) of operation 'Initialize_variable'."
I was able to then run the flow but it attached something that was more like an email .eml file; it opens up as a new email (I suspect that is because the results of the flow show the DSTART field is empty.
J
Jay Lindell
also, see http://jaylindell.com/ICS/ScreenShot_2a.png for the error
HI Jay,
There's something wrong with the formula.. Try the following.
Copy
DTSTART;VALUE=DATE:
into the field and then press "Expression".
Copy
formatDateTime(addDays(utcNow(),7),’yyyyMMdd’)
and press update.
Regarding your other question, I think you can remove them safely. I never tried it but please test it and let me know if you have any issues.
Cheers
Manuel
J
Jay Lindell
Your approach got me thinking and I figured it out 😊. I also dissected the Outlook-created ICS file and was able to pluck out several pieces of code that 1) Adds a reminder that goes off at the start of the event, 2) makes it an all-day event and 3) sets the user's calendar as 'Free'. Here is what it looks like: http://jaylindell.com/ICS/ScreenShot_4.png
Thanks so much for providing the core of this solution; invaluable.
Stay safe!
J
Jay Lindell
Hi, Manuel,
Thanks. Is this what you mean? (see http://jaylindell.com/ICS/ScreenShot_3.png and http://jaylindell.com/ICS/ScreenShot_3a.png). As you can see, it still doesn't work 😞. (fyi, I put back in all the fields I am not using, just to not introduce any other variables with the ICS convention.)
S
Salma
Hi, I have a sharepoint list of meeting rooms and am adding a column that will have a link or attachment which will download the ics file when clicked, so they can book a room. To book a room, the meeting rooms email (which is in the sharepoint list) needs to be an invitee/recipient, so I need to add a MailTo: email in the ICS file. Do you know if there is a way to add a recipient/ that mailTo email?
A
admin
Author
Hi Salma,
To add people you have two roles. The ATTENDEE and the ORGANIZER. You can add them like this
<code>
ATTENDEE;RSVP=TRUE:mailto:person1@mail.com
ORGANIZER;CN=Name of Person:MAILTO:person2@mail.com
</code>
Have only one ORGANIZER and add multiple lines per ATTENDEE. For example:
<code>
ATTENDEE;RSVP=TRUE:mailto:person1@mail.com
ATTENDEE;RSVP=TRUE:mailto:person22@mail.com
ORGANIZER;CN=Name of Person:MAILTO:person2@mail.com
</code>
Can you please try and let me know if this solves your problem?
Cheers
Manuel
R
RV
In the template the file extension is mentioned as ICO instead of ICS. It only worked for me after I changed it to ICS.
Hi RV,
Thanks a lot for the comments. I've added a new template and more sections to the article.
If you find any other issues, please let me know.
Cheers
Manuel
Hi, this works great!
One issue though ... How can I transform the input-time "2021/10/01 11:00" to the right format?
I used you example but I then receive: YYYY10DDT110000Z
Hi!
Unfortunately, the format needs to be YYYYMMDDThhmmssZ since the ICS format has a defined and rigorous structure. I'm writing a bit more about it, but for now, try to convert the time to that format; otherwise, it won't work :(
Cheers
Manuel
D
Devika Madaan
Hi,
I am facing some issue in this process as after adding calendar ics file to google calendar, user is not able to join meeting as there is no link in that event. How to add link in ics calendar file so that attendees can directly join events?
Thanks for nice article. But if you want Cancel this calendar with Power Automate ? What will be the process
T
Tejas
Hi
I 've some problem with above scenario
I trigger above same flow it sends email with attachment but it's not added in calendar as event
please help me out for this issue
A
Alex
Many thanks for this very helpful tutorial !
My question is about ICS with several events.
How to build dynamically the ICS file when the number of events can be between 1 and 4?
ICS doesn't like empty date fields...
C
Chris
When I create a new .ics it asks if I want to open as new or import. When I select open as new, it returns as operation failed. Do you know what that could be?


Hi Manuel Thanks so much for this. I was able to add an ics attachment really easily. One thing though, there was no need to actually create a file in this example - just using the name and the value of the ics variable in the email was enough. Abo
Hi Abonae, Indeed you're right! :) Well done my friend. Manuel
Manuel, this is helpful; thanks. I'm relatively new to PA and am struggling with whether and how your approach can accommodate a wrinkle in my situation. Hoping you or someone else can help. I've developed a recurring flow that sends an email to people (from a SharePoint list) reminding them to send in their reports on a specific date that is always 7 days from the email trigger date. I want to include an all-day ICS that is also set for 7 days from that trigger date. Hopefully that makes sense 😉 Thanks to you or anyone for your thoughts on this.
Hi Jay, It makes perfect sense. You have to do two things to make it all day: 1. Remove the DTEND (since it's an all-day meeting, you only need the DTSTART) 2. In the DTSTART, use "DTSTART;VALUE=DATE:@{formatDateTime(addDays(utcNow(),7),'yyyyMMdd')}" (You can copy what's inside the " and paste it in the "Initialize variable"). The date needs to be in the format 20210215 (year, month, and day without the time). Your ICS should have, in the DSTART something like this "DTSTART;VALUE=DATE:20210222" The formula will dynamically check what day is today, add it 7 days and format the data in the format that the calendar needs to interpret it as a "full-day event." Can you please check if and let me know if you have any questions? Cheers Manuel
Hi, Manuel-- Thanks for getting back so quickly. I wanted to verify a few things and also indicate what I tried and what happened: Since this is a recurring trigger, i didn't include the whole first part of your manually triggered solution, knowing I would hard-code those in the initialized variable As Abonae suggested, I didn't use the steps to build the file In the initialized variable itself: 1) you said I can remove DTEND, but I wasn't sure if I should also remove the other items I don't need (i.e., URL, Description and Location), so I kept them and just left each of them blank. (see http://jaylindell.com/ICS/ScreenShot_1.png) 2) I could not paste your above DSTART code (it just wouldn't take it), so I entered it manually (see same screen shot as in #1) - If I pasted it into an expression (see http://jaylindell.com/ICS/ScreenShot_2.png), it threw an error: "Fix invalid expression(s) for the input parameter(s) of operation 'Initialize_variable'." I was able to then run the flow but it attached something that was more like an email .eml file; it opens up as a new email (I suspect that is because the results of the flow show the DSTART field is empty.
also, see http://jaylindell.com/ICS/ScreenShot_2a.png for the error
HI Jay, There's something wrong with the formula.. Try the following. Copy DTSTART;VALUE=DATE: into the field and then press "Expression". Copy formatDateTime(addDays(utcNow(),7),’yyyyMMdd’) and press update. Regarding your other question, I think you can remove them safely. I never tried it but please test it and let me know if you have any issues. Cheers Manuel
Your approach got me thinking and I figured it out 😊. I also dissected the Outlook-created ICS file and was able to pluck out several pieces of code that 1) Adds a reminder that goes off at the start of the event, 2) makes it an all-day event and 3) sets the user's calendar as 'Free'. Here is what it looks like: http://jaylindell.com/ICS/ScreenShot_4.png Thanks so much for providing the core of this solution; invaluable. Stay safe!
Hi, Manuel, Thanks. Is this what you mean? (see http://jaylindell.com/ICS/ScreenShot_3.png and http://jaylindell.com/ICS/ScreenShot_3a.png). As you can see, it still doesn't work 😞. (fyi, I put back in all the fields I am not using, just to not introduce any other variables with the ICS convention.)
Hi, I have a sharepoint list of meeting rooms and am adding a column that will have a link or attachment which will download the ics file when clicked, so they can book a room. To book a room, the meeting rooms email (which is in the sharepoint list) needs to be an invitee/recipient, so I need to add a MailTo: email in the ICS file. Do you know if there is a way to add a recipient/ that mailTo email?
Hi Salma, To add people you have two roles. The ATTENDEE and the ORGANIZER. You can add them like this <code> ATTENDEE;RSVP=TRUE:mailto:person1@mail.com ORGANIZER;CN=Name of Person:MAILTO:person2@mail.com </code> Have only one ORGANIZER and add multiple lines per ATTENDEE. For example: <code> ATTENDEE;RSVP=TRUE:mailto:person1@mail.com ATTENDEE;RSVP=TRUE:mailto:person22@mail.com ORGANIZER;CN=Name of Person:MAILTO:person2@mail.com </code> Can you please try and let me know if this solves your problem? Cheers Manuel
In the template the file extension is mentioned as ICO instead of ICS. It only worked for me after I changed it to ICS.
Hi RV, Thanks a lot for the comments. I've added a new template and more sections to the article. If you find any other issues, please let me know. Cheers Manuel
Hi, this works great! One issue though ... How can I transform the input-time "2021/10/01 11:00" to the right format? I used you example but I then receive: YYYY10DDT110000Z
Hi! Unfortunately, the format needs to be YYYYMMDDThhmmssZ since the ICS format has a defined and rigorous structure. I'm writing a bit more about it, but for now, try to convert the time to that format; otherwise, it won't work :( Cheers Manuel
Hi, I am facing some issue in this process as after adding calendar ics file to google calendar, user is not able to join meeting as there is no link in that event. How to add link in ics calendar file so that attendees can directly join events?
thank you for the information
Thanks for nice article. But if you want Cancel this calendar with Power Automate ? What will be the process
Hi I 've some problem with above scenario I trigger above same flow it sends email with attachment but it's not added in calendar as event please help me out for this issue
Many thanks for this very helpful tutorial ! My question is about ICS with several events. How to build dynamically the ICS file when the number of events can be between 1 and 4? ICS doesn't like empty date fields...
When I create a new .ics it asks if I want to open as new or import. When I select open as new, it returns as operation failed. Do you know what that could be?