by
by I got this question from a reader, and it’s an interesting one. “When an Excel file is created in a document library, import all its data into a SharePoint list”?
If you’re looking for how to access Excel with a dynamic path, I wrote in the past two articles detailing that. You can find them here and here. Since we already know the file’s path, we’ll use a different strategy to fetch the metadata.
When an Excel file is created, import the values to a SharePoint list
The idea is to check when an Excel file is created in a SharePoint document library, fetch the rows, and create new items in a SharePoint list.
It looks simple, but it’s tricky in specific steps, so let’s check each of them in turn.
Thinks to know before
Here are some things to understand before we start.
We’ll only parse Excel files.
We’ll first check if it’s an Excel file since the Flow depends on the data being in that format. If you want, I also have in my cookbook section a template for parsing CSV files.
Parse a CSV file with no premium connectors
The template now supports quotes, the configuration of separators, select the file with headers, and more. It’s a massive upgrade from the other template, and I think you will like it. More details about it are here.
We need tables
Power Automate requires that you have data in a table so that it can import it. Unfortunately, this is quite a common mistake, and it’s especially tricky here since we’re going to refer to it manually, so your Flow will fail if you don’t have the data in tables. So here’s how to do it.
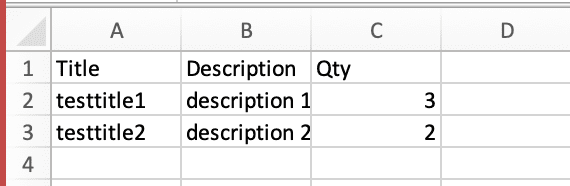
Let’s check a sample dataset.
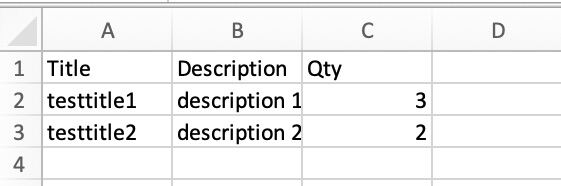
To create your table select the data:
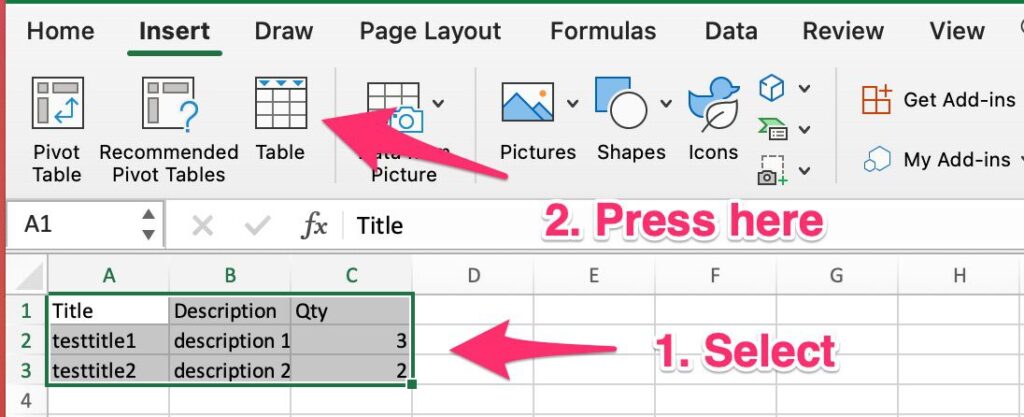
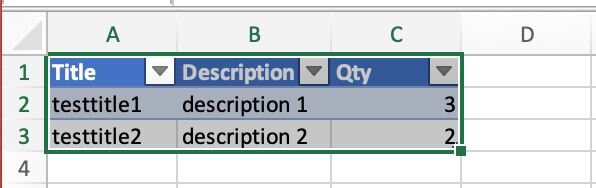
Press “OK” (don’t forget to select the checkbox to include the headers), and Excel will create the table for you.
Finally, we need to have a way to refer to the table since Excel may contain several. To do that, change the “Table Name” with a name that makes sense for you.
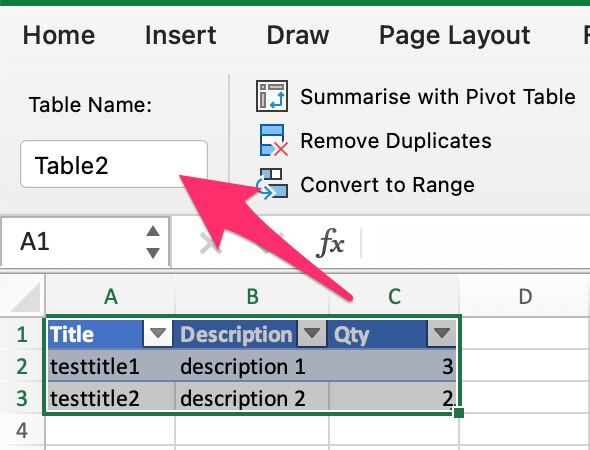
For this template to work, you always need to have the same name for all the files you create, so be sure to check this to avoid errors in your Flow. We’ll call it “TableSharePoint” for the sake of this article and template
The files need to have the same structure.
In the previous step, we checked how to create a table, but another thing that is important to keep in mind is the Excel file structure. For this template to work, we need that the Excel files have the same structure, meaning that we need to define the columns that we want to fetch and insert into the SharePoint list.
(If you want) make them fully dynamic.
If you want to parse the Excel but don’t know the name of the “Worksheet” or the “Table,” you will need to check the ones in the file. Since we don’t know if the files have tables or worksheets, you’ll need to take care of the errors so that your Flow fails graciously and doesn’t generate errors to other Flows.
You can use the “Get worksheets” and “Get tables” actions to do this. By fetching the information, you can then use the “Apply to Each” action to iterate in all items for each result.
I’ll write an article about how to do the whole Flow in the future, but I wanted you to have this information already if you’re going to try it for yourself.
The template
Now that we have the files prepared, let’s look at the destination SharePoint list that will contain the information.

First, let’s look at the whole template and then split it up and explain the steps.
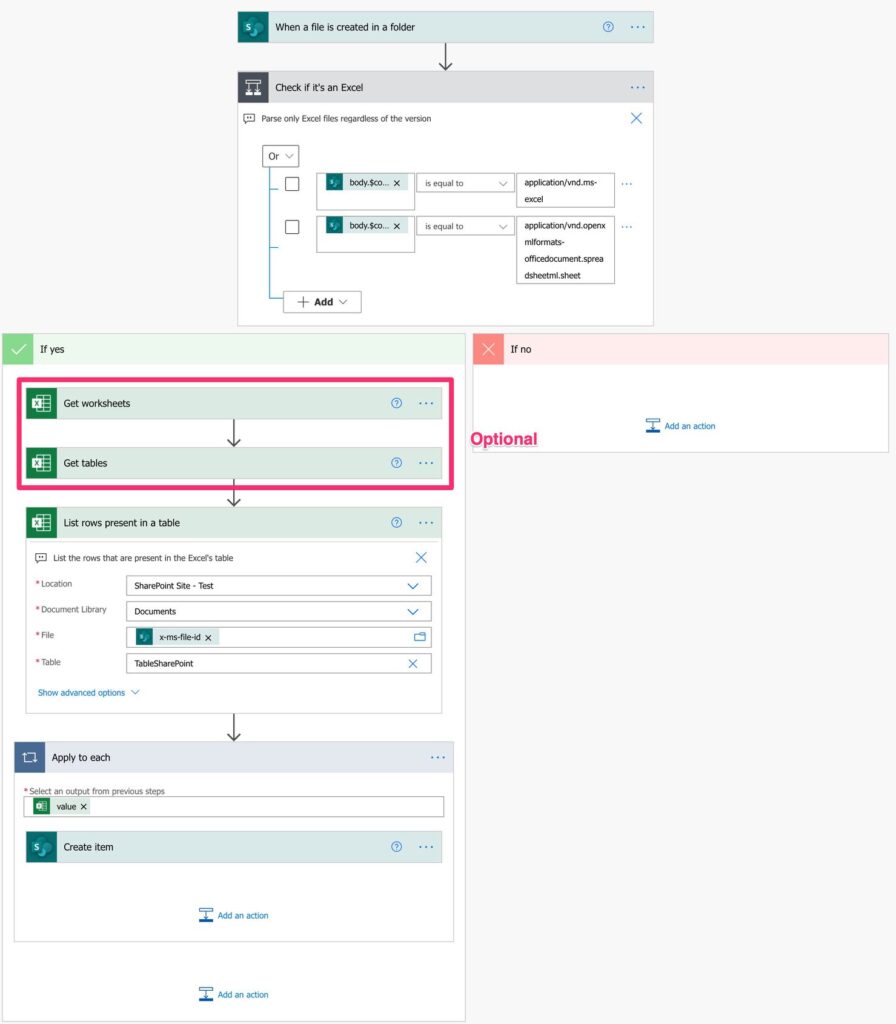
The trigger is the “When a file is created in a folder” trigger, and it is pretty simple. It will deal with the “when an Excel file is created” part of the requirement by looking at a folder and triggering when a new file is created—nothing interesting here.
Do I have an Excel file?
The best way to check if the file is Excel is by its type. We could parse the extension and try to figure it out, but since we have this field available, there’s not much parsing necessary. So instead, we can use the “Condition” action to check if we have an Excel or not:
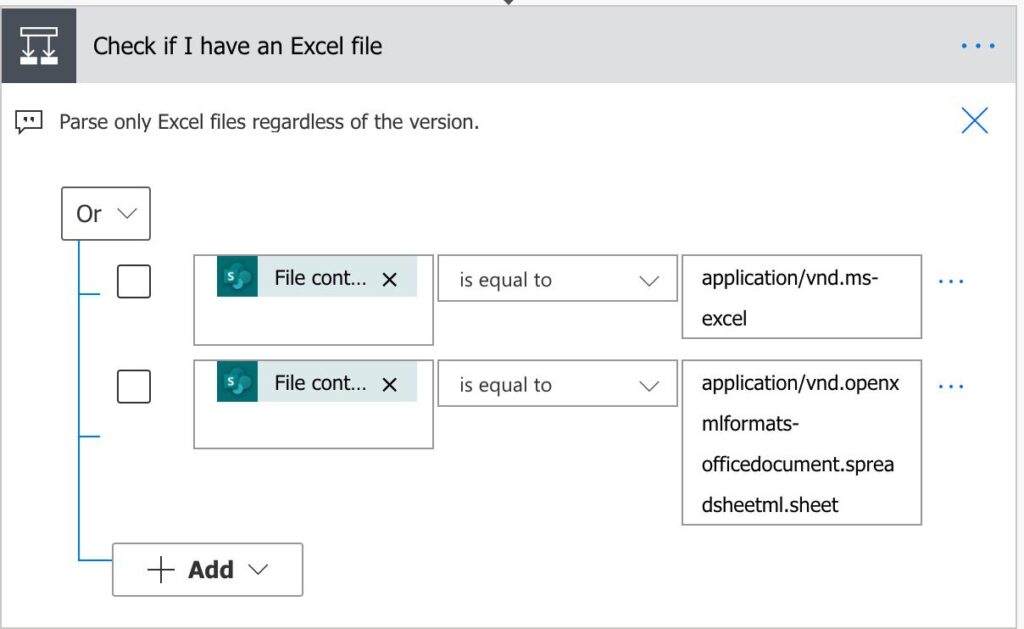
There is a trick to keep in mind here. The “file contents” contain two elements: the file type and the file data. Since we need the file type, we must create the formula to fetch only the required data. Here’s the formula:
triggerBody()?['body']?['$content-type']
The formula will check if in the body we have a “$content-type” value. If it exists, we can check if it is of an Excel data type identified by the string “application/vnd.ms-excel” and “application/vnd.openxmlformats-officedocument.spreadsheetml.sheet”. These strange codes are conventions, so we use them “as is.”
(Optional) Workspaces and Tables
As mentioned before, you have the “Get worksheets” and “Get tables” actions that you can use in case you have multiples of each.
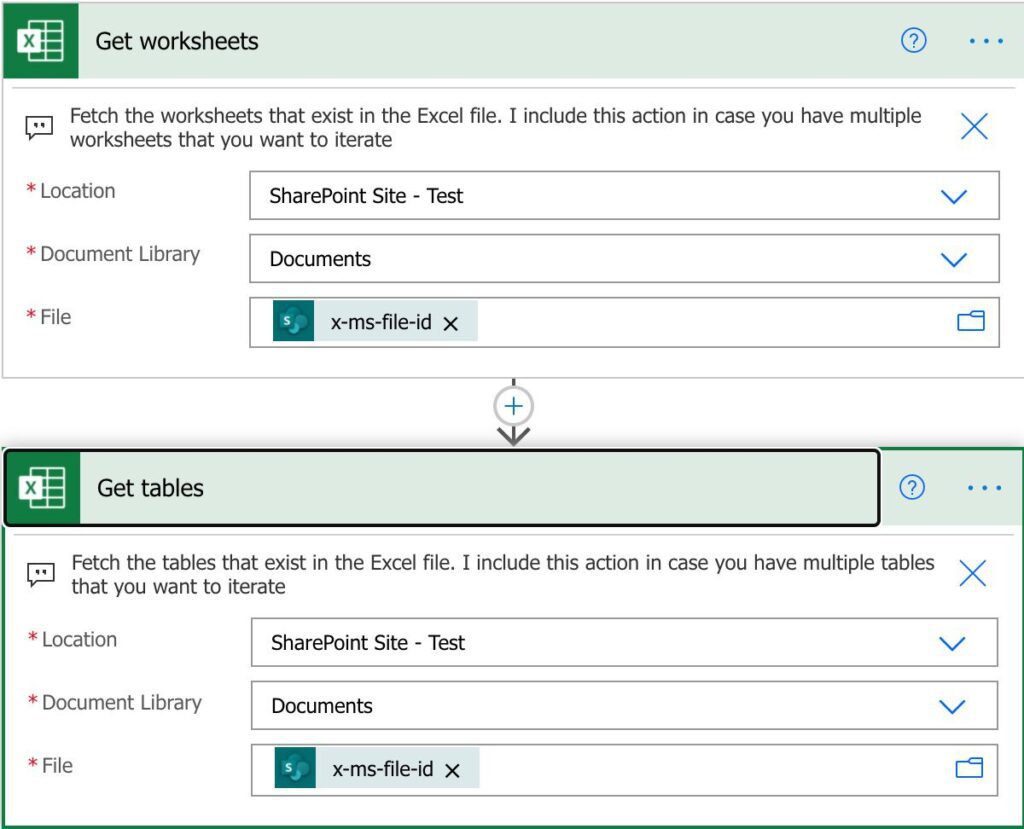
When writing this article, Power Automate is returning the name of the file identifier as “x-ms-file-id”. We would expect to have “File Identifier”, so this is probably a bug or a new feature kicking in. I’ll replace the prints as soon as they change, so be warned if you see something different.
Fetch the Excel Rows
Let’s fetch the rows in the table.
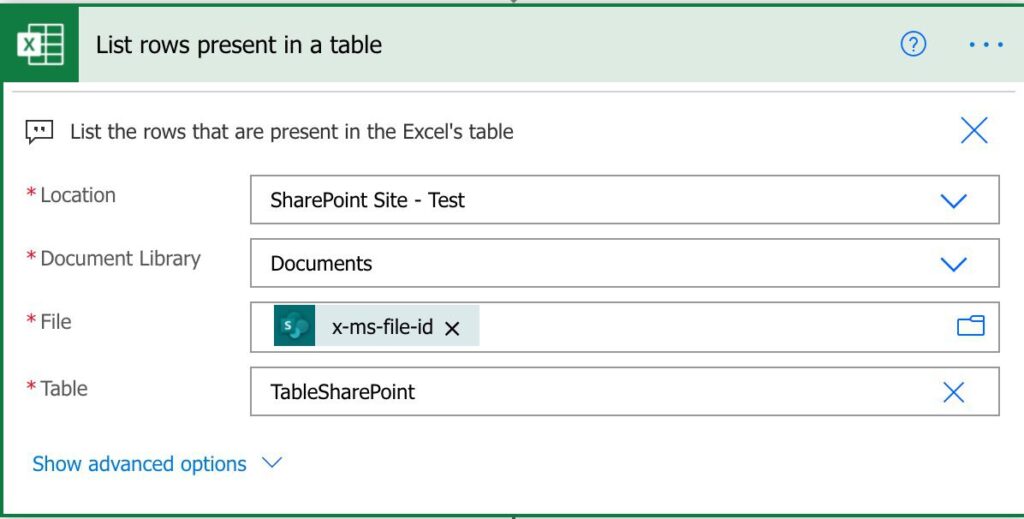
We’ll get the rows using the “List rows present in a table” action. Unfortunately, since we’re not providing the Excel file, Flow can’t check the file and give the tables that exist in it. So we need to provide the value manually.
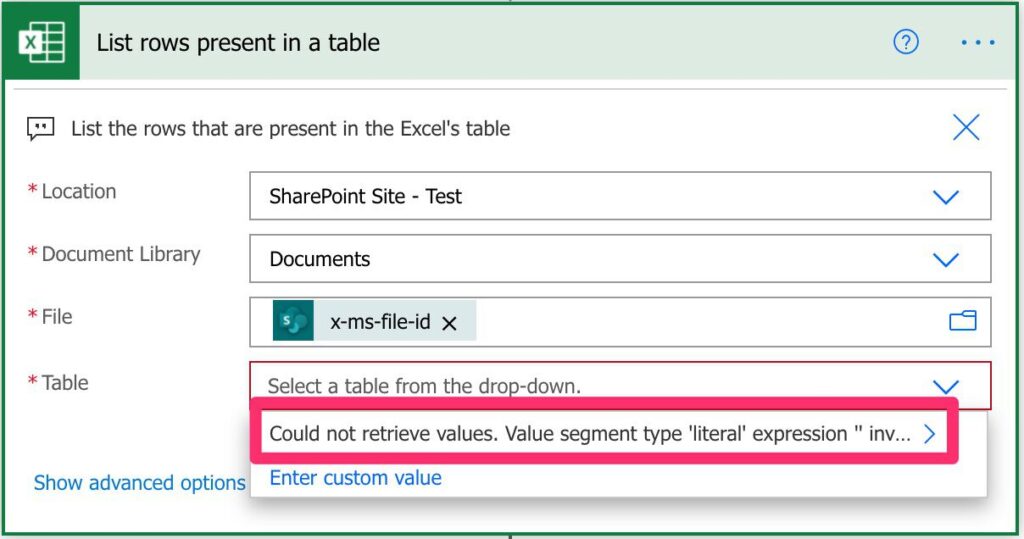
Press “Enter custom value” and insert your table’s name. In our case, it will be “TableSharePoint.”
Insert in the SharePoint List
Now that we have the rows, we’ll use the “Apply to Each” action to parse each row in Excel.
After that, we’ll use the “Create item” action to insert the rows in our SharePoint list.
As you see in the print above, the “Description” looks a bit different than the others. This was on purpose since you won’t have the Excel columns to select in the “Dynamic content” list. The flow will only know the structure once it knows the file imported, so we need to do it manually, with the following formula:
items('Apply_to_each')?['Description']
Let’s break down the items function:
- The “Apply_to_each” represents the name of the “Apply to Each” action. Notice that the function doesn’t support spaces, so you must replace them with “_”.
- The [] represents the field that we want. Again, these are the same in Excel, so copy the value precisely in the columns, including the capitalization.
You can use the same formula for the Title and Qty.
Now the fun part. Once the Flow is saved and runs the first time, it will replace the “purple” formula by mapping to the column you see above as “green.” Don’t worry too much about this, but I wanted to show you both cases so that you’re not surprised when it happens.
Testing
Testing is the easy part. To simulate the “Excel file is created” piece, you can upload the file (You can find here a copy) to the SharePoint Document Library, and the Flow will trigger automatically. When we check the SharePoint list, we get the following.
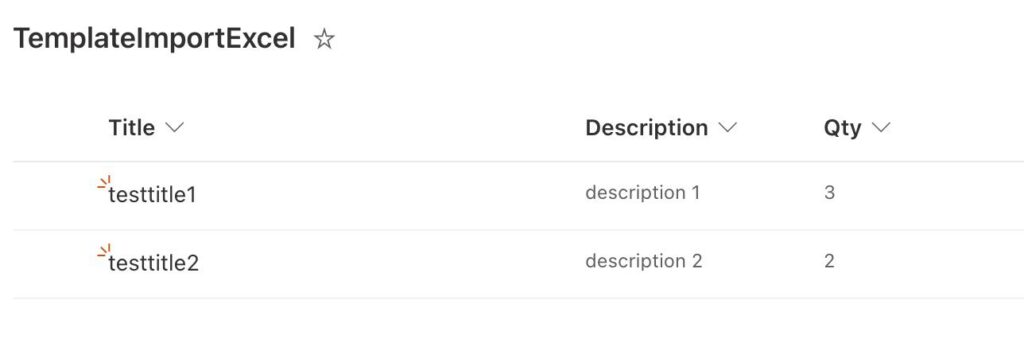
Looks good, so everything is working.
Final thoughts
As you can see above, a couple of instances require our attention, but overall, it’s not too complex after seeing how it’s done. You can always find the template in the cookbook section so that you don’t need to create all these actions manually.
Today a #PowerAutomate template will look at a SharePoint Document Library, check if a new file is created and if it’s an Excel, and import all rows to a #SharePoint list. There are a couple of tricky spots, so here’s to do it.
Photo by Matthew Cassidy on Unsplash